
Comidor Low-Code Hyper-Automation platform offers the ability to build your own Low-Code App through App Builder, without writing lines of code. Making simple or more complicated Apps is easier than ever, even for non-developer users. In this article, we will give two Low-Code examples of real business problems and we will see the step-by-step Low-Code App creation for the solution of them.
Low-Code Example 1. Internal Rules and Regulations Application
Business Problem
In this Low-Code example, we are members of the Administration Team. We need an Application that would allow us to submit important information regarding our internal Rules and Regulations. Those rules and regulations assist us in our internal auditing activities and in our ISO compliance. Members of the Administration Team, need to be able to insert rules and regulations and monitor them as per their status.
Additionally, all employees need to be aware of our internal regulations. Thus they need to be in a position of searching for a specific rule or have a clear overview of the whole list.
The solution
As we need only the members of the administration team to be able to initiate an entry we are going to limit the access of inserting rules to this team only. Also, all the employees of the company will be able to view the table and retrieve information, but they will be limited to a view-only mode, thus they will not have any right to make an entry or make any editing on it.
The fields that are needed in this App development would cover all the necessary information that employees needs to restore, such as the kind of rule or regulation, its status, its importance and if there are any penalties for not conforming to this rule.
We are going to use the App builder function of Comidor and follow 7 simple steps for our Low-Code App development.
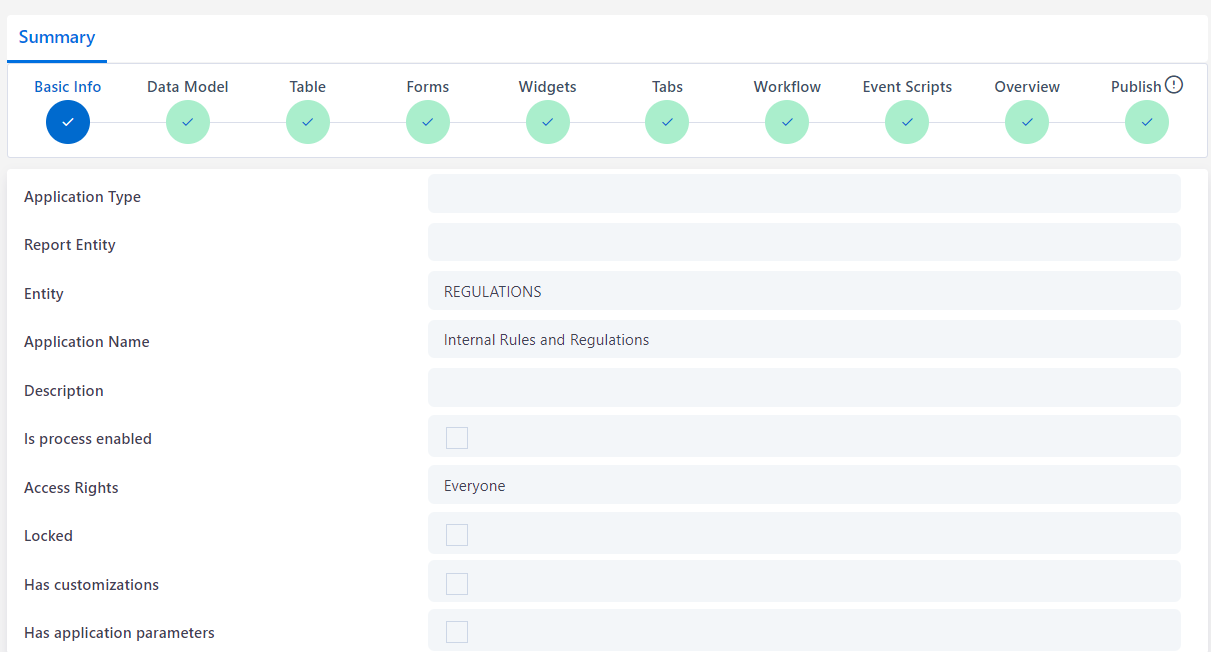
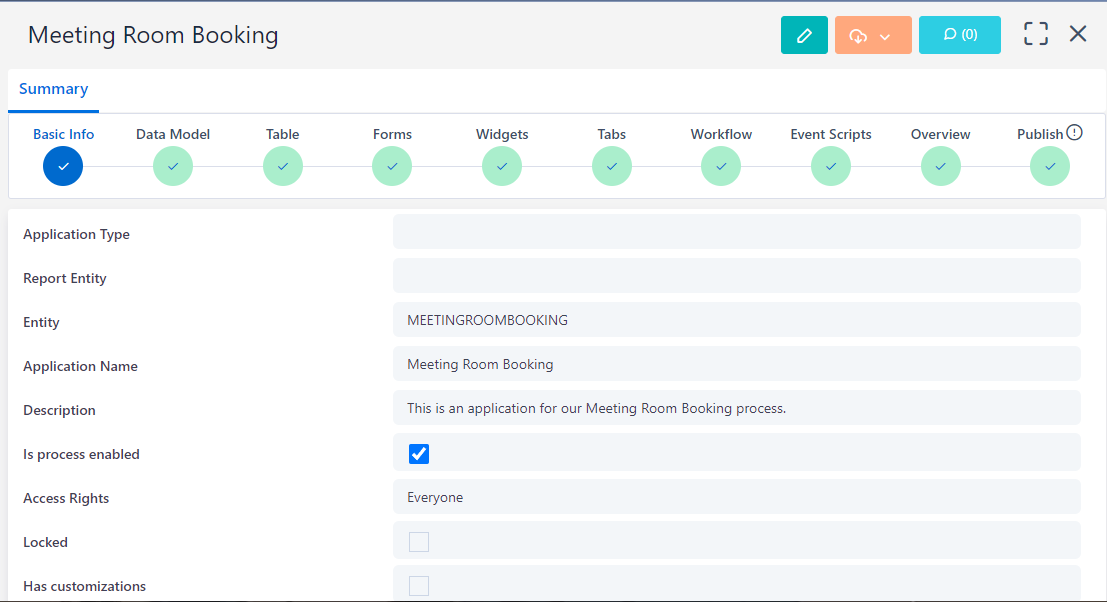
1. Low-Code App Creation
We need to define the Entity which will be the name of the Application in the database and the Application Name. We chose the database name “REGULATIONS” of this entity and “Internal Rules and Regulations” as the Application Name. Note that the Application Name is the name that would be displayed as a Header for our Application.
For this kind of application setup, we do not need a workflow. This business problem requires only a user to insert data without any tasks being connected. For this reason in the Basic Info step, In the field “Is process enabled” that defines if the Application would be connected to workflow, we keep the checkbox unticked. In the Access Rights field, we selected Everyone, since we want all users to have access in this App.
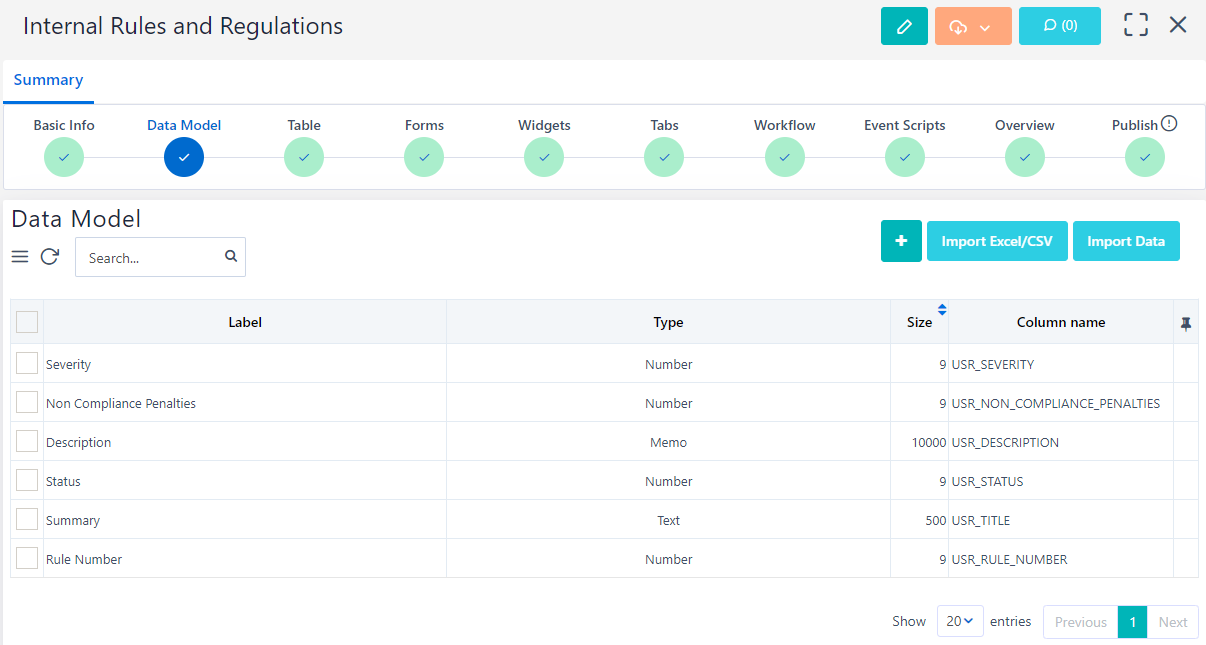
 2. Data Model
In this step, we are going to create all the necessary fields that would be required when the user makes an entry of a new rule or regulation.
For our Application we are going to create:
- A number field that would be the Rule Number of our rules and regulations
- A text field that would be a Summary of our rule
- A paragraph-Memo field with the description of our rule
- A field that would indicate the Severity of the rule (List type). This is going to help users for categorizing them according to their Severity and provide information about which are the most important regulations in the organization.
- A field that would indicate the Status of the rules and regulations (List type). The options of this list would be Applied, Not Applied, Pending. This field will also help in the categorization of the rules. In addition, users could also see which rules are active in the organization, which are going to be implemented in the future and which will not be implemented at all.
- A drop-down list field that would indicate the penalties that employees are going to face in case they are not compliant with the internal rules and regulations.
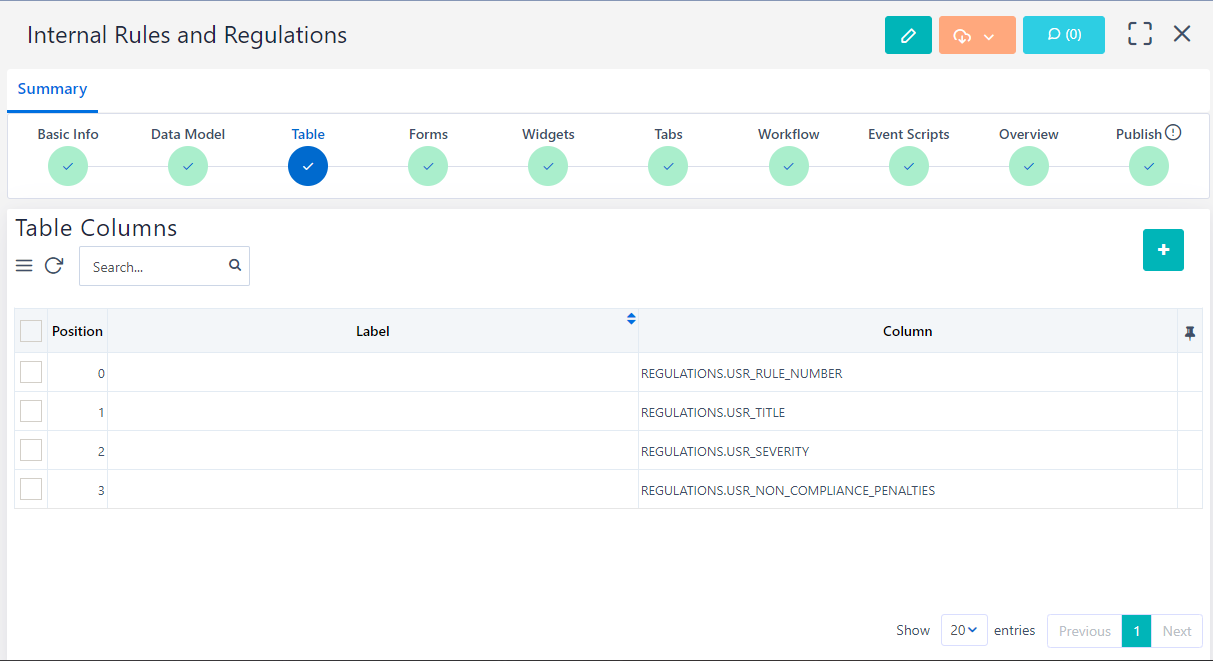
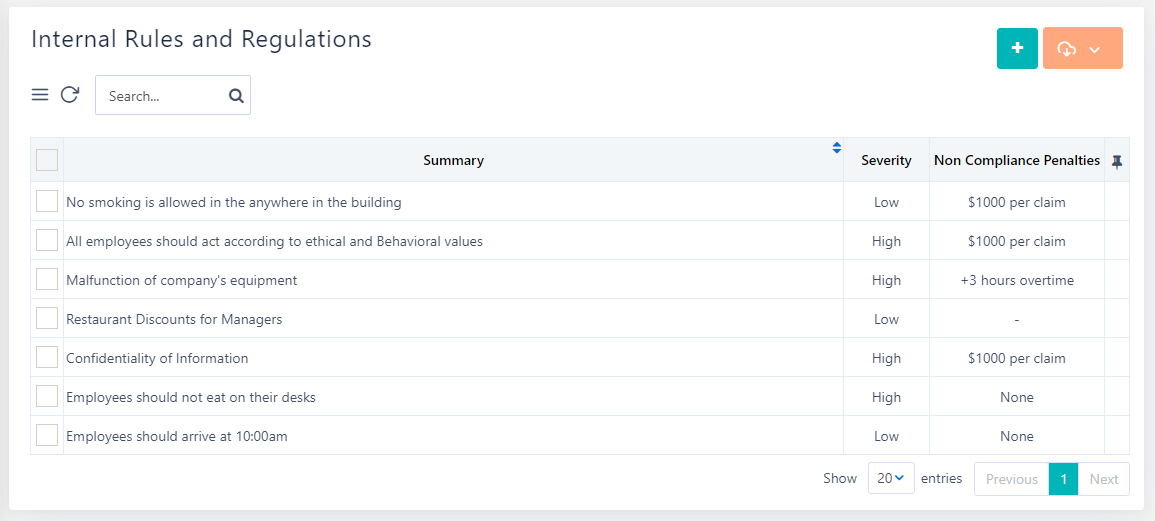
 3. Table
By organizing the table columns properly, we are going to provide all the necessary information to the employees. We are able to decide on the sequence of the columns by just drag-n-drop them and that would be displayed in the Application table.
The position of the table columns defines their order in the table from left to right and counting numbers start from 0.
By selecting those columns to be displayed, everyone who navigates to the Application may have an informative overview of the Internal rules and regulations of the company.
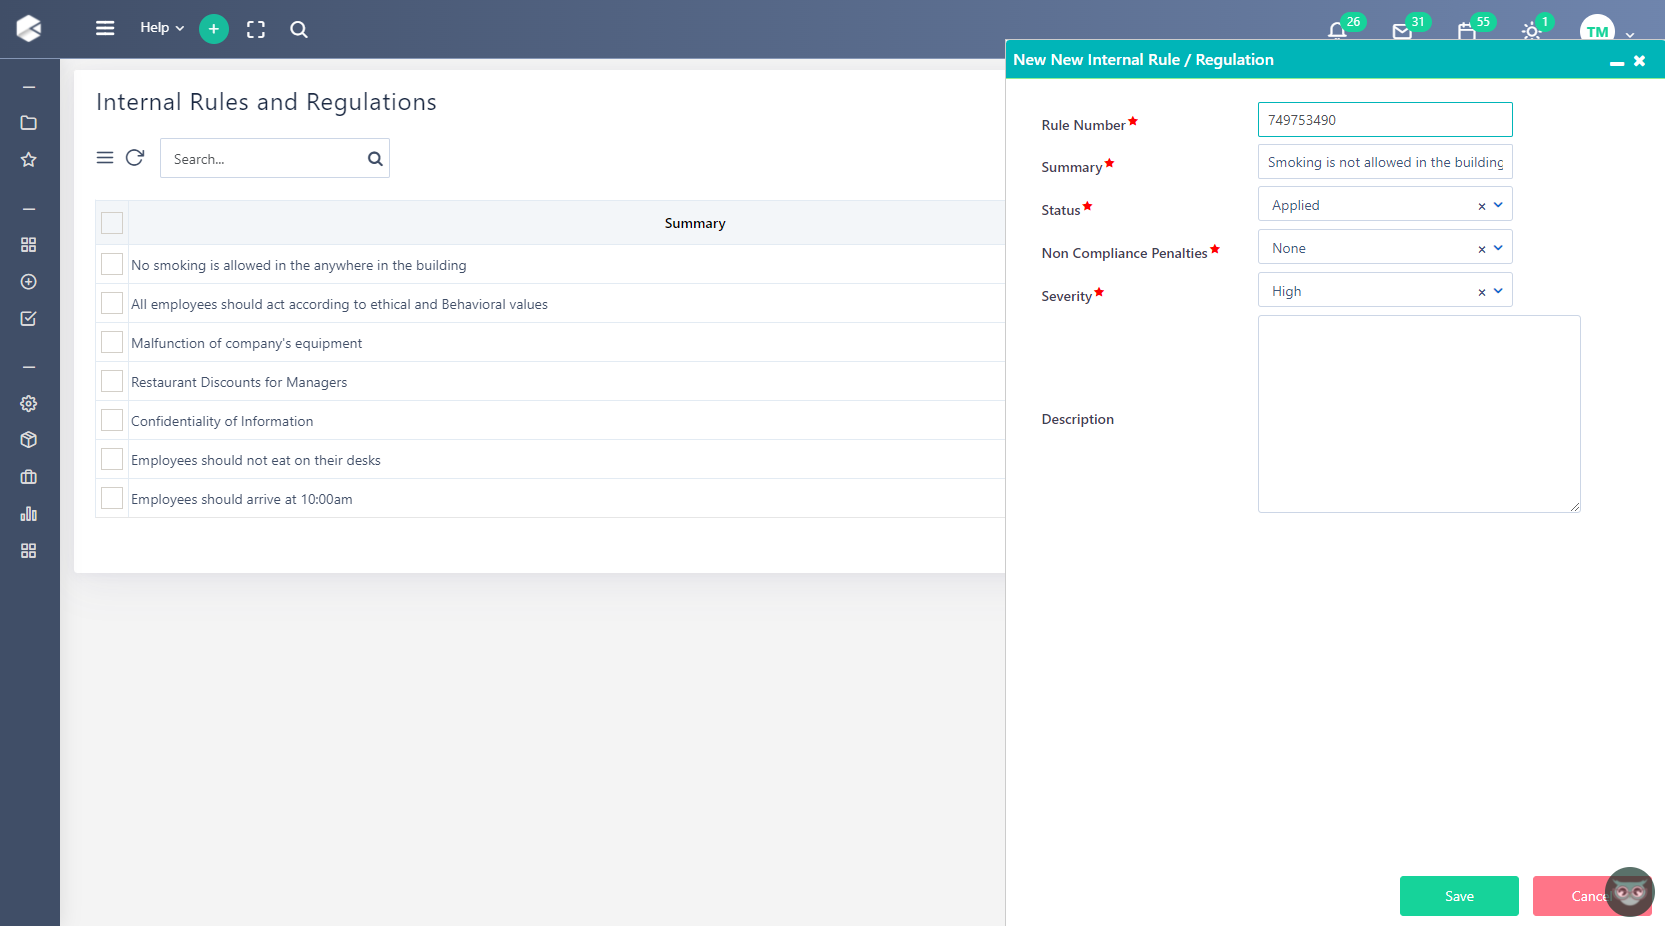
 4. Forms
In Forms step, we are going to design the creation form of a new Rule or Regulation entry.
Firstly, we make sure that there is an Administration Team in the Organizational chart and that there are the proper members added.
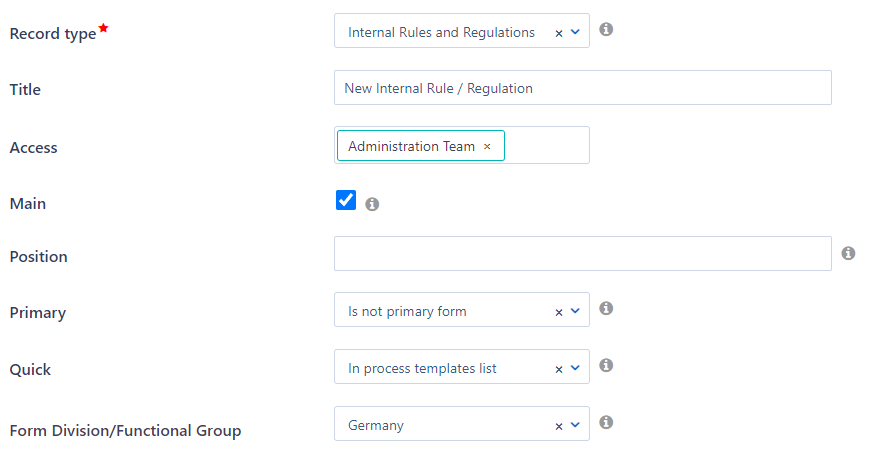
Then, in the Access Rights field of App Builder, we select the group Administration Team, in order only members of this group to be able to initiate a new Regulation.
In order to make the form easily accessible to the users, we are going to place it in the Quick-Add menu. This setting will enable them to initiate an entry with just two clicks.
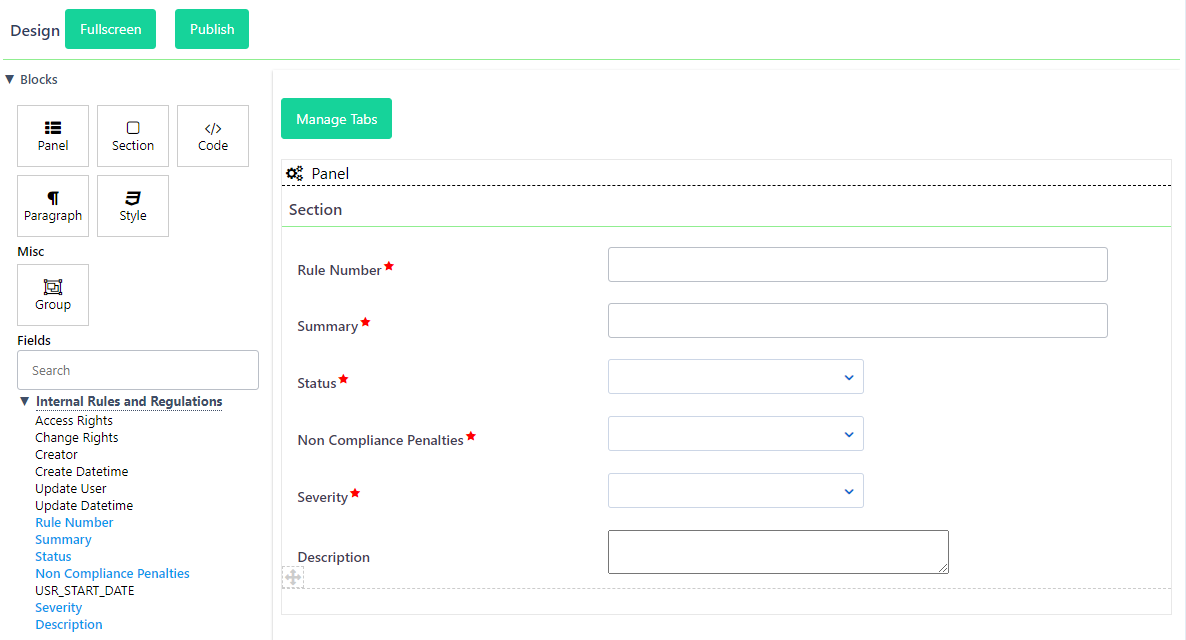
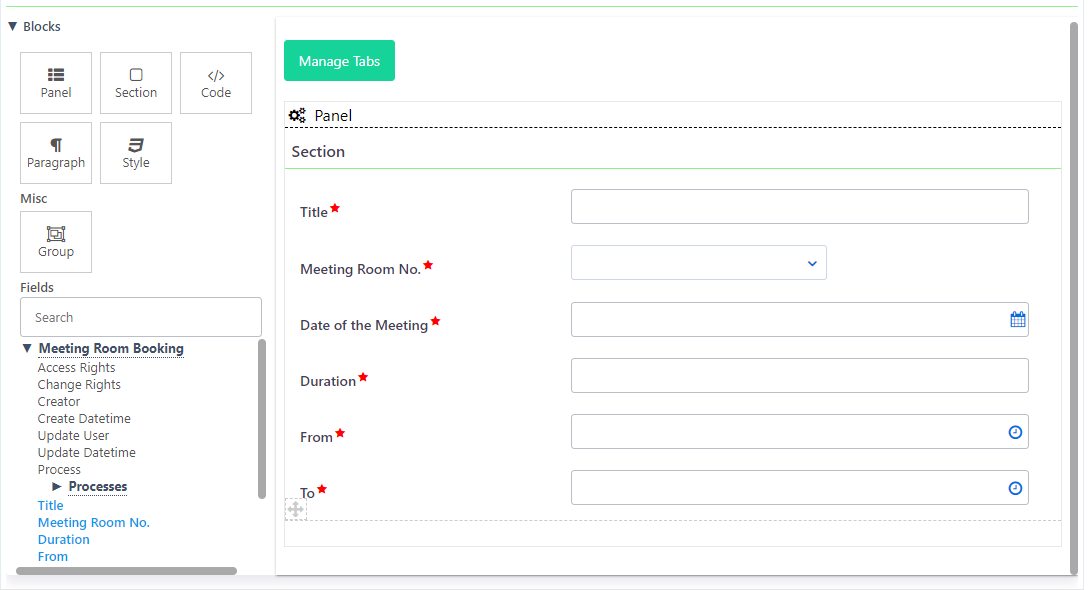
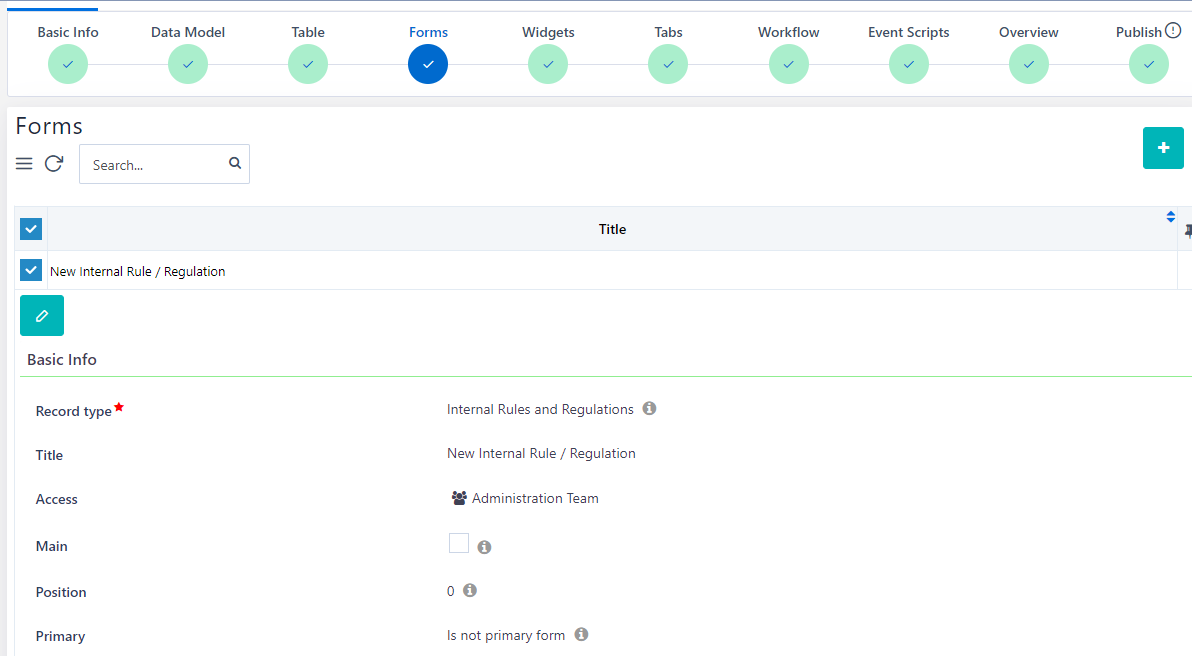 In the form designer, we are going to make a Section with all the fields that we created in the Data-Model step. By just dragging and dropping the fields in the Section we are able to design our form according to our preferences.
As we want to make sure that we will have data in those fields, we are going to mark them as Mandatory.
 Additionally, we create a second form with the option to replace the existing form enabled. This form will be displayed to any user who wants to find more information about any rule by clicking on an entry of the table.
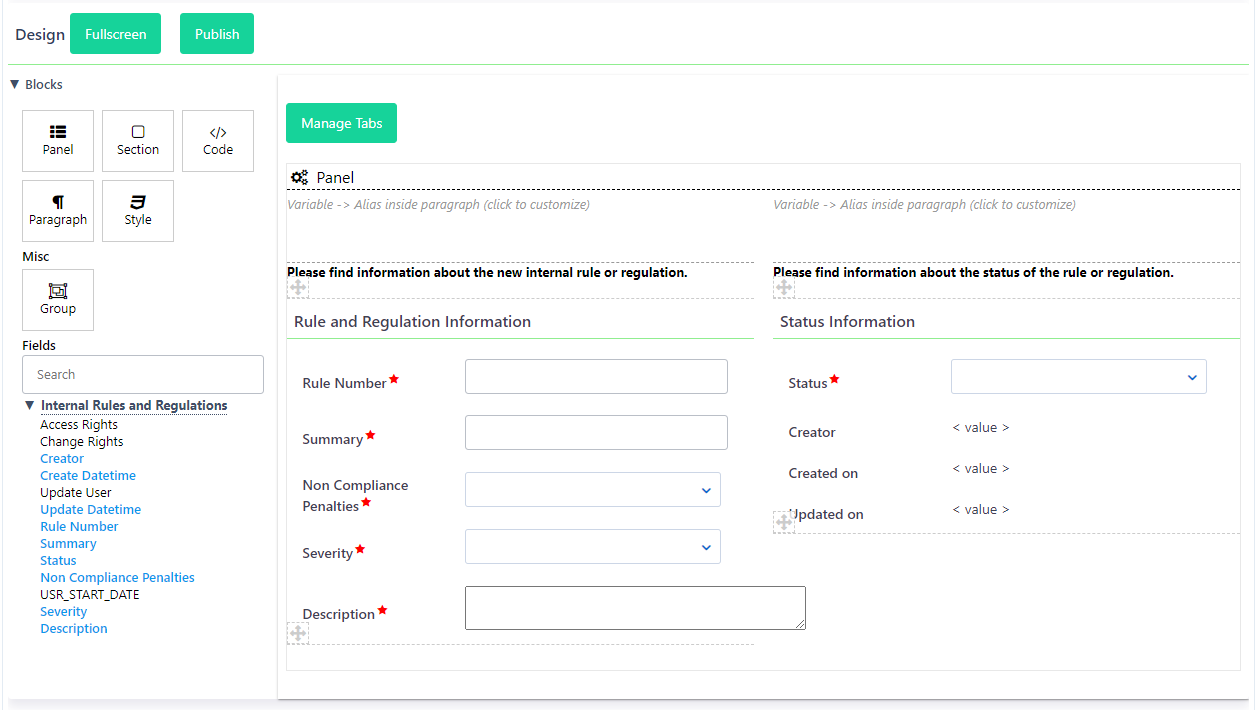
 For this form, we will use two parallel sections. In this way, all information will be visible easily without any need of scrolling. The first section will contain all the fields that the members of the Administration Team should insert and will be named as Rule and Regulation information. The second is going to provide general information with regards to the Status information of the rule, who was the creator and when it was created.
5. Configuration
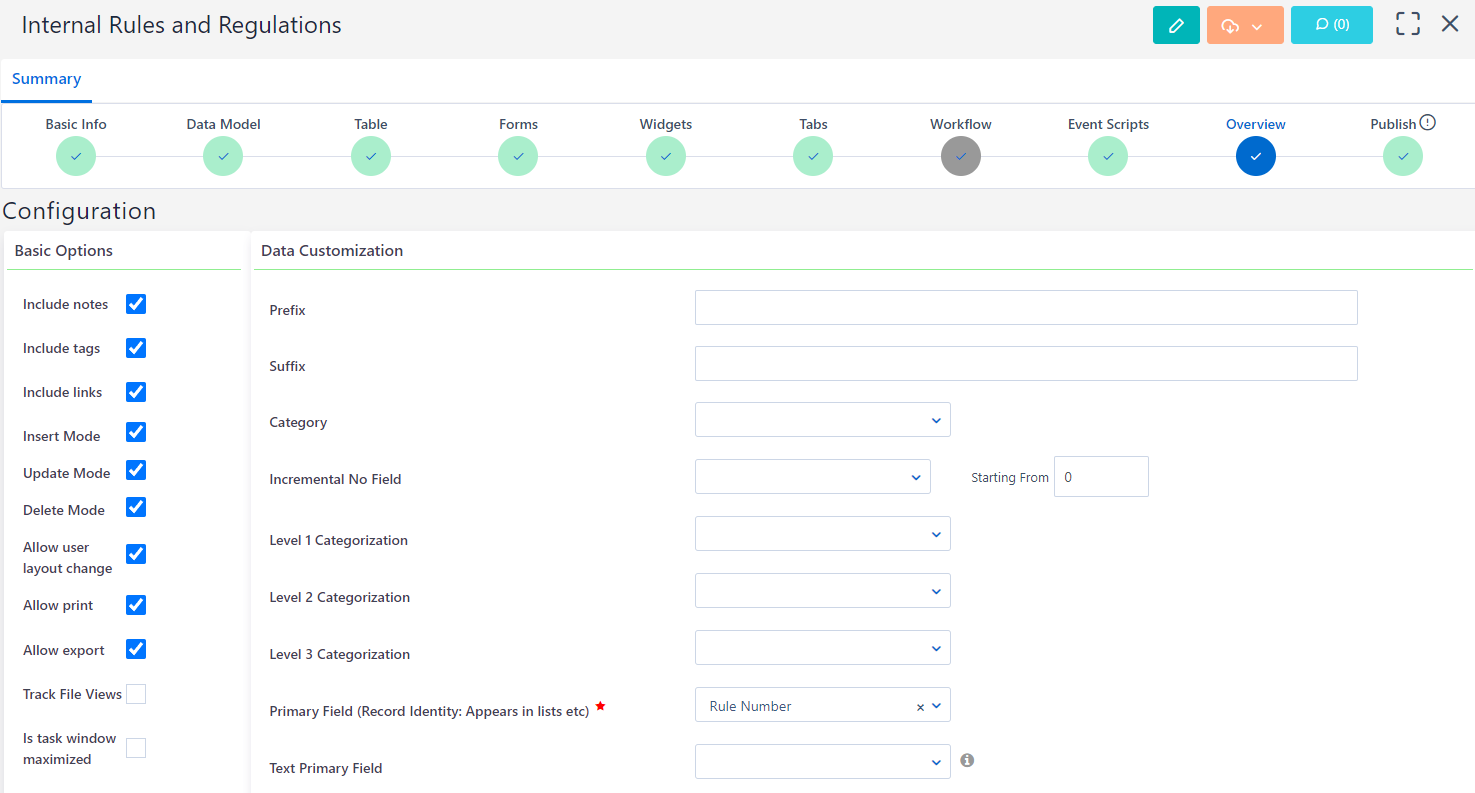
In step Overview, we have to set up the configuration of our Application. As we need to limit the access to the Administration team, we are going to deactivate Insert Mode. By unchecking this option, employees that do not belong to the Administration team would not be enabled to make a submission of a new rule or regulation. Also, as Level 1 Categorization we will select Status. This way, the rules and regulations that are inserted in the Application will be categorized according to the value that it is provided in the Status field.
As Primary Field, the Summary field is selected. As a result, the title that would be given to each rule or regulation will be the Summary of it.
 6. Publish
Finally, we need to press the Publish button in order to save the settings that we have set in our Application.
7. Run the Low-Code App!
Members of the administration can start the Application easily by clicking on the Quick-Add icon and then on New Internal Rule / Regulation. The form that needs to be filled with the information about the new rule or regulation opens and they are able to submit data in the mandatory fields. By clicking on Save, the new entry is created in the Internal Rules and Regulations table.
The visualization of our Low-Code Application table would enable all employees to retrieve all the necessary information with regards which rules and regulation are applied to the company, which are not applied and which are on pending status. Also, It is clear which one is of High or Low severity and which are the penalties to the employees if they are not compliant to any internal rule.
 If employees want to retrieve more information regarding one rule or regulation, all they have to do is to click on the respective rule that they want to navigate. In the Rule or Regulation card which is displayed, the employee can view on the left section the information that the Administration Team submitted and on the right section some information about the status of the rule.
Low-Code Example 2. Meeting Room Booking
Business Problem
In this Low-Code example, we are a company that wants an Application to handle our meeting rooms booking processes. Currently, there are 3 meeting rooms available in the company, but several meetings should take place at the same time. Employees should be able to book any of the meeting rooms and every booking request should be approved by the Meeting Room Booking Manager.
All the employees in the company can initiate booking request and they should specify when they want to book, the reason for booking, the duration and which meeting room they would like to book. If the Meeting Room Booking Manager rejects the request, requestors should have the option to reschedule the booking or Cancel their Application.
The solution
For this business problem, the solution that we will develop would be a process-enabled Low-Code Application. Every employee in the company would have access to the initiation of the process.
The fields that would be created would cover the necessary data that the Meeting Room Booking Manager may need for the booking approval and enable him to organize meetings better. Those fields would be lists that the requestor would select the preferred meeting room, the reason of the booking, and some information about the duration and the period of time that the meeting is going to last.
Additionally, in workflow designing, we are going to use gateways which would determine the different paths that the procedure would follow based on the Manager’s decision or approving or rejecting a request.
1. Low-Code App Creation
We need to define the Entity which will be the name of the Application in the database and the Application Name. We chose the database name “MEETINGROOMBOOKING” of this entity and “Meeting Room Booking” as the Application Name. Note that the Application Name is the name that would be displayed as a Header for our Application.
Due to the fact that this Application will require a workflow, the Application should be process enabled (we tick the checkbox). If the checkbox is ticked we will be available to set up a workflow during the Application development. Also, we select Everyone in the Access Rights so that all employees would have access to the Application.
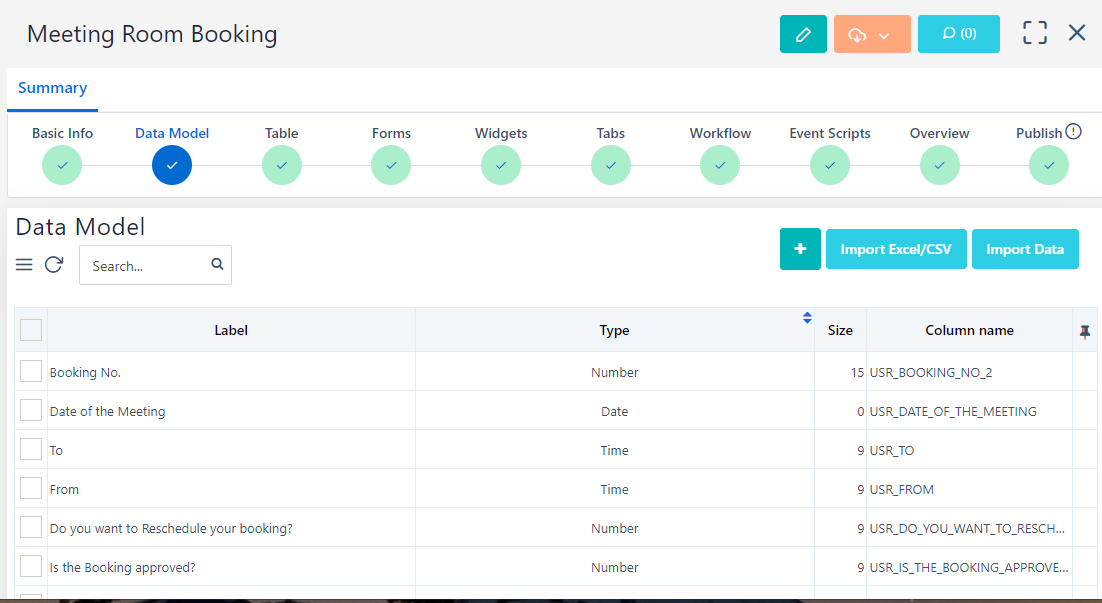
 2. Data Model
The fields that are necessary to cover the business needs and for our Application development are:
- The Booking No. which will be the incremental number of our meeting room booking requests (Number type)
- The Title which will explain the reason for booking a meeting room (Text type)
- The list with the Meeting Rooms that the company owns (List type)
- Date of the Meeting that will define which day the meeting is going to take place (Date type)
- Duration which will describe the number of hours that the meeting is going to last (Number type)
- Starting hour of the meeting (Time type)
- Ending hour of the meeting (Time type)
- The decision of the Manager that would define is he approves or rejects the request (List type)
- The requestor’s option of rescheduling or canceling his request in case of rejection by the Manager (List type)
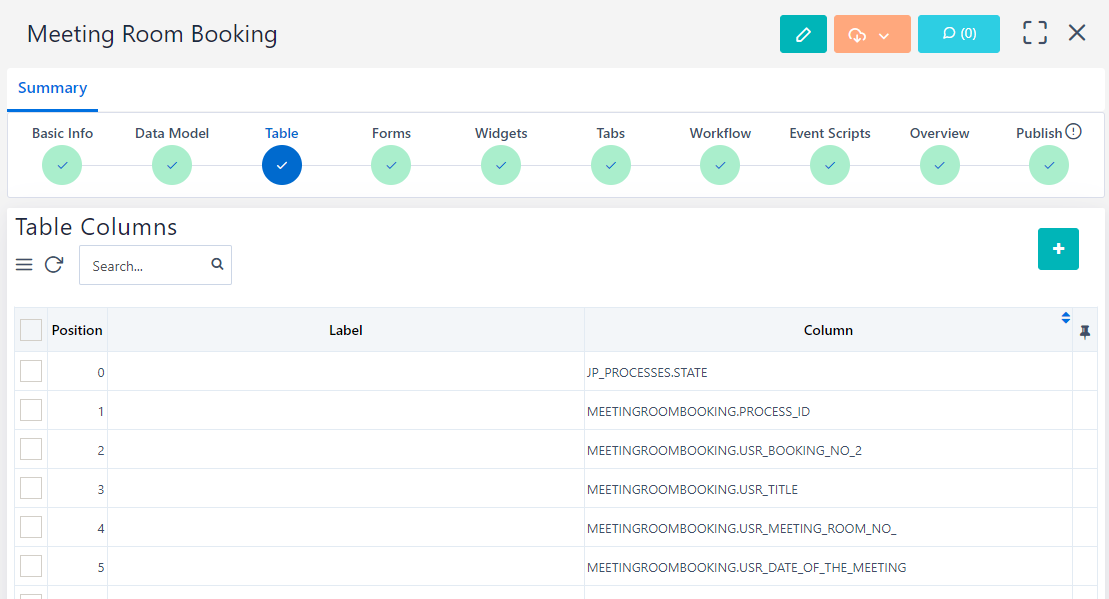
3. Table
By drag-n-drop, we are going to organize the table columns of our Application. We are going to place the State of the request first, followed by the Booking Number and the reason for booking the meeting room. The State column is going to depict the Approval request status: Completed, Canceled or Pending.
Then, we select the column which will show which meeting room is booked followed by the information about the date and the duration of the booking.
 4. Forms
For our Application, we will need four forms.
First of all, we will design the creation form, which will be the form that the employees will initiate their requests, thus Everyone is going to have access to this form. We will place it in the Quick-Add menu for easier accessibility.
In this form, employees are going to provide to the Manager all the necessary information that he needs to take into consideration before approving or rejecting a request.
The fields that we included in the creation form will be Mandatory. Given that, requestors will have to fill them all, in order for their request to proceed for approval.
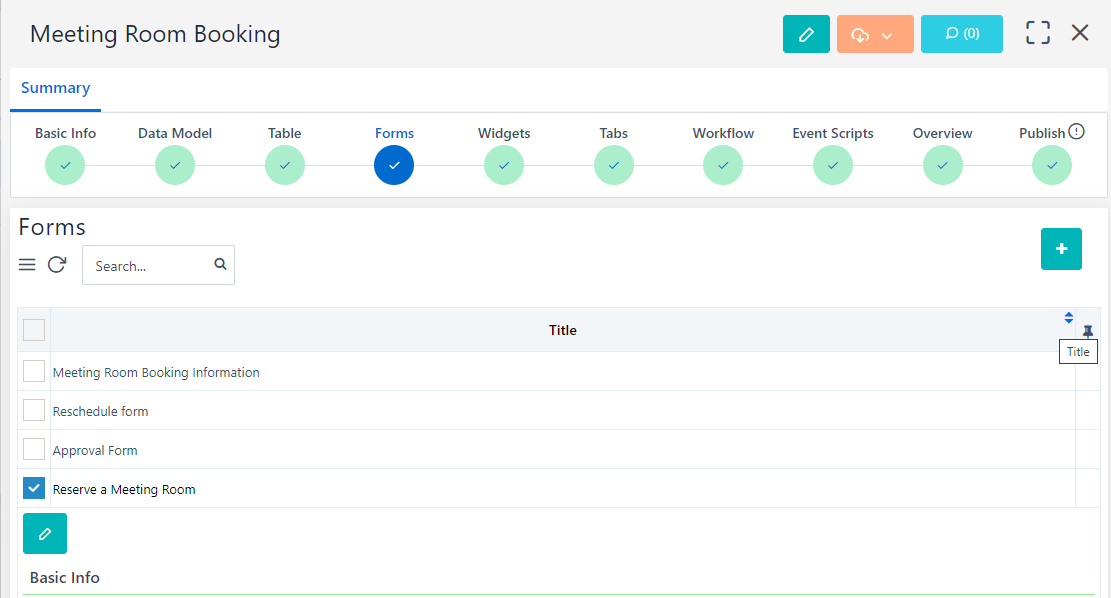 Additionally, a form that will include all the information about the request is essential. This form will be the Main form and will replace the existing form. Hence, when someone clicks on a Meeting Room Booking request, he will view this form with all the information about the Booking request and its status.
 We are going to need two more forms. The first form that will determine the Manager’s decision, whether to approve or not a request. The second form will inquire an input of requesting a booking again or not (in case of rejection). The decisions that would be submitted on these form, are necessary for the workflow designing on the next step.
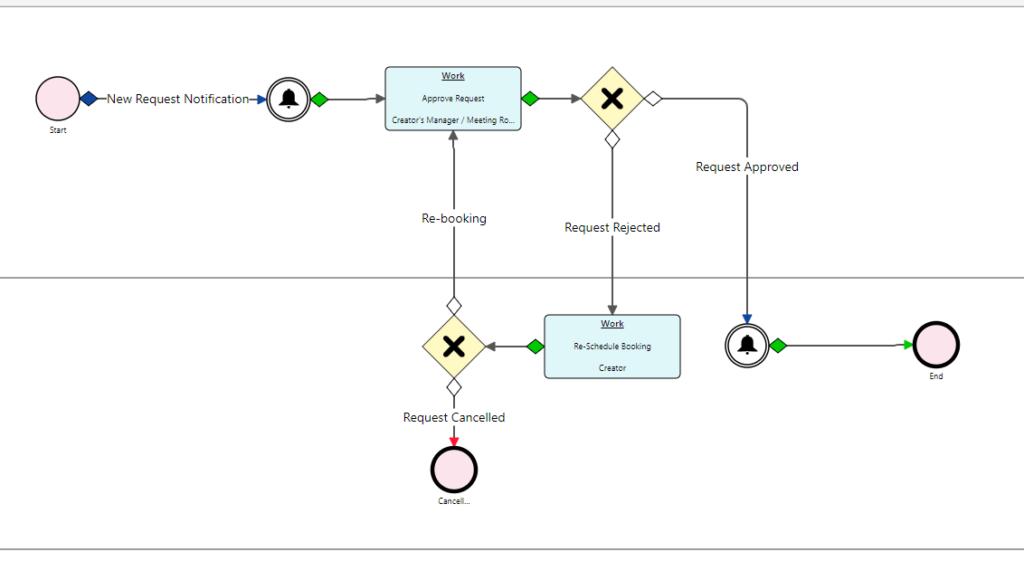
5. Workflow
The workflow needs to depict the process and the decisions that need to be taken from the Manager and the requestor.
When a user initiates a request, the system sents a notification in order to notify the Meeting Room Booking Manager. Then, the Manager needs to decide whether to approve the request or not.
If the manager approves the request, a notification will be sent to the requestor to inform him respectively. If the Manager decides to reject the request, the requestor would have the option to reset his booking request. Otherwise, they can cancel his request and end the process.
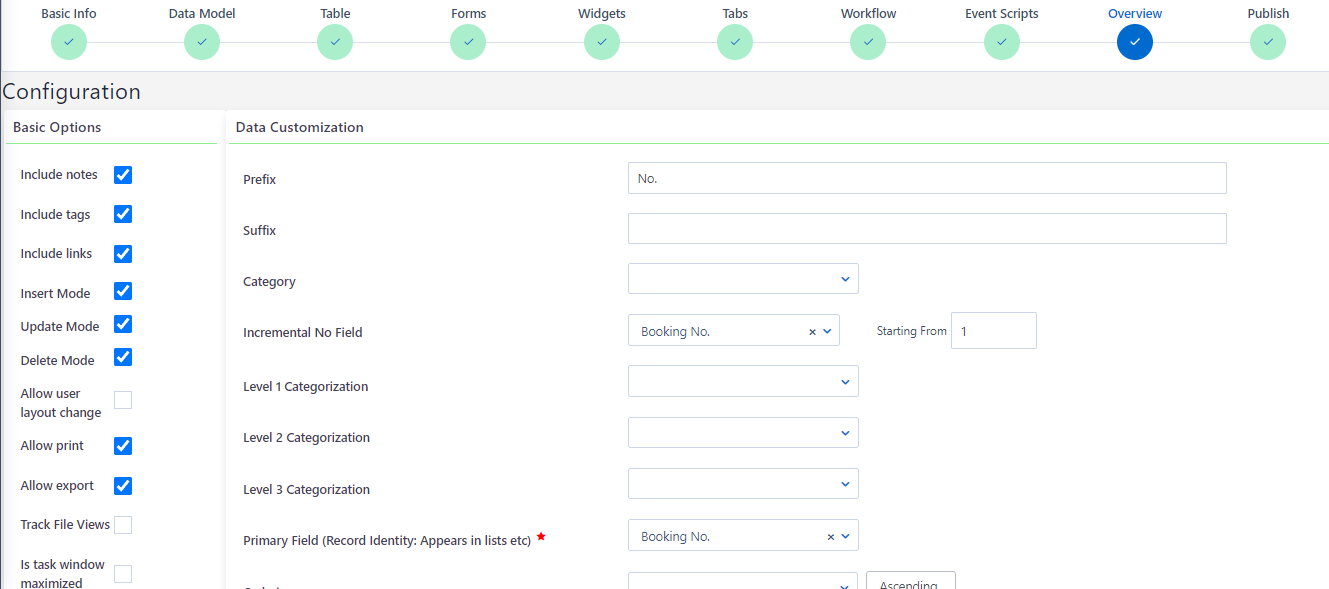
6. Configuration
In the configuration of our Application, we are going to use the incremental functionality that Comidor offers to us. This functionality enables an automatic incremental counter and it doesn’t require from the user to provide any value.
The incremental number along with the Prefix will replace the title of the process. The primary field will be the Booking No. field. We have to state it as Incremental No. field as well. As Prefix we will insert “No.” and we will set the process to start automatically.
 7. Publish
Finally, we need to press the Publish button in order to save the settings of our Application.
8. Run the Low-Code App!
Employees can start the Application easily by clicking on the Quick-Add icon and then on Reserve a Meeting Room. In the pop-up window that appears users should fill in all mandatory fields for their booking request. By clicking on Save, the new entry is created in the Meeting Room Booking table.
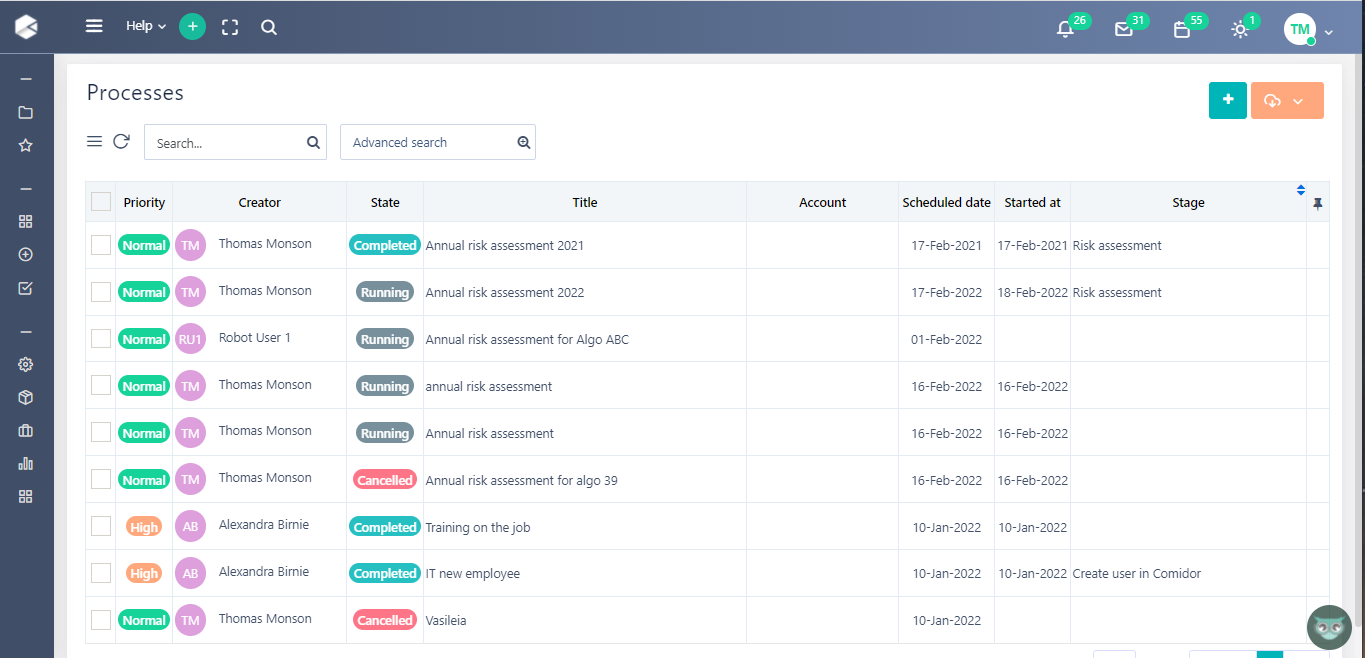
 The visualization of our Application table would provide information about the status of each request along with a link to the respective process. The entries in the table are categorized according to each meeting room. This would enable the manager to have a better overview of which meetings take place in each meeting rooms. More filters can be applied for specific periods of time or more detailed searches with advanced search option.
 If you wish to retrieve all the information regarding the request, just click on the respective request and navigate. In the request that is displayed, there are two sections: Booking Information, and Status Information. Here, the employee can view information regarding the booking and check the status of the request(like we built it in step 4).
You can find more information on how you can use the App Builder to create Low-Code Apps here.