Through Timesheet Unit you can manage your Tasks and Expenses relevant to Project Work Packages that your manager has assigned to you.
- Once a Project Work Package has been assigned to you, you receive a Process Notification viewable and accessible through the Notifications Bar.
Timesheet View
- If you want to access the Timesheet Unit, go to My Comidor > Tasks >Timesheet.
The Timesheet consists of the Filters area and a Weekly Calendar into which you can add, view, and manage your (all) Processes’ Tasks and Work Packages’ Expenses. Especially from Timesheet, you may track hours spent in Processes (Generic Processes, WorkPackages, Events, Trainings, Job Posting, Ticket, Opportunity, Campaign) or track expenses of WorkPackages.
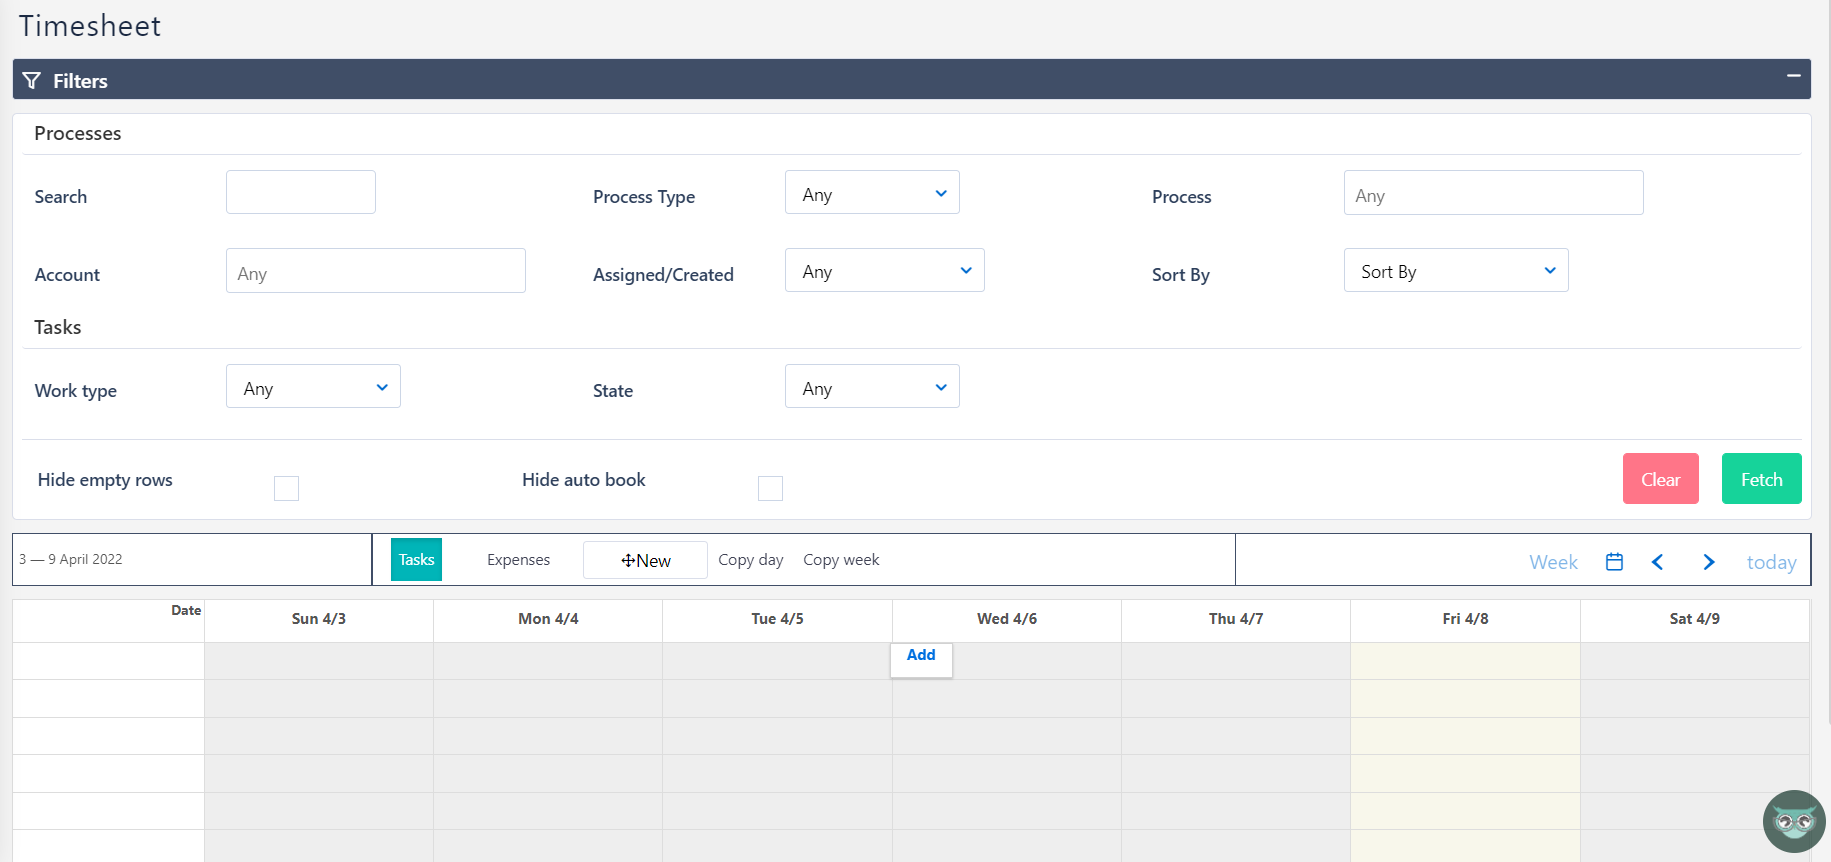
- Timesheet Filters are common for Tasks and Expenses.
- You may Search Processes by Title or with Process Type or by selecting one Process of the list-when clicking on the Process drop-down list you see only the Processes which your manager has assigned to you.
- Account: Clicking on Account drop-down list you see only the Accounts relevant to at least one Process that someone has assigned to you.
- Check Processes that are Assigned to you (Mine), to your team (My Team’s), to either you or your team (Assigned to Me or My Team), OR Created by you (Created by Me). Also, you may filter the booked this week, too.
- Also, you can Sort them by Booking create date, Process Name, most active Process, or Due Date.
- View only Task type such as Normal, Overtime Hours, Sunday, Saturday, Nightwork, Public holiday work, Personal holiday.
- View only specific State of Task or Expense.
- You can select to Hide empty rows; allows you to view only the Processes which have already created tasks or see all of them in order to add a new task to empty Processes.
- Hide auto book will hide all the Projects’ Work Packages, which were automatically booked to you – without an accepted Booking request from your Manager-.
- Finally, the clear button erases all the used filters, while the Fetch button displays the respective tasks or expenses.
Anytime you wish, you can hide the filters by clicking on the respective icon ‘-‘, to focus on the Tasks or Expenses displayed at the below Weekly Calendar. If you want to apply different filters, you can click on the plus icon ‘+’, change them and click Fetch.
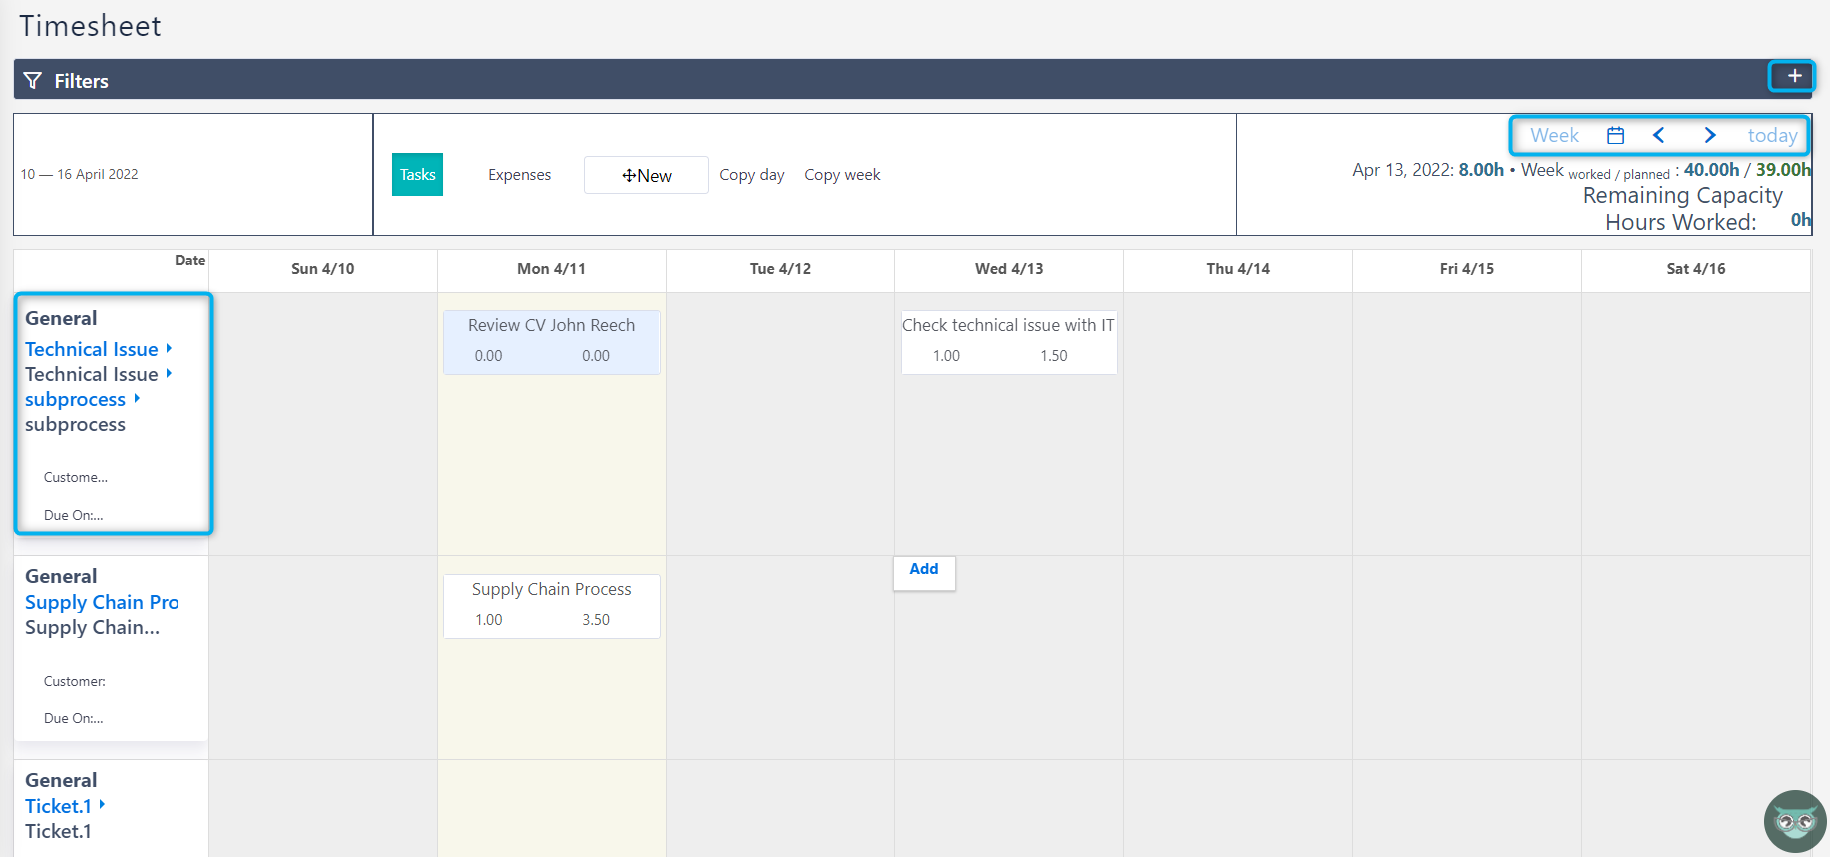
- Weekly Calendar can switch between Processes’ Tasks Calendar and Work Packages’ Expenses Calendar through the Tasks and Expenses buttons, respectively. At the top-right corner of the calendar, there are arrows that enable you to navigate to different weeks. Today transfers you quickly to the current week.
- At the left side of the Calendar, you can see information per assigned Process:
- The Process that the Work Package belongs.
- The name of the Work Package
- Account name, if Process is associated with an Account
- Process due date
- Personal Workload is the actual duration of tasks performed by you below this Process.
- The workload is the scheduled duration of tasks below this Process.
- Today’s date is light-yellow highlighted, Absence days are highlighted in Yellow and Public holidays days are highlighted in light blue.
Tasks in Timesheet
Add a new Process Task
- In order to add a new Task, go to Modules Menu Icon > Enterprise Collaboration >Timesheet.
- Ensure that you have selected the Tasks tab.

- Find the Process and the Date of your task at the Weekly Calendar and clicking on the respective cell. A cell form appears. In this form, you fill in:
- the task title as a brief description of what you have done.
- the scheduled task duration. There are two ways to populate the duration of your task. You can either type the exact duration and use the arrows button to increase/decrease the duration, or click on the plus icon and enter the start and end time.
- Finally, fill in the actual task duration.
- Click outside the cell to save the task.
Especially for pre-booked WorkPackages’ Tasks, scheduled duration may be already added and task already created. Read how to manage a Task below.
Furthermore, at the Tasks Weekly Calendar, the column of a specific date might be yellow or blue. This indicates that there is a scheduled absence day or a company holiday, respectively. Adding a task on a company holiday or a scheduled absence the system informs you with a relevant pop-up message at the top of your screen.
View/Manage Process Tasks
- In order to view or/and manage Process tasks, go to My Comidor > Tasks >Timesheet.
- Ensure that you have selected the Tasks tab. Here, you can see all your existing Process Tasks on your screen based on your used filters. Process Tasks may have different colors: White for tasks that are not completed and they are the only ones still editable.
- Light blue-grey, if the user has completed the task
- Light green, in case, that the project manager(s) have approved a completed task.
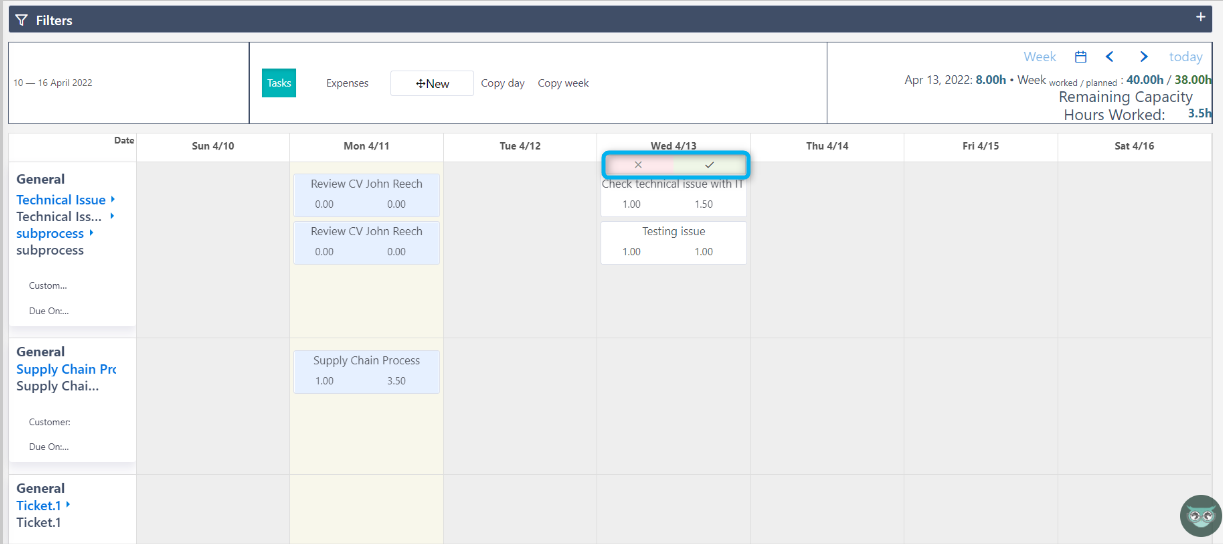
 At the bottom of the Tasks Weekly Calendar, users can see the total scheduled duration and the total actual duration per date.
- Then, check the Remaining capacity for a respective date by hovering your mouse above the date. Weekly capacity is also available.
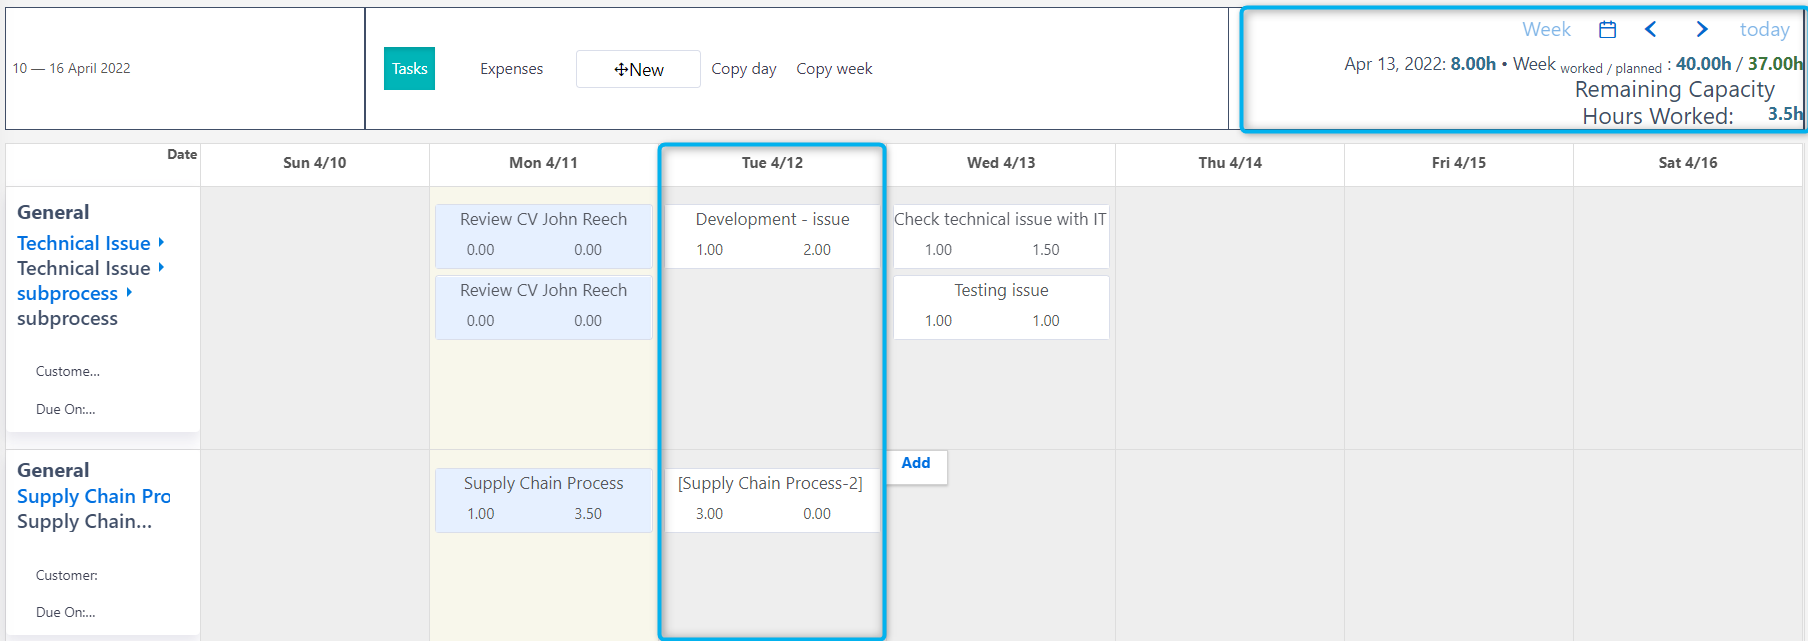
 3. Find the task you wish to manage based on its Process Name and Date.
4. Click the specific cell form in order to change any information you wish.
5. After editing you can either complete or delete the specific task from the cell’s check button or erase button, respectively.
6. By pressing Copy Day or Copy Week, you may copy tasks to the following days/weeks.
Once you complete the task you cannot do anything to change it from the Timesheet Unit.
While a task state is changing to complete, you also cannot change any field of the task cell form. Otherwise, a relevant message appears on the top of your screen.
Expenses in Timesheet
Add a new Work Package Expense
To add a new Expense:
- Firstly, go to My Comidor > Tasks >Timesheet.
- Ensure that you have selected the Expenses tab.

- Then, find the Work Package and the Date of your expense at the Weekly Calendar. After, click on the respective cell and a cell form will appear. In this form, you fill in:
- the expense title, briefly describing the reason for your expense.
- the expense amount. You can type a specific amount or/and use the arrows to increase/decrease it.
- the expense type, selecting among the choices of the drop-down list.
If you want to change the expense type, you can click on the cancel (x) button and select a different one from the drop-down list.
View/Manage Expenses
To view or/and manage work package expenses:
- Go to Modules My Comidor > Tasks >Timesheet.
- Ensure that you have selected the Expenses tab.

 At this point, you can view all your existing Work Package Expenses based on your used filters. Work Package Expenses may have different colors:
- either white for expenses that are still editable,
- or light green, for expenses that the project manager(s) have approved.
- At the bottom of the Expenses Weekly Calendar, there are total expenses per date.
- Find the expense you wish to manage based on its Work Package and Date.
- Then, click the specific cell form and change any information you wish.
- After editing, you can either cancel the specific expense or upload a receipt using the cancel (x) button or the upload button, respectively.
- People’s Managers in the Team Task Approvals unit will review all Tasks of Processes that you add via Timesheet.
- People Managers and Project Managers will see Tasks of Project’s Workpackages in Team Task Approvals unit and Task Approvals respectively.
- Project Managers will see Expenses of Project’s Workpackages in the Project Expenses Approvals unit.


