Comidor PM Module can help you deliver successful projects easily no matter the size or complexity. You may import an MS Project file, associate a workflow pattern with the Project or start from scratch by designing a new Gantt chart. Each project is based on 3 main user levels (Echo ModelTM): Project Managers, Team Leaders, and End Users, but Supervisors and Followers can also be included. Comidor Projects come with lots of features such as Gantt Chart, Deliverables, Milestones, BurnDown Chart, KanBan Board, Work Packages Constraints, Resources Cost, Financial Breakdown and more. Following Comidor’s philosophy of integrated information, you may connect your Projects with all other elements in Comidor such as Incomes, Expenses, Documents, Tasks, Events, Opportunities, Contracts, E-mails and more.
Projects Unit is highly connected with Work Packages Unit and all units under the “Projects” module on the menu.
- Personnel participation in a Project implementation can be confirmed or rejected through Personnel Booking Approvals unit by Resource Managers regarding booked Personnel and Resource Managers regarding booked Job Titles.
- Expenses and Tasks of simple users can be added in Timesheet and be approved/rejected by (a). Project Managers from Project Task Approvals, Project Expenses Approvals, – (b). Managers from Team Task Approvals.
- Project Manager and Manager can monitor Personnel efficiency, effectiveness and productivity in Projects through Dashboard (People and Project Perspective) and other reports exist there.
- Timecards that help in Project Management are User Timecards and Project Timecards.
- Processes of type Project can be monitored through Workbench and Processes Overview.
- Repetitive Projects can be created, re-used and monitored through Process Scheduling unit. Repetitive Processes can be connected usually with Projects that follow a specific Workflow.
- Set up Project Templates in the Process Templates unit. Process Templates can be connected usually with Projects that follow a specific Workflow. Still, you may have a Project as a template and duplicate it or apply its structure to newly created Projects.
- Set up a Notifications Scenario so as to trigger System-Notifications upon new Project creation that comes with a specific Business Category and an extra scenario.
Project Creation
In case you would like to Create a new Project:
- Go to Packages > Project Management > Projects.
- Click on the “+” button to create a new Project.
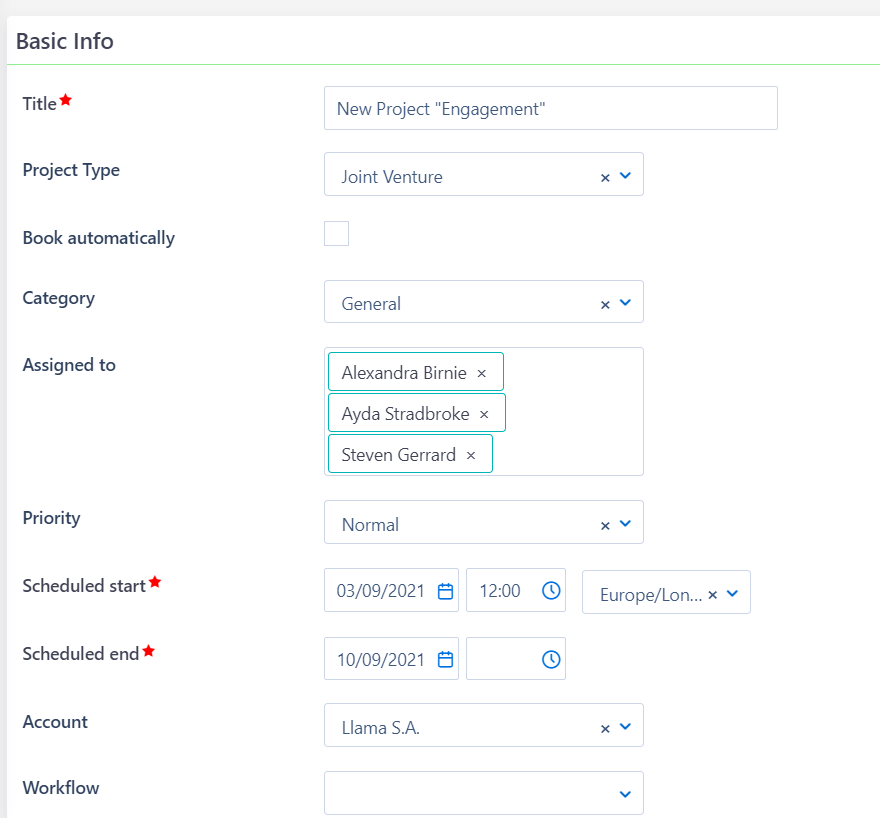
- Fill in the Title of the Project and the General Info of the Project. This project is also a Process of project type.
- Continue with the Basic Info:
- Select the Project Type from the available list, i.e. Consultancy, Client Delivery, Pre-sales, Internal, etc.
- Category: Search for a Process Category and select it or add a new one. See how to add Categories here.
- Assigned to: Click on Assigned to field in order to see Comidor Users and Groups. You can assign this Project in as many people or groups as you wish. This means that people you will select here, are those who will be responsible for Project completion.
- Priority (Low, Normal, High, Top) of the Project.
- Set Scheduled Start and End Dates and Times of the Project. Also, the Timezone for this Project time details.
- Link this Project with an Account and a Workflow. Type some related letters and click on to find an entity.
- Continue with the Description of the Project.
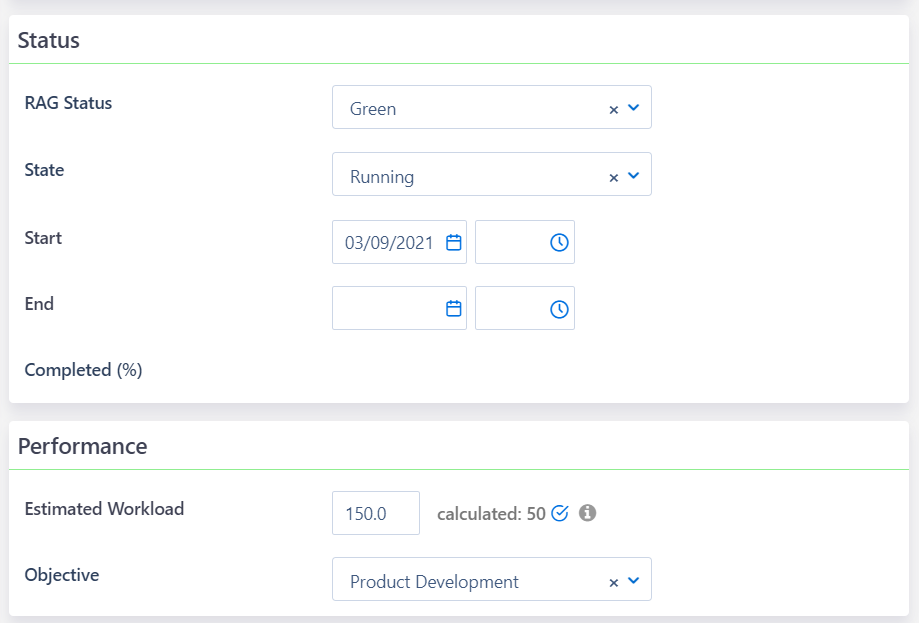
- Status of the Project can be added later:
- RAG Status is a mark field, which may highlight a process as Green, Amber or Red.
- The State will be stated automatically as Confirmed when the Project will be created. You may change this later as Scheduled, Running, Completed, Canceled, Paused or Failed. Project State will be changed to Running automatically on the Scheduled Date and Time, provided that you had checked the Execute automatically field below.
- Start and End Dates & Times are the execution actual start and end dates and times. They will be displayed when the Project starts and is completed.
- Completed (%) is the percentage of Project completion and will be added and managed by the Project holders. This Project completion percentage will be displayed here.
- Location information can be added here:
- Functional Group/Division: As pre-selected are the ones, as set in Project’s creator Profile. These can be changed in order to align with the Project. Division field is quite important, in cases when People from other Divisions.
- Fill in the Country, City, Address that refers to this Project execution if any.
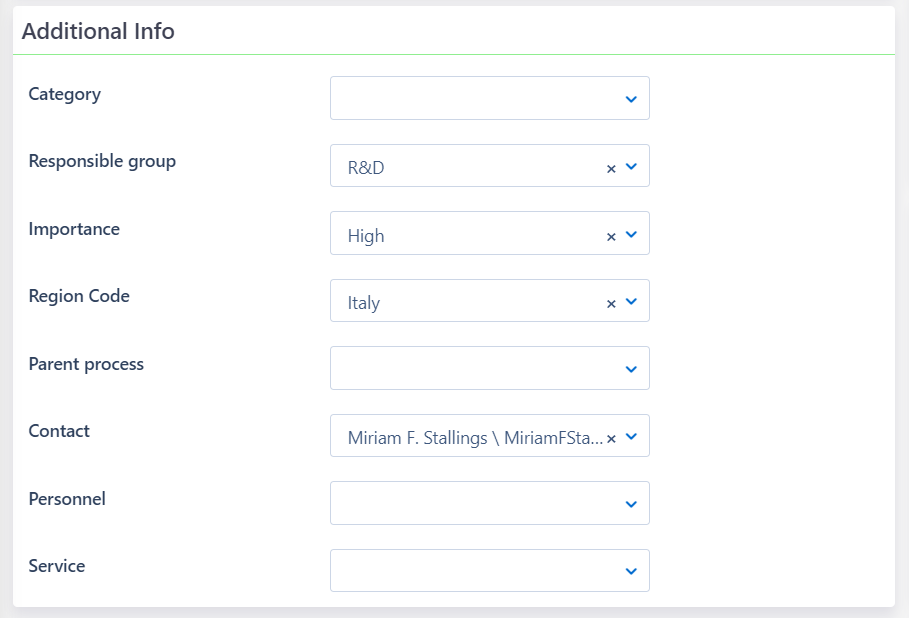
- Additional Info section includes:
- Category, which comes as a List that is available only inside the Projects.
- Responsible Group: The group will have the accountability of this Project.
- The Importance (Normal, High, Top) of the Project.
- In the Region Code, you should select the Region that refers to this Project. Usually, a Region is associated with a specific Schedule in Regional Settings. This will help in the Scheduled duration calculation-it gives an indication in this field, if only the Project is assigned to a specific User.
- The Parent Process should be filled, in cases when this Project should be added as sub-process of another Process/Project.
- Contact can be added, when the project refers to client delivery and you need to fill the Contact person.
- When a Project refers to a Personnel procedure, you may connect it here. Most of the time, a selected Personnel is associated with a Workflow.
- Set up the Performance criteria:
- Estimated Workload must be set in order to calculate the Actual Workload later and get metrics. So, insert here the scheduled duration of the Project in hours. e.g. insert 0.5 for a Project that will last half an hour or 200 for a Project that is about to last 200 hours. Provided that the Region Code is selected, you will see a Calculated duration of hours, which is based on the a) Scheduled start and end dates and time, b) People assigned in the Project, c) public holidays, schedule and days-off already added.
- Objective: a KPI can be linked here to measure the performance up to each phase completion.
- Financial details of the Project can be added, such as:
- Contract, which is connected with this Project (for non-internal Projects)
- Billing Currency: all Accounting information that refers to this Project will be converted and displayed in the selected Currency. Again, as pre-selected, you will see the Project Division’s default Currency.
- Contract Value: given at the start of the Project.
- Add Administration details:
- Set users that will be Project Manager(s) and Project’s Supervisor. Practically, this means that these users will have access to everything on this Project, even if they are not added in the Basic Info above.
- Permissions and Notifications setup includes:
- Send notification to: Fill in Comidor Users and Groups, you wish to receive a notification when someone commented on this Project’s discussion board.
- “Inform Project Manager upon task completion?” can be checked, if you wish Project Manager to receive a System-Notification each time someone completes a task.
- Additional access: People or/and Groups that should have access to this Project, without being necessary to act upon it.
- Change rights: People or/and Groups that could edit this process details in the future. “Everyone” is chosen by default. This means that Everyone who has access to this Project will have the right to modify it.
- Finally, you can choose to enable/disable some Parameters, such as:
- Execute automatically: it will set as “running” and “completed” the Project at the scheduled start and end dates and times, respectively.
- Book assignee automatically: This option, if clicked, will book automatically in every Work-Package created under this Project, everyone included in the “Assigned to” field. Thus, all Booking Requests will be approved automatically – this option is mostly used in internal/personal projects.
- Skip auto-create income from labor work: This option, if checked, will disable the automatic calculation of Income under this Project each time a Project Manager approves a completed Task.
- Click on Save to save the new Project, on Save and New to save this and start creating another one. Choosing Save and Notify, Project will be saved and you could send Note-Notification upon its creation not only to users but also to external recipients via email. Alternatively, click Cancel to cancel the procedure.
In case you would like to find and start planning an already created Project:
- Go to Packages > Project Management > Projects.
- Enter the Project you wish from the list of Projects.
Make sure prior to any action that you are viewing the searched or filtered or all Projects, having them sorted and/or grouped by the way you wish.
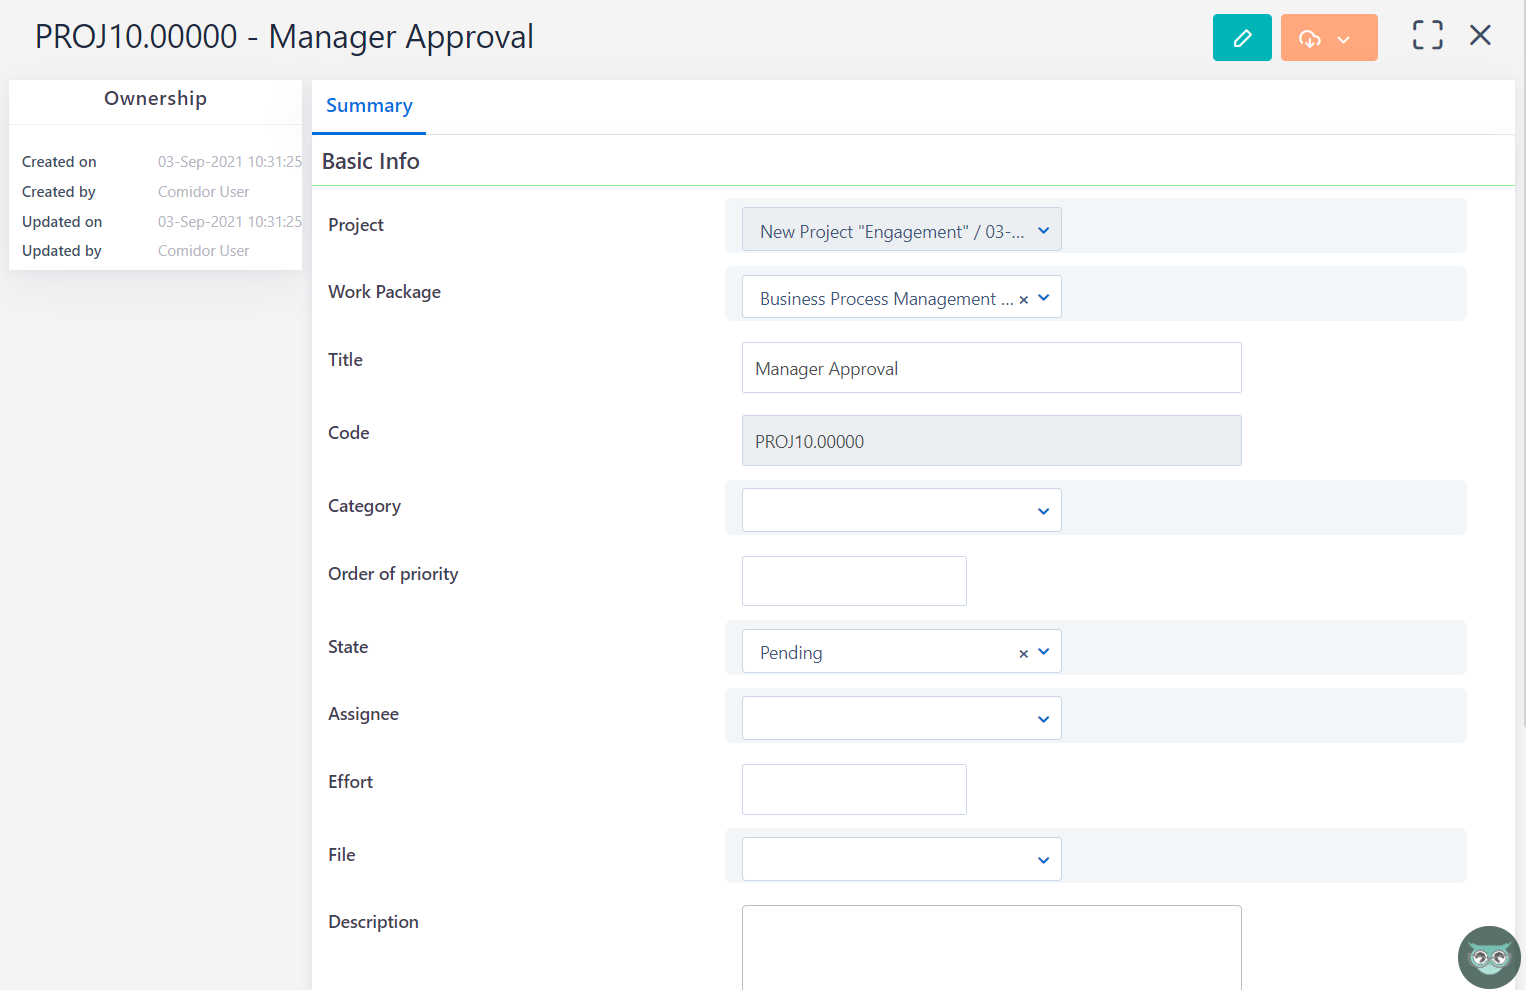
Requirements inside a Project
Project Manager 1 & 2 and Supervisor are able to add and manage Project Requirements.
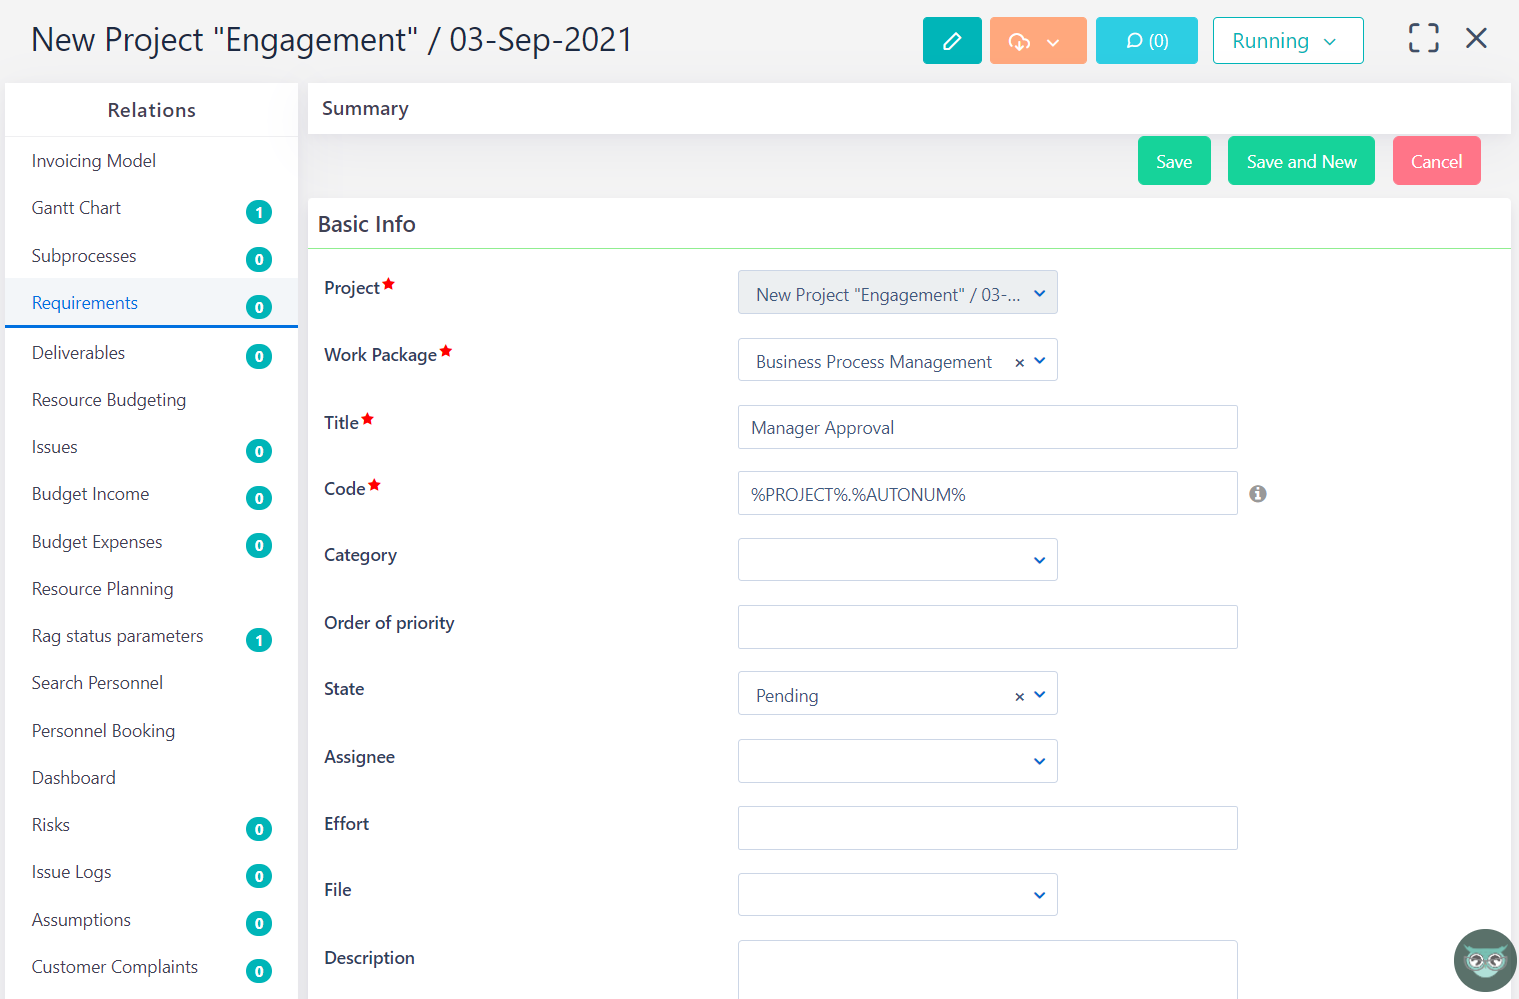
Being inside a Project, in the Requirements tab, you may add, edit or manage Project Requirements.
- In order to add a new Requirement, click on the + icon.
- Fill in the Requirement Title and its Code. The code will be generated automatically with Project title/Autonumber/Date, if not changed.
- Also, you may select the Requirements Category. See how to add Lists.
- Order of Priority needs to be stated so as to differentiate from other Requirements.
- Using the State filter, you may monitor the Requirement status.
- A Requirement may be assigned in a specific user (Assignee), Effort and Description can be added, too. In the File field, an already uploaded file can be added upon Requirement completion.
- Click on Save to proceed, on Save and New to save this and start creating another one. Choosing Save and Notify, Requirement will be saved and you could send Note-Notification upon its creation not only to users, but also to external recipients via email. Alternatively, click Cancel to cancel the procedure.
- In order to manage an already added Requirement, click on the one you wish from the list.
- To edit the Requirement, click on the Pencil button. Adjust details and then, press Save or Save and Notify to send Note-Notification upon its edit not only to users but also to external recipients via email. Alternatively, click Cancel to cancel the procedure.
- To delete the Requirement, select the Requirement from the list and choose Delete.
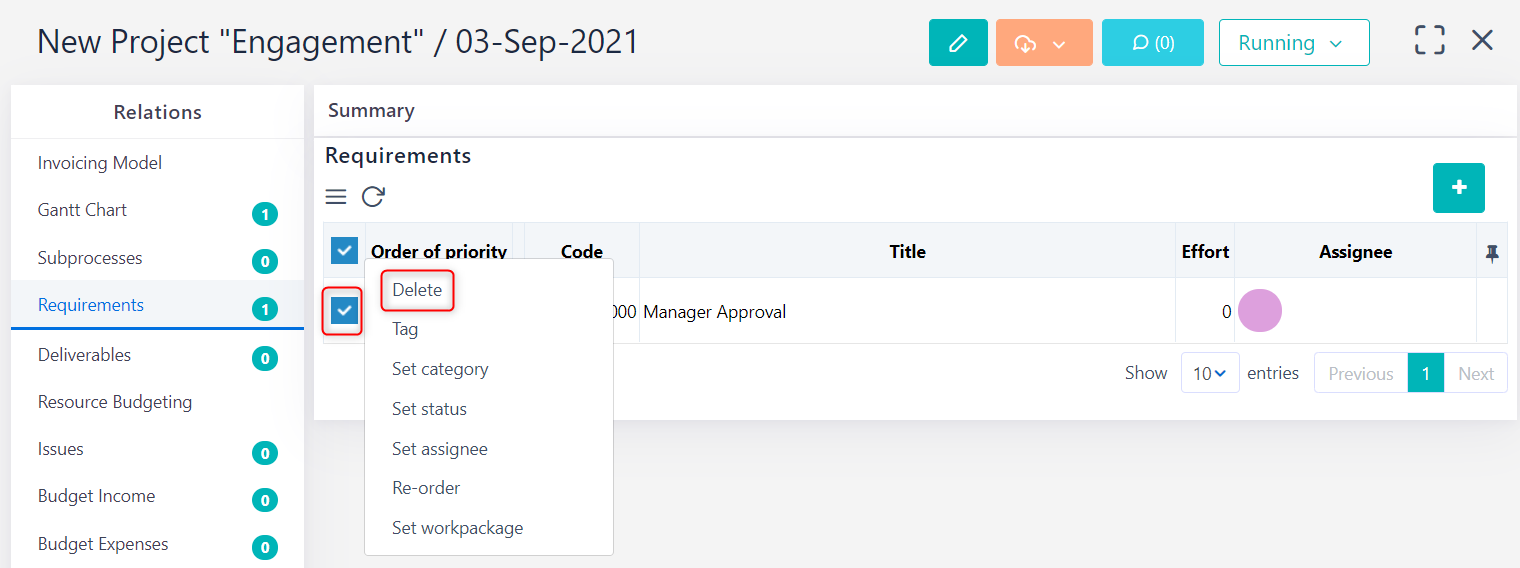
- Selecting a Requirement you are also able to change the Category, status, assigned user or order. Provided that you have already created the Work-packages of the Project, you may choose to Assign or Unassign this requirement in a specific Workpackage and press Save.
Deliverables inside a Project
Project Manager 1 & 2 and Supervisor are able to add and manage Project Deliverables.
Being inside a Project, in the Deliverables tab, you may add, edit or manage Project Deliverables.
- In order to add a new Deliverable, click on the + icon.
- Fill in the Deliverable Title.
- Also, you may select the Deliverable Category. See how to add Lists here.
- Attach related File that has already been uploaded in Comidor Files. Of course, you may fill in this field later when Deliverable is delivered.
- Delivery Date will be filled later on when Deliverable is delivered.
- Click on Save to proceed or on Save and New to continue adding Deliverables.

- In order to manage an already added Deliverable, click on the one you wish from the list.
- To view a Deliverable detail, just click on it.
- To adjust Deliverable details, select a Deliverable and press Edit. In the pop-up that opens, change details and press Save to proceed. Alternatively, click Cancel to cancel the procedure.
- To delete the Deliverable, select the Deliverable from the list and choose Delete.
Requirements in multiple Projects
Project Managers 1 & 2 and Supervisors are able to add and manage Projects Requirements.
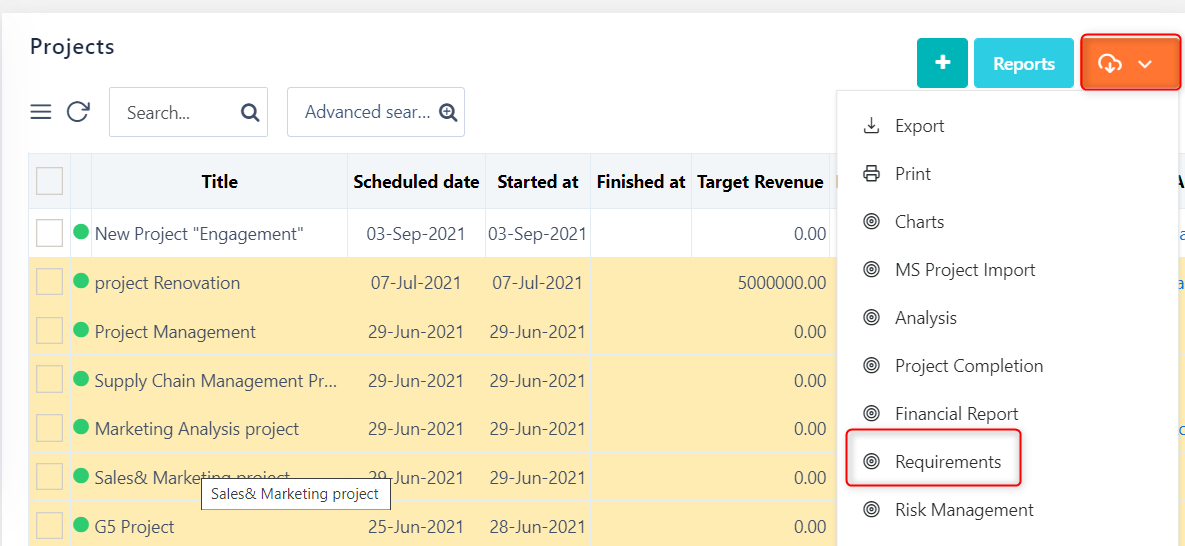
- Go to Packages > Project Management > Projects.
- Click on the Actions button and then, select Requirements. Inside that Unit, you may see all the Project Requirements, no matter they are assigned or not in a Work package.
- Inside Project Requirements, click on the + icon to add a new one.
- Select the Project you would like to add this Requirement in.
- Fill in the Requirement Title and its Code. The code will be generated automatically with Project title/Autonumber/Date, if not changed.
- Also, you may select the Requirements Category. See how to add Lists.
- Order of Priority needs to be stated so as to differentiate from other Requirements.
- Using the State filter, you may monitor the Requirement status.
- A Requirement may be assigned in a specific user (Assignee), Effort and Description can be added, too. In the File field, an already uploaded file can be added upon Requirement completion.
- Click on Save to proceed, on Save and New to save this and start creating another one. Choosing to Save and Notify, Requirement will be saved and you could send Note-Notification upon its creation not only to users but also to external recipients via email. Alternatively, click Cancel to cancel the procedure.
- Being inside a Project Requirement, you have the options to:
- Edit the Project Requirement information, by pressing the pencil Press Save to save the changes. Choosing Save and Notify, Project will be saved and you could send Note-Notification upon its edit not only to users but also to external recipients via email. Alternatively, click Cancel to cancel the procedure.
- Click on the Actions button to Delete A confirmation box will appear.
- Click on the Actions button to Print the current tab view with Project Requirement information. Otherwise, click on the Printer icon.
- Press Tags tab, to add a new Tag on that Project Requirement that it may be a private, group, internal or public. From this point, you can also manage old tags that have been added on that Project Requirement. Adding Tags may help you in grouping them, filtering and finally find them easier.
- Finally, you may prepare Tasks that are associated with this Requirement. Click on the + icon to quickly add a new Task.
- Also, in the Project Requirements table, you may perform multiple actions, such as to multi-check Requirements, and:
- Delete: a confirmation box will appear prior to these Requirements’ deletion.
- Change category: Massively change the Requirements’ category.
- Change status: Change the status of a Requirement from Pending in To Do, In Progress, Done or Canceled.
- Change user: Change the assignee.
- Change order: Change the order of priority.
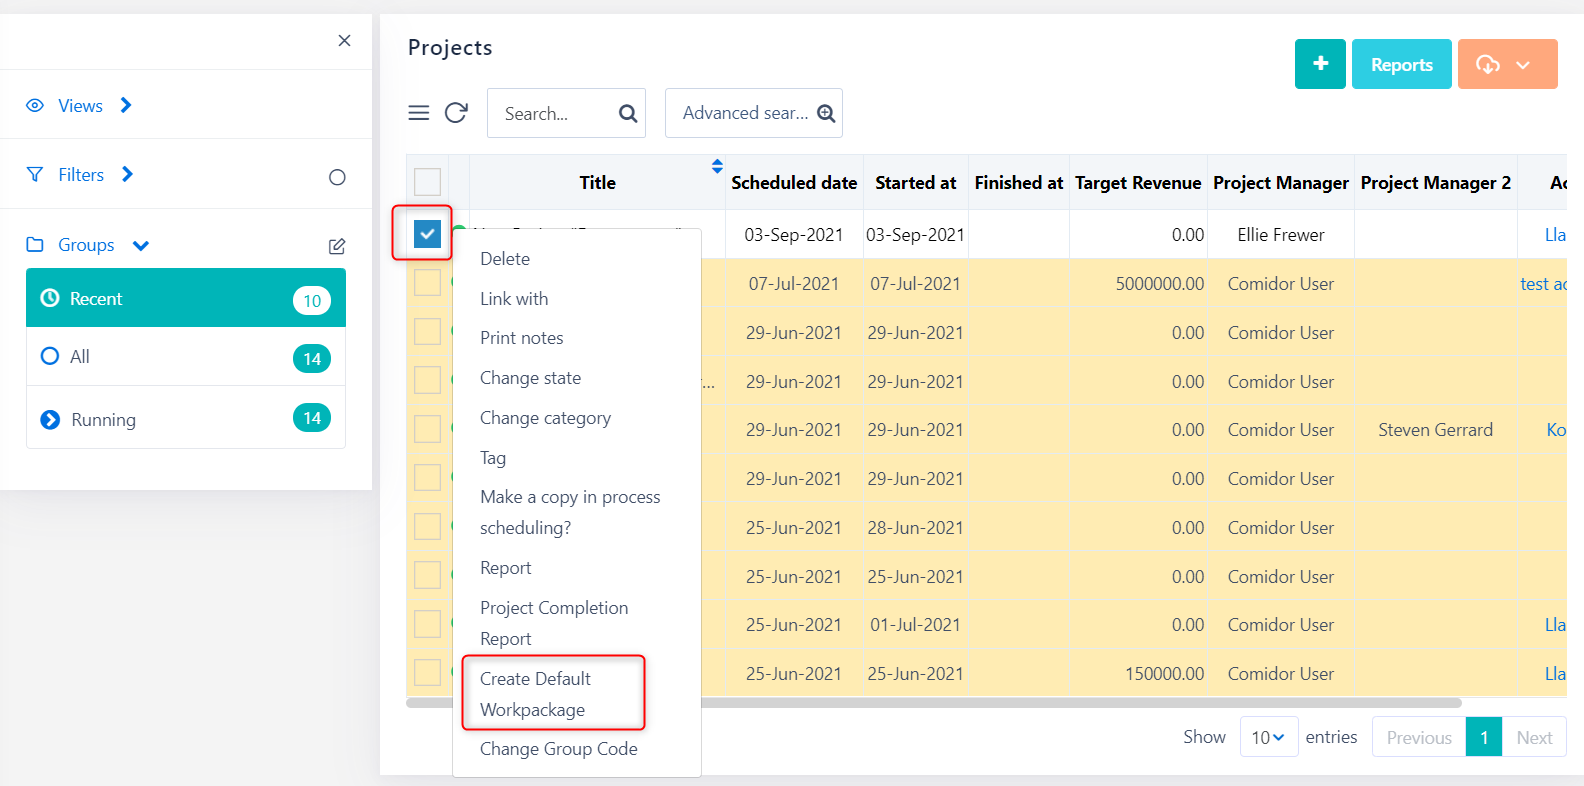
Gantt Chart – Add WorkPackage
Project Manager 1 & 2 and the Supervisor are able to manage Work Packages inside the Project’s Gantt Chart.
For Projects that would have only 1 Work-Package (for example, Internal Projects), you may create automatically that Work-Package inside the Gantt Chart, by selecting the Project inside Projects unit and pressing Create Default Work-Package option. This will create automatically a Work-Package to continue with the rest of Project Planning.
- Go to Packages > Project Management > Projects.
- Enter the Project you wish.
- To start the creation of Work-Packages, click on the Gantt Chart tab.
- Click on the small Actions button inside the Gantt Chart to Create a new Work package.
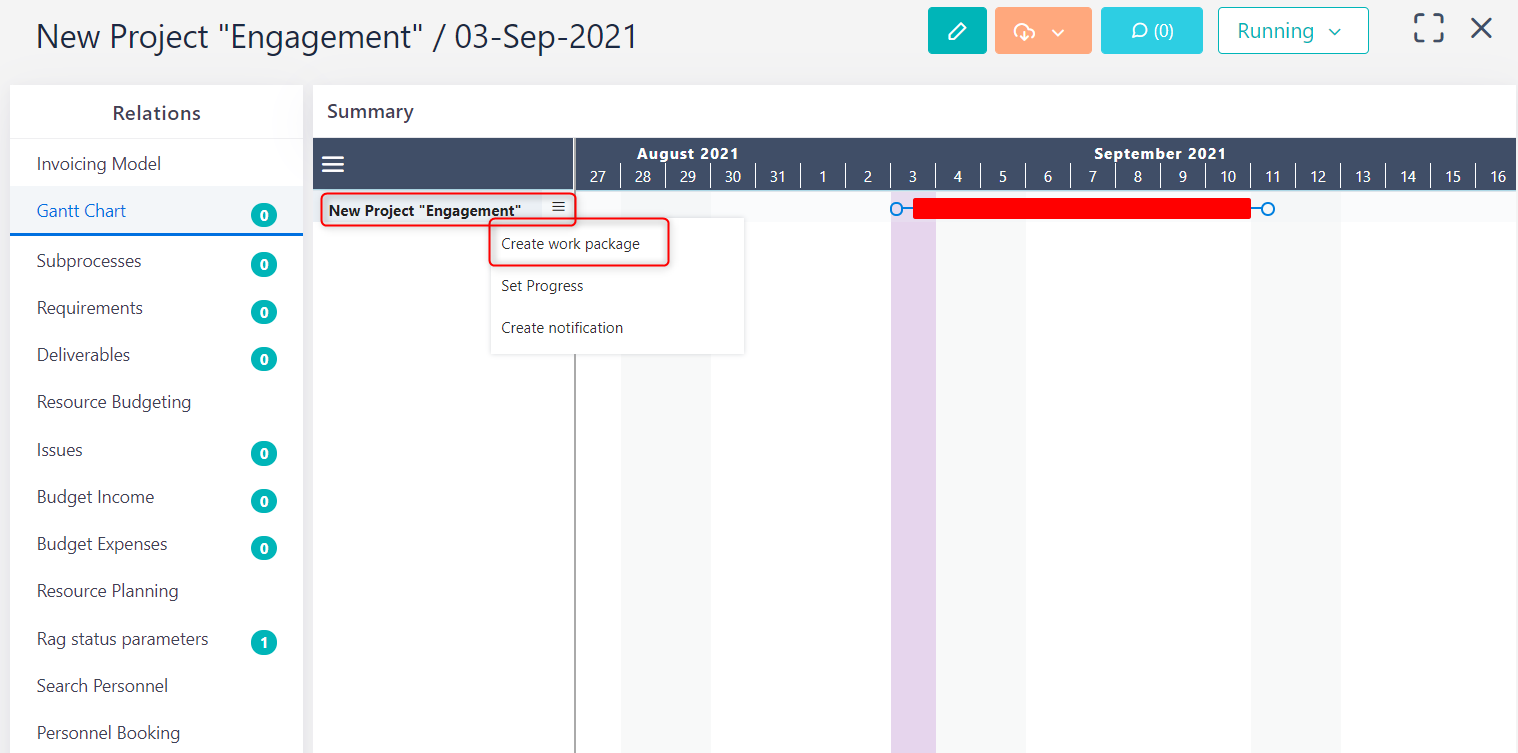
- A Quick add of Work Package appears, where users can complete information and see it displayed in the Gantt chart above. Main Project-Process will be set automatically as the Parent process. Switch to the Basic tab and fill in the following:
- Fill in the Work Package Title, select its Business Function and extra Category. You may add new Lists, too.
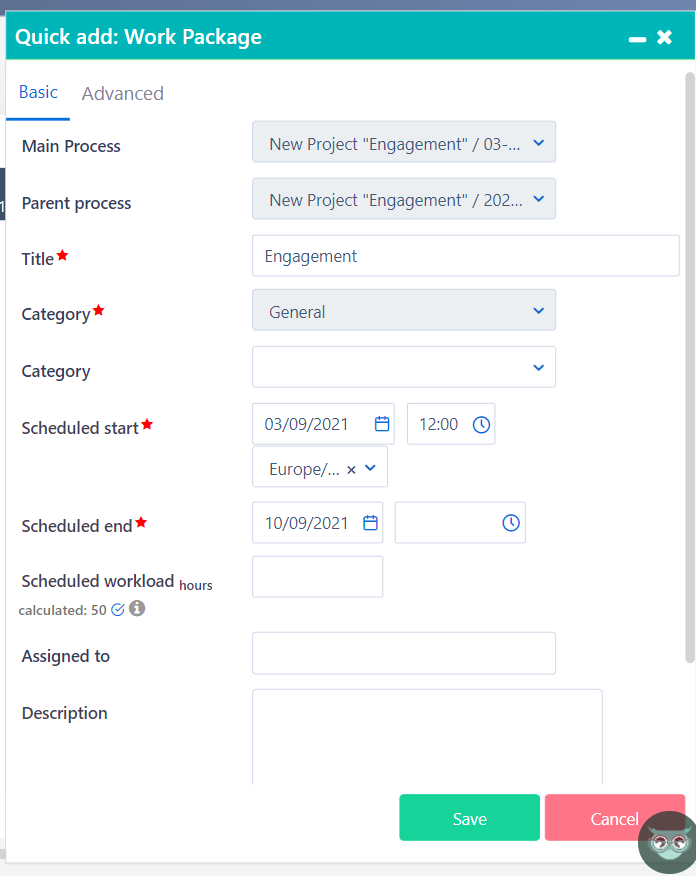
- Set the Scheduled start and end Dates and Times, also the Scheduled workload (in hours). The suggested calculation of working hours in days is based on the Project’s Region Code.
- Select Timezone for this WorkPackage.
- Fill in a Description of this Work-Package.
- Switching to the Advanced tab, you may add Importance and Priority fields.
- If required, connect this Work Package with a Workflow.
- Connect a specific Account (it is not already connected through Project), attach Files from Comidor DMS of your Desktop.
- Set the Amount of money that should be invoiced upon this Work-Package completion or the Percentage of money that should be invoiced by then.
- Press Save to add the new Work Package or Cancel to cancel the procedure.
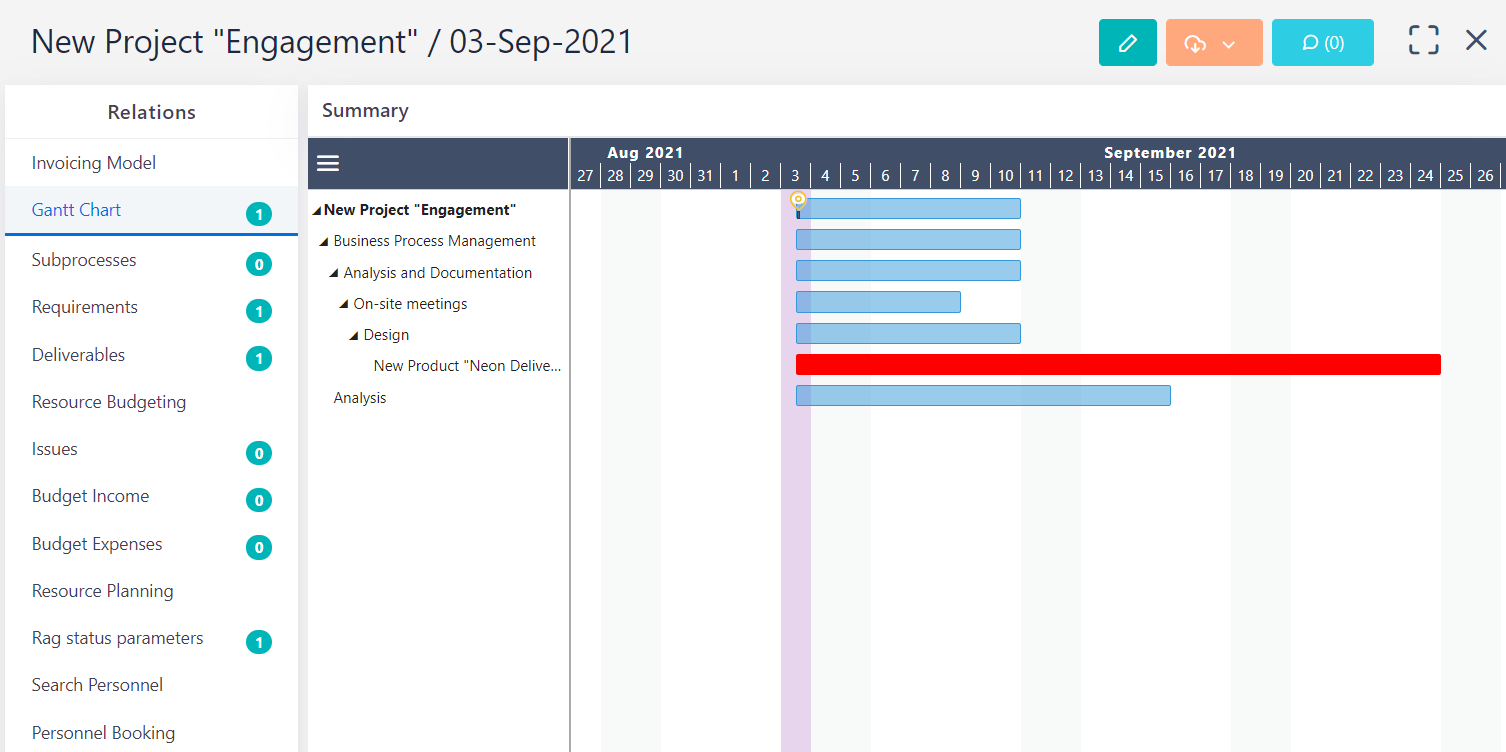
- Continue by adding more Work Packages and Sub-Work Packages of them and so on. When Project runs, your Gantt Chart will look more or less like in the picture below.
- Fill in the Work Package Title, select its Business Function and extra Category. You may add new Lists, too.
A legend for the Gantt chart signs is shown below:
Gantt Chart – Manage WorkPackage
- Go to Packages > Project Management > Projects.
- Enter the Project you wish.
- To start the creation of Work-Packages, click on the Gantt Chart tab.
- Click on the Work Package Actions button inside the Gantt Chart to:
- Open the Work-Package
- Edit it, adjust details in the pop-up that appears and press Save. In case you change the Work-Package period but you have already made a Personnel Booking that was accepted by its Manager, you will be notified whether this Personnel is unavailable in the new period, so as to reassign the Work-Package.
- Delete it – a confirmation box appears.
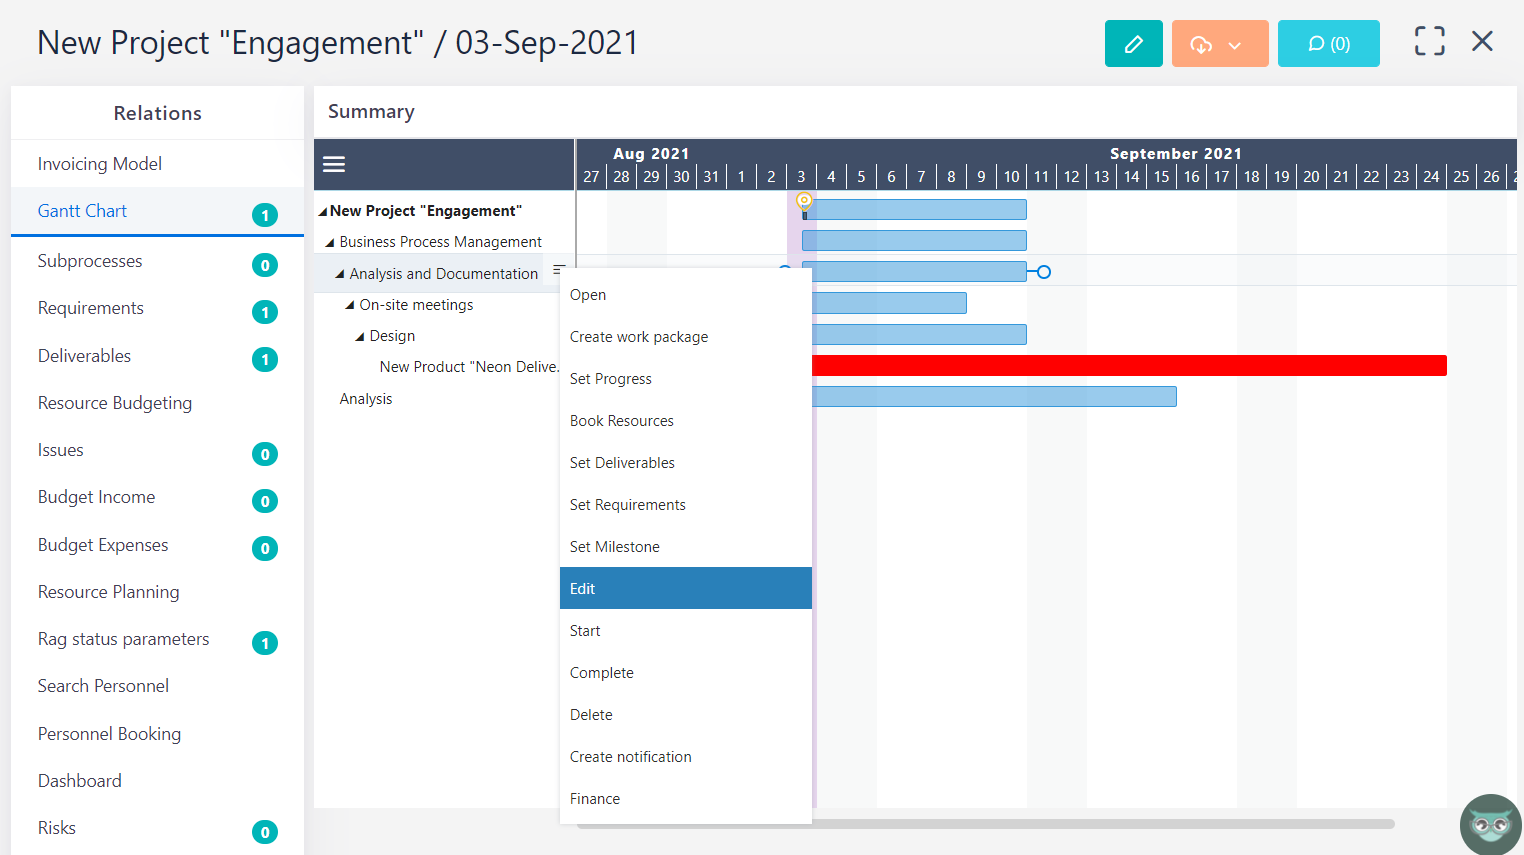
- From the Work Package Actions button inside the Gantt Chart, you may:
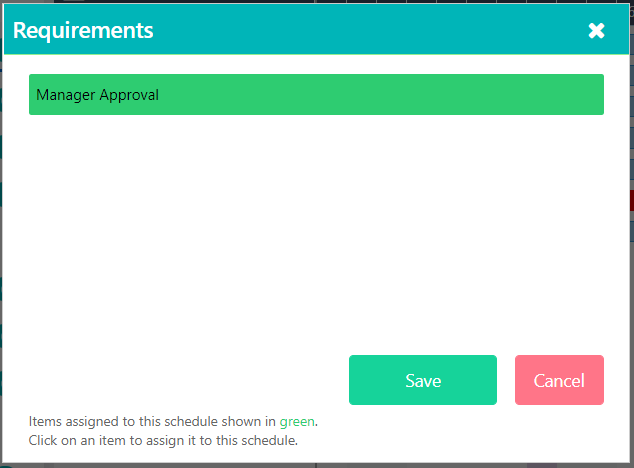
- Set Requirements on it, by selecting the ones that you’ve set already in the Requirements tab of the Project. In the pop-up that appears, select the one(s) you wish and press Save.
- Set Deliverables on it, by selecting the ones that you’ve set already in the Deliverables tab of the Project. In the pop-up that appears, select the one(s) you wish and press Save.
- Set Milestone on it, by selecting Milestone Date and Time. Press Save to see it the Gantt Chart.
- Set Requirements on it, by selecting the ones that you’ve set already in the Requirements tab of the Project. In the pop-up that appears, select the one(s) you wish and press Save.
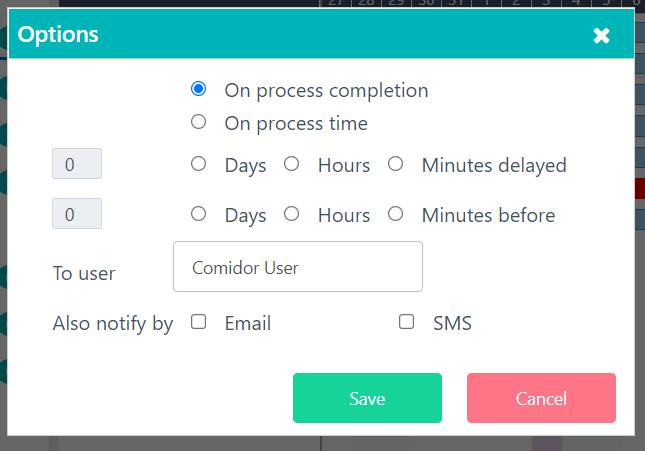
- Create notification Reminder for the Project or for any of the Work Packages by selecting Create notification from Actions button of them, respectively. A pop-up window appears where user can select between a notification on a Process Completion or on Process Time or when the process is Delayed for a number of days/hours/minutes or prior on a number of days/hours/minutes to schedule start. Select the user that will be notified, check for extra notifications by Email and/or SMS and click Save. Reminders that are set in the Gantt Chart can be managed from the Notifications tab inside the Project or the Work-Package that the Reminder has been set.
- After finishing with the Projects – Scheduling Phase and Projects – Resource Budgeting Phase, you will see that you may Book Resources, as explained in the Projects – Resource Booking phase.
- Later on, during the Projects – Monitoring Phase, from the Gantt Chart inside, you may click on the Expenses and Income tabs of the Project to add extra Expenses & Income in the Project. You can add Financial information like these in a Project or in each Work-Package, simply by going on the Gantt Chart, clicking on the Actions button of the Project or Work-Package, then select Finance and click to Add Income and/or Add Expenses. Expenses that are coming from booked Resources’ Hours and Expenses are added automatically in Expenses of the Project, after their Approval. Also, you may Set Progress of each Work-Package while Project is on the go.
- Click on the Actions button of the Gantt chart to perform the following:
- Print: you can print the Gantt Chart. A new tab opens-please follow the default browser’s procedure by pressing Ctrl+P, so as to print or export as .pdf.
- Legend: get advice on some Gantt Chart icons.
- Settings: choose whether to Highlight or not the critical path, choose the Calendar offset days. Press Save to apply changes. Click on the Actions button of the Gantt chart to perform the following:
- View: select to expand or collapse all Work Packages of the Gantt chart.
- Presentation mode: select to see both Scheduled and Actual timeframe of Work Packages, or simply the Scheduled
- Zoom: zoom in and out the Gantt Chart view (month, quarter, semester, year)
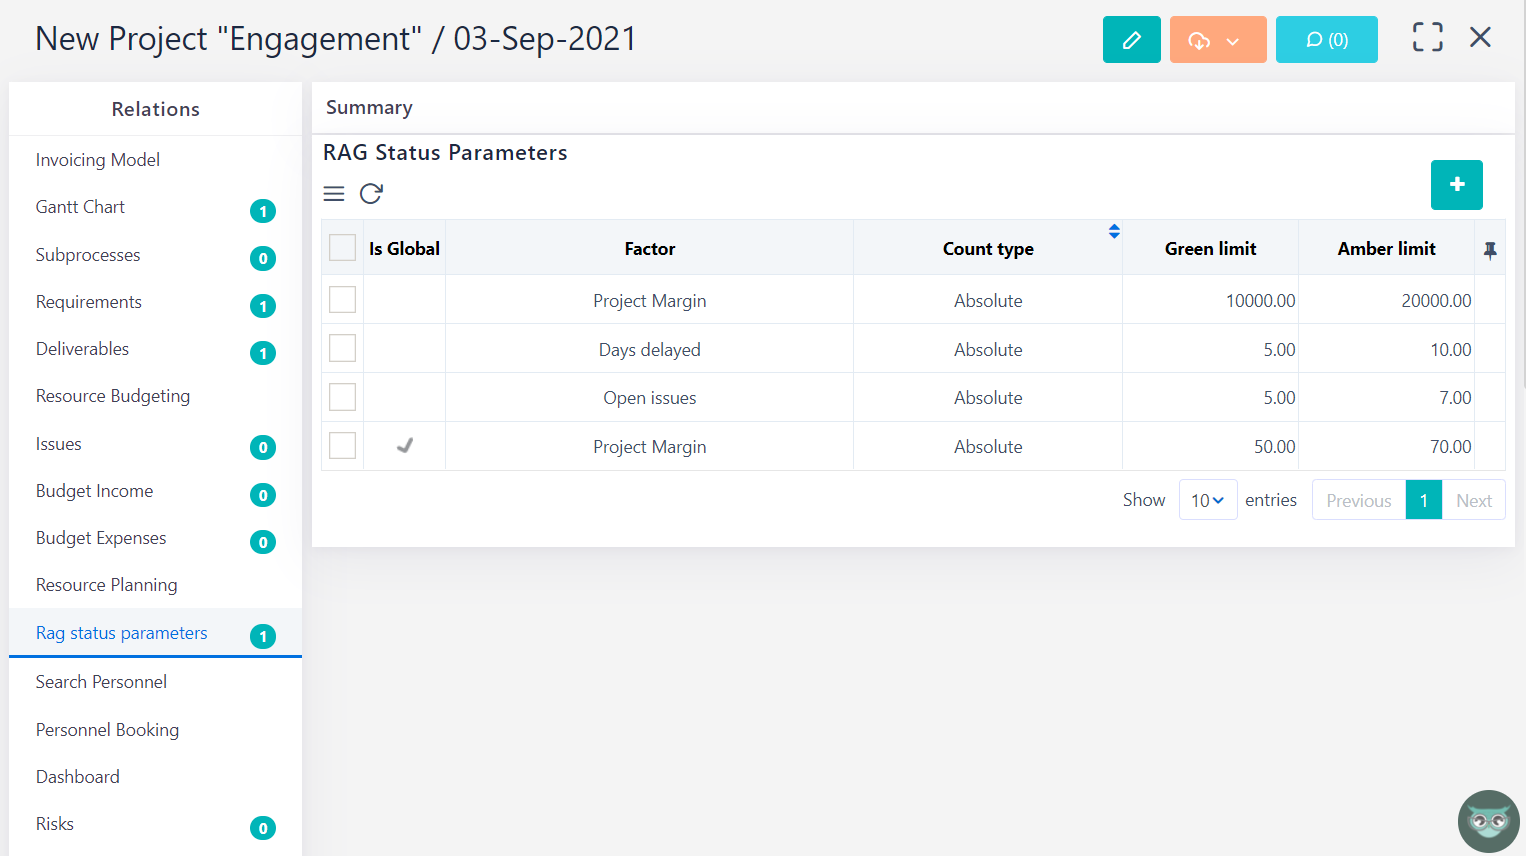
RAG Status Parameters
RAG Status Parameters are used to set up and benchmark the monitoring of project margins.
RAG Status Parameters inside a Project
- Go to Packages > Project Management > Projects.
- Enter a Project from the list.
- Press RAG Status parameters tab, so as to set parameters that will manage when RAG status color will change. Also, it is quite important to mention that an automated comment will be added to Notes (Discussion box), so as to inform specified people on RAG status change.
Add a new RAG status parameter
- Press + icon to add a new parameter.
- In order to set a RAG Status Parameter based on Project Margin, select this Factor,
- Select between Absolute or Percentage Count type, set the Green and Amber limits.
- Click on Save to save the new entity, on Save and New to save this and start creating another one. Choosing to Save and Notify, the entity will be saved and you could send Note-Notification upon its creation not only to users but also to external recipients via email. Alternatively, click Cancel to cancel the procedure.
- In order to set a RAG Status Parameter based on Days Delayed:
- Select between Absolute or Percentage Count type, set the Green and Amber limits.
- Click on Save to save the new entity, on Save and New to save this and start creating another one. Choosing to Save and Notify, the entity will be saved and you could send Note-Notification upon its creation not only to users but also to external recipients via email. Alternatively, click Cancel to cancel the procedure.
- In order to set a RAG Status Parameter based on Open issues,
- Select between Absolute or Percentage Count type, set the Green and Amber limits.
- Click on Save to save the new entity, on Save and New to save this and start creating another one. Choosing to Save and Notify, the entity will be saved and you could send Note-Notification upon its creation not only to users but also to
external recipients via email. Alternatively, click Cancel to cancel the procedure.
- In order to set a RAG Status Parameter based on Budget/Actual Expenses:
- Select between Absolute or Percentage Count type, set the Green and Amber limits.
- Click on Save to save the new entity, on Save and New to save this and start creating another one. Choosing to Save and Notify, the entity will be saved and you could send Note-Notification upon its creation not only to users but also to external recipients via email. Alternatively, click Cancel to cancel the procedure.
Manage and View RAG status parameters
- To view already added RAG Status Parameters, you simply need to click on the RAG Status Parameters tab.
- To edit already added RAG Status Parameters, you simply need to click on the RAG Status Parameters tab and then press the pencil button. Press Save to make changes or Save and Notify, so as to send Note–Notification upon its edit not only to users but also to external recipients via email. Alternatively, click Cancel to cancel the procedure.
- To manage already added RAG Status Parameters, you simply need to have clicked on the RAG Status Parameters tab.
- Multi-check entities to Delete them.
- Link with other Comidor entities.
When RAG status parameters reach their Green and Amber limits, the following will occur:
- An informative Note (comment) will be added in Discussion Box of the Project and people added in the “Send Notification To” field of the Project information will be notified with a Note-Notification regarding the RAG Status change and the reason.
- RAG Status of the Project will change automatically.
RAG Status Parameters globally
The main use of this unit is to create global RAG Status parameters that can be used in Projects for PPM reasons. Still, RAG status that refers to a specific Project and is not global can be set.
Global RAG Status parameters are used only in Projects that no related RAG Status parameters have been set.
- Go to Packages > Project Management > Rag Status Parameters.
- Press + icon to add a new parameter.
- Select whether this parameter will be Global or not and if it is not, you may set a specific Project that this Parameter will run on.
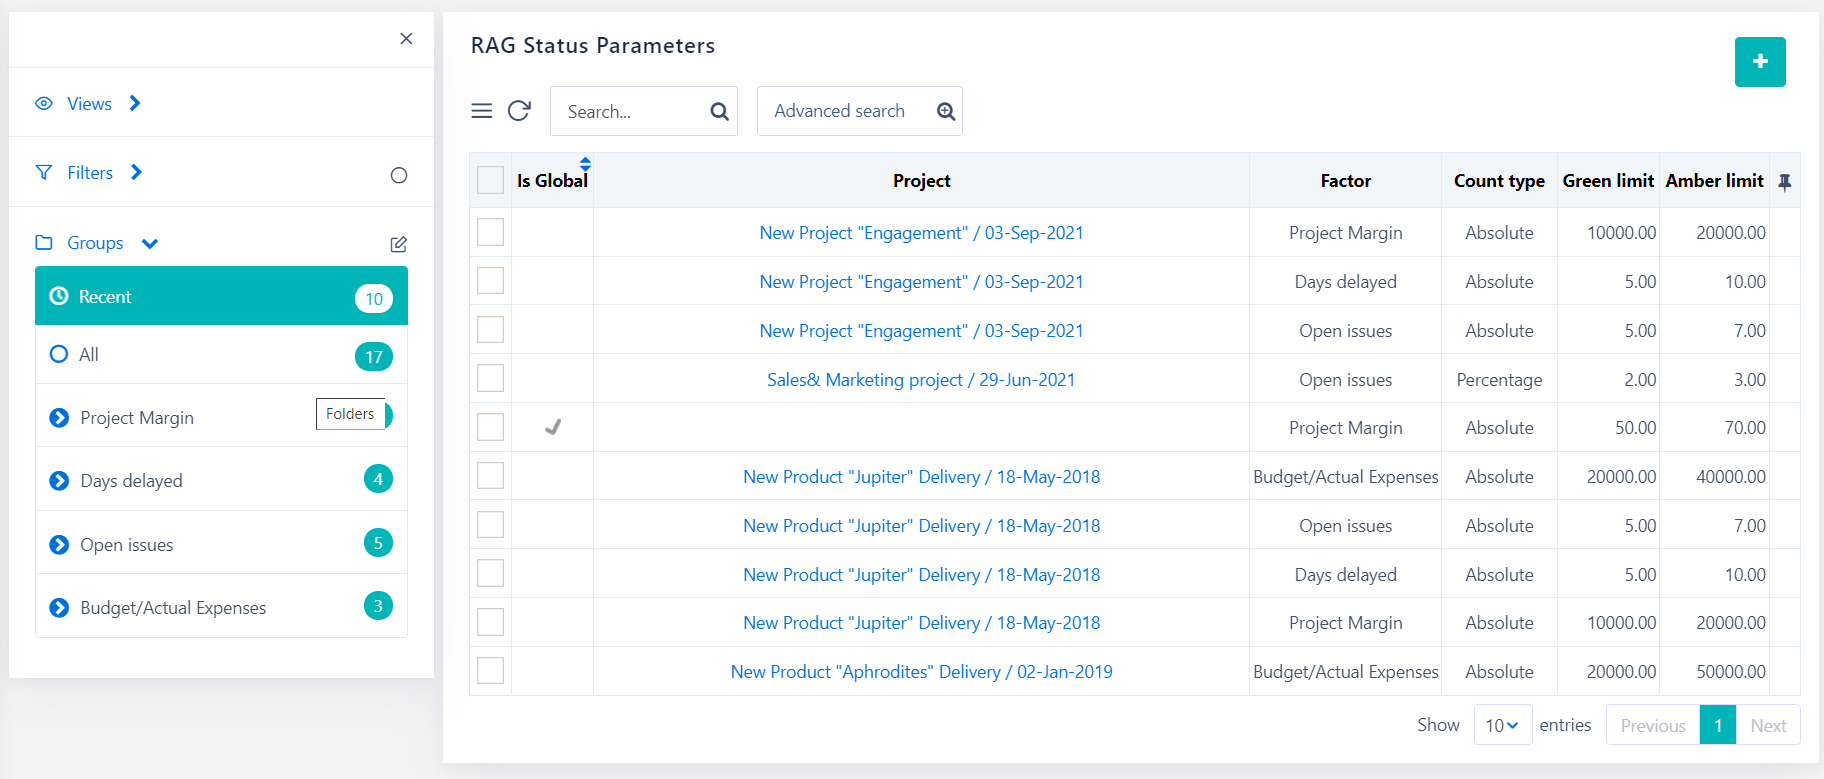
- In order to set a RAG Status Parameter based on Project Margin, select this Factor:
- Select between Absolute or Percentage Count type, set the Green and Amber limits.
- Click on Save to save the new entity, on Save and New to save this and start creating another one. Choosing to Save and Notify, the entity will be saved and you could send Note-Notification upon its creation not only to users but also to
external recipients via email. Alternatively, click Cancel to cancel the procedure.
- In order to set a RAG Status Parameter based on Days Delayed:
- Select between Absolute or Percentage Count type, set the Green and Amber limits.
- Click on Save to save the new entity, on Save and New to save this and start creating another one. Choosing to Save and Notify, the entity will be saved and you could send Note-Notification upon its creation not only to users but also to external recipients via email. Alternatively, click Cancel to cancel the procedure.
- In order to set a RAG Status Parameter based on Open issues,
- Select between Absolute or Percentage Count type, set the Green and Amber limits.
- Click on Save to save the new entity, on Save and New to save this and start creating another one. Choosing to Save and Notify, the entity will be saved and you could send Note-Notification upon its creation not only to users but also to external recipients via email. Alternatively, click Cancel to cancel the procedure.
- In order to set a RAG Status Parameter based on Budget/Actual Expenses:
- Select between Absolute or Percentage Count type, set the Green and Amber limits.
- Click on Save to save the new entity, on Save and New to save this and start creating another one. Choosing to Save and Notify, the entity will be saved and you could send Note-Notification upon its creation not only to users but also to external recipients via email. Alternatively, click Cancel to cancel the procedure.
- To view already added RAG Status Parameters, you simply need to click on a RAG Status Parameter entity to enter it.
- Click on the pencil button to edit this entity.
- Adjust details, such as the Global checkbox or Project.
- Adjust Factor, Count type and Green and Amber limits.
- Click on Save to save the changes. Choosing to Save and Notify, the entity will be saved and you could send Note–Notification upon its edit not only to users but also to external recipients via email. Alternatively, click Cancel to cancel the procedure.
- Click on the Actions button to perform the following:
- Delete specific RAG Status Parameter. A confirmation box will appear.
- Print current RAG Status Parameter details. A new tab will open to your browser, where you should follow the relevant printing procedure.
- Link RAG Status Parameter with another Comidor entity, e.g. a Project, an Event, etc. Learn more about how to add a Link.
- Notify, to send Notes-Notification to specific Comidor groups or Comidor users or external recipients via email (provided that you have already connected your email in the system) regarding this RAG Status Parameter.
- Click on the pencil button to edit this entity.
- To manage already added RAG Status Parameters, you simply need to have clicked on the RAG Status Parameters tab.
- Multi-check entities to Delete.
- Link RAG Status Parameter with another Comidor entity, e.g. a Project, an Event, etc. Learn more about how to add a Link.
When RAG status parameters reach their Green and Amber limits, the following will occur:
- An informative Note (comment) will be added in Discussion Box of the Project and people added in the “Send Notification To” field of the Project information will be notified with a Note-Notification regarding the RAG Status change and the reason.
- RAG Status of the Project will change automatically.