


RPA Components
Comidor RPA components and elements allow you to automate and manage repetitive tasks. With the RPA Caller and RPA Receiver workflow components, you are enabled to retrieve or exchange data with other systems.
RPA can be integrated into:
- Process initiation
- Report generation
- File upload in Comidor Document Management System (DMS)
With Comidor RPA you can:
- Automate repetitive tasks
- Increase employee productivity
- Speed up time-consuming processes
Prior to involving RPA Scripts and Agents in a workflow design, the following actions need to take place:
- Install an RPA agent to the PC (any unit) that you wish to perform RPA tasks
- Save Agent’s properties (needed for RPA Agent set up in Comidor)
- Install the RPA software (e.g. we used Sikulix for the following examples)
- Create your RPA Script including all actions that you want the RPA bot to replicate
- Save your RPA Script (Script name needed for RPA Script set up in Comidor)
RPA Agents
To access RPA Agents, go to App Factory Icon > RPA & AI/ML > RPA Agents.

- Click on the “+” icon at the top of the screen to open the Creation Form.
- Type an Agent Name.
- The field Code refers to the agent code that you gave in application properties.
- Provide other information such as the Operating System, Version, and Description of this Agent.
- Select the desired Save option (refer to the Quick Reference Guide).

Edit RPA Agents
- Go to App Factory Icon > RPA & AI/ML > RPA Agents.
- Select the RPA Agent to edit.
- Click on the Edit button to open the Edit Form.
- Edit the information you want and click on the desired Save option (refer to Quick Reference Guide)

Delete RPA Agents
- Go to App Factory Icon > RPA & AI/ML > RPA Agents.
- Select one or more RPA Agents.
- Click on Delete to delete one or multiple RPA Agents at the same time. A confirmation pop-up box appears.
RPA Scripts
To access RPA Scripts, go to App Factory Icon > RPA & AI/ML > RPA Scripts.

- Click on the “+” icon at the top of the screen to open the Creation Form.
- Type in the Script Name exactly as you saved the script file in the PC Agent.
- Field Integrated Software refers to the software you have installed at the PC Agent.
- Provide other information such as Built with and Description of this Script.
- Select the desired Save option (refer to the Quick Reference Guide).
Edit RPA Scripts
- Go to App Factory Icon > RPA & AI/ML > RPA Scripts.
- Select the RPA Script to edit.
- Click on the Edit button to open the Edit Form.
- Edit the information you want and click on the desired Save option (refer to Quick Reference Guide).
Delete RPA Scripts
- Go to App Factory Icon > RPA & AI/ML > RPA Scripts.
- Select one or more RPA Scripts.
- Click on Delete to delete one or multiple RPA Scripts at the same time. A confirmation pop-up box appears.
RPA Components in a Workflow Design
Comidor Workflow designer offers a variety of RPA components and elements, in order to eliminate manual repetitive tasks and allow employees to focus on more significant ones.
In particular, Comidor RPA components and elements are the following:
- RPA Caller/Receiver
- RPA Selenium
- RPA Document Creator
- RPA Excel Processor
- RPA Web Scraper
RPA Caller/ Receiver
Add an RPA Caller in various steps of the workflow design, to send data from the workflow and perform a series of repetitive actions in the 3rd party system, or an RPA Receiver to receive data from other systems and perform actions in Comidor workflow fields.
To access Workflows go to App Factory Icon > Workflow Automation > Workflows
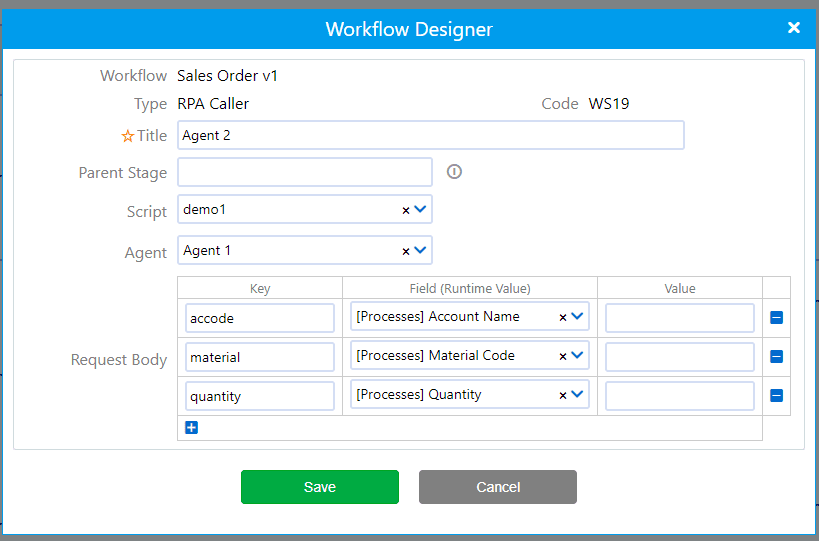
RPA Caller
- Drag-n-drop the RPA Caller element.
- Give a Title to the component.
- Set the Parent Stage which is the stage of the parent process once this step is reached.
- Select which Script you would like to run at this step, from the list of RPA Scripts that you have already created.
- Select which Agent you would like to run at this step, from the list of RPA Agents that you have already created.
- Define the Request Body by specifying the Key and its Value as the Runtime Value of a custom field or predefined value.
RPA Receiver
- Drag-and-drop the RPA Receiver element.
- Give a Title to the component.
- Set the Parent Stage which is the stage of the parent process once this step is reached.
- Select a user field as RPA Response to store the result of the RPA Receiver once this runs.
RPA Selenium
Use an RPA Selenium in your workflow to replicate repetitive manual steps. Use unique CSS Selectors for specifying each element.

- Drag-and-drop the RPA Selenium element in the workflow design.
- Give a Title to the component.
- In the Variables table, define all the actions that you wish the bot to execute step-by-step:
- Go to URL: select this action to define the URL that the bot should browse.
- Sleep: select this action to determine how many seconds should the bot wait until the next action. This depends on the loading time of each website.
- Wait for element: select this action when not certain of how many seconds the bot should wait for an element to be displayed.
- Click: select this action to define where the bot should click on.
- Input-Put: select this action when you wish to add a value to a specific element. Specify the unique id of the element in “Value 1” and the value of the field in “Field (Runtime Value)”
- Input-Get: select this action when you wish to get the value of a specific element. Specify the unique id of the element in “Value 1”.
- Select a user field as RPA Response to store the result of the RPA Selenium once this runs. If you used more than one “Input-Get” all the values will be stored in the response field, separated with commas.
Document Creator RPA Component
Create invoices, reports, or other types of documents by combining a file template format and fields of the workflow.
- Give a Title to the component.
- Give the Parent Stage which is the stage of the parent process as soon as this step is reached.

- Set a Template File for your document either in a Form, upload it in a step of the workflow in a Binary Field, or give the Template Name of a file stored in DMS.
- Form: Select the User Form in which you have uploaded the Template Tile. (fixed template scenario)
- The Template file should be either .docx or .xlsx.
- The produced file can be either .docx, .xlsx, or .pdf.
- Apply format options in your template such as font colour, size, alignment, number format, etc. and it will be captured in the produced document.
- Form: Select the User Form in which you have uploaded the Template Tile. (fixed template scenario)

-
- Binary Field: Select the binary field in which the Template File will be uploaded during the workflow. (dynamic template scenario)
- Template Name: Type the name of a file stored in DMS. Keep in mind that this file should be linked with the Account of the process, in order to be used as a template file.
- Define the Variables being used in the Template File by providing the Key and its Value as the run-time value of a custom field or predefined value. Excel fields and images stored in binary fields can be added too.
- For excel fields specify the area to be replaced in the produced document. For example, r:1:2,c:0:4 will include from Rows 2-3 and columns A-D.
- For images, correlate the binary field that is stored, and define the size in pixels in value. E.g. 200×200.
- Choose a field to be the name of the produced document from the list of text fields in File Name.
- Set the binary field in which you wish to save the Response document.

- Check the option Return PDF, if you wish the produced document to be in PDF format. Leave it unchecked, and the produced document will be in the same format as the template.
- In Status you can add a text field, to see the response of this component.
Excel Processor
Use the RPA Excel Processor component to parse a big excel file or part of it. Capture values of certain cells into user fields or a whole area and depict them in an excel type user field.

- Drag-and-drop the RPA Excel Processor component.
- Give a Title to the component.
- Set the Parent Stage which is the stage of the parent process once this step is reached.
- Select a binary field in the Excel Document – the document that you will upload in a previous stage.
- Define the action you wish the Excel Processor to perform, from the following:
- Parse Excel – select this action to return values of cells or an entire area of the excel and store them in user fields.
- Get No of Sheets – select this action to get the number of the sheets in the uploaded excel (useful for large excel files with multiple sheets)
- Find in Sheet – select this action to find a certain value in excel. Define the Search Index.
- Find the row in Sheet – select this action to find a specific value in excel and get the entire row as a response.

- Select the option Create Excel From Uploaded when you want to define an area of the excel to be saved in an excel type field. The fields “Read uploaded from (row), Read uploaded to (row), Read uploaded from (column), Read uploaded to (column), and Produced Excel Field” will appear to guide through.
- In Assign to user fields map the user fields with the cells. E.g. if you want to display B2, type in Index r1c1.
- Select a user field as RPA Response to store the result of the RPA Excel Processor once this runs.
RPA Web Scraper
Use an RPA Web Scraper in your workflow to first find information in a selected area of a website and then store it in user fields.

- Drag-and-drop the RPA Web Scraper element in the workflow design.
- Give a Title to the component.
- Set the Parent Stage which is the stage of the parent process once this step is reached.
- Choose whether you want a hardcoded or Dynamic source
- In the dynamic source option, define fields as host and port; those fields should get value in a previous step
- Alternatively, type a host and port to the respective fields.
- Define the URL that you wish to be scraped. Select a text field type.
- Choose the Search selector from the variety of options (xpaths, class, id, etc) based on the website you are scraping.
- Define the Selector (based on the Search option above). Select a text field type.
- You can have a script in a previous step and give a specific value to this field. (eg. #this.USR_SELECTOR# = “//*[@class=’v2-responsive-table__content v2-pav10′]//tbody/tr/td”)
- Select a memo user field as RPA Response to store the result of the RPA Web Scraper once this runs.
Find out more on how to create and manage workflows, including RPA components, and learn about all Comidor Workflow Elements.
