


With Comidor BPMN 2.0 designer, you can map and optimize every process that takes place in your company. Comidor provides a plethora of workflow components such as basic, integration, data, RPA, and code components to cover every possible need. Easily drag and drop any component, connect the elements between them to draw the alternative paths, and add any automation features like an automated email or an automated document creation.
To access Workflows, click on App Factory Icon > Process Automation > Process Designs.
Open a record, and click on the tab Design.
Workflow Components
Basic Components:
Comidor offers the following BPMN 2.0 basic workflow components:
-
- Tasks and escalations
- Subprocess
- SMS
- Notification
- Timer
- AND/OR/XOR gateways
- Annotation
- End
Integration Components:
Additionally, designers cover their integration needs with the following workflow components:
-
- RESTful Web Service
- OpenAI ChatGPT
- Message Queue
- Teams integration
- Google integration
- Zoho projects API
- Zoho leads API
- Freshdesk API
- Salesforce API
Data Components:
Designers use low-code data workflow components for data input and output.
-
- Comidor DATA (insert/update/delete)
- Shell Command
- File Reader
- Export Data
- Convert Data
- Digital Signature
- Document Creator
- QR Generator
- Table Extractor
- Excel Processor
- Graph Creator
- Blockchain
RPA Workflow Components:
Other workflow components can be added within the workflow design to enhance automation in business processes with RPA and ML/AI. Those components are:
-
- RPA Caller/ Receiver
- Sentiment Analysis
- Document Analyzer
- Text Classification
- Predictive ML
- Selenium RPA
- Image Classification
- Web Scraper
Code Components:
Users without development skills can add the following workflow code components into the workflow designs to replace commands and queries:
-
- Set values
- Existence check
- SQL Creator
- String Utilities
- JSON Array to Excel
- Deserialize JSON
- Custom Component
Let’s zoom in on each workflow component.
Basic Components
Task
In the Task component, add the Basic attributes:
- The title of the task, which is one of the required fields.
- The Parent Stage, refers to the stage of the parent process as soon as this step is fulfilled.
- The Assigner’s name (Assigned From), selecting from a list that includes Process Creator, Admin, Assignee’s Manager, or other users.
- The Assignee’s name (Assigned To), selecting from a wide list of options (Abstract Options: Creator or Personnel of Process, Creator’s or Personnel Manager, Creator’s or Personnel Default group from Organizational Chart/Users’ Groups, Creator’s or Personnel Default group – Leader, Creator’s or Personnel Default group – Parent Group, Creator’s or Personnel Default group – Parent Group Leader, Role associated with a specific Functional Group/Division/Company, Account’s Responsible or Pre-defined options: User(s) name, Group Leader name(s), Group names).
- The Form, where you connect any User Form (that is already created).

- Click on more options and more attributes are displayed:
- Complete the Start point, Endpoint, and Stage fields, and that information will be visible in the Business Process Guidelines of this task.
- Select the dynamic assignment option between users, groups, leaders, and excluding leaders.
- Dynamic assignment, select the next assignee from a list of assignee user fields(list free field that fetches users).
- Exception Assignees, where you define to whom the task will be assigned if other rules set above (group leader, role, etc) do not fetch any user.
- Option to Filter group assignments according to main process assignees, meaning that a selection of “Assigned to” will be filtered according to what is added in the Main Process “Assigned to” field.
- Task type (work, appointment, meeting, event, etc.).
- Define a user Activity related to this task.
- Parent Completion Percent (%) is the completion percentage of the parent process once the current activity is completed.
- Link this task with a Mobile form.
- File, where you attach a draft of a File already uploaded in Comidor.

In the Advanced tab:
-
- Define the RACI of the current task: Responsible user, Accountable user, Consulted user, and Informed user.
- This information is visible in the RACI report as well.
- Link one or more KPIs with this task. Select from the list and click Add. In the Connected KPIs, you see the linked KPIs and remove records if you wish.
- Approve/Reject Email Task in case you want this step to be completed via mail.
- In this case, you should define the Email Task body and the recipient in Addresses, either as a specific email address or in a text field of the workflow. You can also choose one or more binary fields to be sent as attachments in the task email.
- Do not display the default form option, the basic information of the task is hidden and by selecting a custom user form above, you show the user only the important information based on your design.
- Define the RACI of the current task: Responsible user, Accountable user, Consulted user, and Informed user.

Other attributes regarding the Scheduling of the task are:
- Scheduled Start Date, Scheduled End Date, and times: Change the Scheduling of this task, by defining the respective date and time workflow fields.
- Leave those fields empty if you wish the task to have a Scheduled Start Date the date of task creation.
- Activity boundaries by setting the Maximum days or Maximum hours of this task duration.
- Tip: In case you want to associate this task’s completion with the end of the whole workflow, you may put a negative numbering i.e. “-5” meaning 5 days before workflow completion.
- Mandatory task duration field, where you ensure that the user completes the actual duration before task completion.
- Priority and Importance of this task.

Work Practice: describe the Activity that should be performed. Add plain text or use an HTML editor.
- This information is visible in the task’s description and the Business Process Guidelines.

In the tab Attachments, designers upload one or more files that are related to this step. Anyone with access to the process design can view the attachments.

SubProcess
In the SubProcess component, you can fill in most of the fields (as explained in Task), but also the following:
- Type: Generic Process, Project, Opportunity, Event, Training, Issue, Ticket, Topic, Job Posting, Campaign, or any custom Application.

- Process type: refers to the Process Map Category selected.
- Workflow: a Call-Activity (another Workflow with other activities) creating a collapsed subprocess can be added here.
Connectors: Sequence/Conditional Flow
Through Conditional Flows, you connect your workflow elements (activities, gateways, or events) and design any possible/desired alternative path. For example, once a Task is created you should connect it with the previous element with a Conditional Flow. In the conditional flow form:
- Drag and drop a conditional flow from a Start Event to an Activity and select the Target State, which is the initial state of the target activity (state can be Scheduled or Running). Type a brief description of the conditional flow that will help users in understanding this part of the workflow.

- Drag and drop a conditional flow from an Activity/Gateway and select the Source State and Target State, which are the trigger state (can be completed/failed/cancelled) and impact state (can be scheduled/running/paused/completed/cancelled/failed), respectively.

- Conditions can be added in both cases from the Advanced Conditions tab/Custom condition builder. Add further conditions through a custom condition builder using either database system fields or any custom user fields you have created in User fields and have added in a User form.

- In more complicated workflows, there might be a need to combine and use more complex Advanced conditions. In these cases, the workflow will check more conditions as shown below. Click on icons “<“,”>” to add parenthesis before or after the condition you want, and select AND, OR between the conditions in each case accordingly. With the “+” and “-” button you add or delete a condition.

Once the above step(s) have been completed, a conditional flow with your brief description is added to your workflow design between the standard start event and the task you have created or between activities/gates.
Diamonds in the conditional flow refer to the Source state and arrows to Target State, blue: Running, green: Completed, black/white: Canceled, red: Failed, grey: Scheduled, and orange: Paused.
Email
The email component is a Throw – Message Intermediate Event. By using it, you send a custom email through each process that is related to the specific workflow. When adding an email element in workflows you can set:
- The Title, which is one of the required fields.
- The Parent Stage, which is the stage of the parent process as soon as this step is reached.
- The Variables, that will appear inside the body of the e-mail. For example, set a variable Key for the Title field of the Process, or another database or custom field. Then use the key of the variable in the email subject or body with ##. When the email is sent, the variable key will be replaced with the value of the field.
- The Sender, should be a predefined text and/or a custom text type field (probably already given in a custom form).
- The Subject, can be a predefined text and/or a custom text type field (probably already given in a custom form).
- Tip: in case of adding both predefined and custom text, the predefined text appears first and the custom one follows.
- The Email Body, may be a predefined text and/or custom memo-type field.
Tip: in case of adding both predefined text and custom memo, the custom memo appears first and the predefined text follows.

- For more advanced users: you can provide more details in your email body and create a paragraph, or just a sentence with data that were acquired during the process of creation. In particular, you may use the variables you have already set in a sentence with #key# as shown below. You can also apply HTML code for changing the size, the font, and the colors of your message.

- The Recipients as:
- Addresses that can be a predefined text with email addresses separated with a comma and/or one or more custom text type field(s) with email addresses.
- Emails of process-related people and/or roles. These people can be users involved in the workflow, users with a specific role(s), any other users, leaders of groups, or all the members of groups.
- The dynamic recipient option is also available. Select the dynamic assignment option between users, groups, leaders, and excluding leaders. Dynamic assignment, select the recipient from a list of assignee user fields(list free field that fetches users).
- Attachments as custom binary type fields, or a hardcoded file from your computer.
Emails are connected with other events/gateways/activities using conditional flow.
SMS
Send SMS Notifications in Workflows, provided you have an SMS service provider. Configure the following:
- The title, which is one of the required fields.
- The Parent Stage, which is the stage of the parent process as soon as this step is reached.
- Type the SMS Gateway URL, Username, Password, and API Key (authentication key), as provided by the Service provider.
- Your text is displayed as the Sender of the SMS and the Recipient’s Phone number.
- The Recipients, who can be users involved in the workflow, users with a specific role(s), any other individual users, leaders of groups, or all the members of groups.
- Also, type the SMS message in the Text message.

Notifications can be connected with other events/gateways/activities using conditional flow.
Notifications
Set System Notifications in Workflows defining:
- The title, which is one of the required fields.
- The Parent Stage, which is the stage of the parent process as soon as this step is reached.
- Variables that will appear inside the subject. For example, set a variable Key for the Title field of the Process, or for another database or custom field. Then use the key of the variable in the subject ##. When the notification is sent, the variable key will be replaced with the value of the field.
- The Subject, which can be a predefined text and/or a custom text type field.
- The Recipients can be users involved in the workflow, users with a specific role(s), any other individual users, leaders of groups, or all the members of groups. Limit the recipients’ list by adding a role.
- The dynamic recipient option is also available. Select the dynamic assignment option between users, groups, leaders, and excluding leaders. Dynamic assignment, select the recipient from a list of assignee user fields(list free field that fetches users).

Notifications can be connected with other events/gateways/activities using conditional flow.
Timer
You can use a Timer to add a delay in your workflow by completing the below basic fields:
- The title, which is one of the required fields.
- The Parent Stage, which is the stage of the parent process as soon as this step is reached.
- Define the Region from the list of available Regional Settings, to exclude non-working days and public holidays from the delay.
- The delay in days or hours, filling in the corresponding field.
- Alternatively, a specific date for the timer to wait or a Date field that is used within the workflow.

The Timer can be connected with other events/gateways/activities using conditional flow.
Annotations
With the Comidor BPMN 2.0 workflow designer, you can add comments to your design. This allows you to explain in detail what is the use of certain tasks or apply a description.
- Drag and drop the Comment element.
- In Your comments field, type your comment.

- If you wish, connect your comment with the desired component(s).

- In case you want to modify your comment, click on the pencil icon and proceed accordingly.
Integration Components
REST
When adding a RESTful Web Service define:
- The Title, which is one of the required fields.
- The Parent Stage, which is the stage of the parent process as soon as this step is reached.
- The URL of the resource.
- You can either add a hardcoded URL, or select a URL field from the list. Ensure the selected field has a value before sending the REST request.
- The Method, by selecting from GET, POST, or POST FORM.
- If you require certificates, please select the option and provide the paths for the private and public keys.
- The Request Header Parameters by giving the Parameter Name and its Value.

- The Request Body by specifying the Key and its Value as the run-time value of a custom field or predefined value.
Tip: By clicking on the “+” button you can add as many parameters or keys as required or needed.- Alternatively, you can add a JSON in the Free Text Request Body.
- The JSON response map by populating the Key and the respective custom Field.
- Alternatively, click the option Show Response Code, and assign a numeric field to store the Response Code and a memo/text field to store the Response Body.
- When you are building a workflow, make sure you use the response code as a condition and plan for all possible scenarios. For example, if the response code is 200, you can proceed to the next step. However, if the response code is not 200, you should add a notification and a timer to wait for some time before retrying the request. The workflow will loop, until you get a successful response. This will help you handle any happy or unhappy scenarios that may arise during your workflow.
- In case the response includes a file, specify the file name and choose a binary field to store it.

OpenAI chatGPT
Integrate ChatGPT and DALL·E into your business processes, by dragging and dropping the OpenAI chatGPT component from the Integration Components list to the workflow design. In the attributes pop-up form, define:
- The Title, which is one of the required fields.
- The Parent Stage, which is the stage of the parent process as soon as this step is reached.
- define the type:
- ChatGPT
- DALL·E
- For ChatGPT, choose the input; a text/memo field where the question is stored, and the Response; a memo field where the answer of the ChatGPT is saved (the previously created fields).
- define the type:
 For DALL·E, choose the input; a text/memo field where the image description is added, and the Response; a binary field where the produced image by DALL·E is saved.

Find out more on how to Integrate ChatGPT and DALL·E in your Business with Comidor here.
Message Queue
Read an existing Message Queue and create a new one within your workflows with the Comidor Message Queue element.

- Drag-and-drop the Message Queue element in the workflow design.
- Specify a Title for the component.
- Set the Parent Stage, which is the stage of the parent process as soon as this step is reached.
- In MQ type select MQ Reader if you wish to read an existing MQ
- Define the Host and Port where the MQ is stored in, and the Routing Key is the title of the MQ
- Add your credentials (Username and Password fields)
- In Write to: select a memo user field to store the Message Queue that will be read

- Alternatively, in the MQ type select MQ Writer if you wish to create a new MQ
- Define the Host and Port where the MQ will be stored in, and the Routing Key is the title of the MQ
- Add your credentials (Username and Password fields)
- In the Free Text Message Body type your Message that will be stored in the MQ that you have defined in the Routing Key above.
- You can also include values of fields (e.g. #app.USR_NAME# for app fields and #this.USR_NAME# for database/process fields)
- Alternatively, click the option Hardcoded Body. A new field appears to select the user field where you have set the Value with script in a previous step.
Teams Integration
With the Teams integration workflow component, create a new event in MS Teams Calendar.
- Simply drag and drop the Teams integration component in a workflow step and specify its attributes.

- Type the Authority, Client id, Secret and the Scope.
- Define the event description, date, and time, for the task to be created in Teams Calendar as well as the user’s email.
Google Integration
With the new Google integration component, designers send API calls to Google Calendar in order to create tasks and to Google Drive in order to upload files to a specific folder.

- Simply drag and drop the Google Integration component in a workflow design and choose the Google Drive API option in API type.
- Define the folder ID to store the file in Google drive, the file, and its name; choose workflow fields from the list.

- Simply drag and drop the google integration component in a workflow step, and choose the Google Calendar API option in API type.
- Define the event description, date, and time, for the task to be created in Google Calendar, as well as the email; choose workflow fields from the list.
Zoho Projects API & Zoho Leads API
Easily incorporate Zoho Projects & Zoho Leads APIs with Comidor’s drag-and-drop functionality.
- Integrate with Zoho Projects
- Integrate with Zoho CRM
FreshDesk API
- Integrate with Freshdesk ticketing system with the new Freshdesk API workflow component.
- Simply add the Freshdesk API component in a workflow step, define the API attributes, and the new ticket is created including the workflow data.
Salesforce API
Create and update records in Salesforce, with the new Salesforce API workflow component.
Data Components
Comidor Data (Insert/Update/Delete)
When adding a Comidor DATA object you can define:
- The Title, which is one of the required fields.
- The Parent Stage, which is the stage of the parent process as soon as this step is reached.
- The Action, by selecting among Insert, Update, Delete.
- The ID Field (Runtime Value)/Value.
- The Data Map parameters, which give the Field, Field (Runtime Value), and its Value.
Tip: By clicking on the “+” button, you add as many parameters or keys as required or needed.
- The Status and Message.

Shell Command
Include simple or more advanced scripts in your workflow with a Shell Command component:
- The Title is one of the required fields.
- The Parent Stage is the stage of the parent process as soon as this step is reached.
- The Shell Type, select between Unix (sh), Windows (cmd), Windows (Powershell), Platon script, and Sikuli script.
- The Shell Script Variables, give the Key, the Field (Runtime value), and its Value.
Tip: By clicking on the “+” button you can add as many keys as required or needed. - The Shell Script Body text.
- The Shell Response.

File Reader
With this component, Comidor enables users to check the existence of a file in a particular path and store it in a binary file.
- Specify a Title for the component.
- Set the Parent Stage, which is the stage of the parent process as soon as this step is reached.
- In Layout, there are 4 options:
- choose Read file.

- Type the exact File Name with its extension.
- In Read From Path, select the path in which the file is stored.
- Click on the “Check Only File Existence”, if you do not need this file to be stored inside the workflow.
- Alternatively, Save to File, to select a binary field from the list where the file will be stored within the workflow.
- You can create a text field and set it as the Response field, to see the response of this component.

Secondly, users import data from a file, either from a specific path or from a binary field that is used within the workflow in a previous stage.
- In Layout, choose Import Data.
- Type the exact File Name with its extension.
- In Read From Path, select the path in which the file is stored.
- Alternatively, in Read From File, select the name of the binary field where the file is stored in.
- In Entity, define in which table you wish the data of the file to be imported (Units, Apps).
- In case you select Processes you should also define the Internal Type (General, Project, Issue, etc.).
- Define the Start to read from row No.
- Define if the CSV file Delimiter is a semicolon or comma.
- Set the Date, Time, and Number Format if you have those types of fields in the file.

- In Before Save Script, you can type any additional scripts you wish to execute before the completion of the File Reader component.
- Then, correlate the fields from the Table you have chosen with the respective columns of the CSV file.
- You can also create a text field and set it as the Response field, to see the response of this component.
Finally, there are 2 more options:
- Read text from File – use this layout when you want to upload a binary field and store its content in a memo field.
- Save text of File to: select a text/memo field to store the text of the binary file in
- Read text from File: select the binary field that you want to be read

- Read text from URL– use this layout when you want to read a file from a URL and store its content in a memo field.
- Save text of File to: select a text/memo field to store the text of the URL file
- Read text from URL: select the text field that the URL will be typed so it can be read
Export Data
With this element, users can export any data from a workflow to a CSV file and make their own reporting.
- Specify a Title for the component.
- Set the Parent Stage, which is the stage of the parent process as soon as this step is reached.
- In Entity define the table of which you wish the file data to be exported (Units, Apps).
- In case you select Processes you should also define the Internal Type (General, Project, Issue, etc).
- Select the fields you wish to be exported and displayed in the CSV file as columns.
- Type the conditions that you want to be met in your export in Where Condition.

- In Export Path, select the path that you wish the file to be stored in.
- Alternatively, in Binary, select the name of the binary field that you wish the file to be stored in.
- Give a File Name to the exported CSV.
- You can also create a text field and set it as the Response field, to see the response of this component.
Convert Data
With the Convert Data component, you can convert an excel file to CSV format and store it in a User field inside a workflow. Define the binary field, where you will upload the file, and a memo field where the content of the CSV file will be visible at.
- Specify a Title for the component.
- Set the Parent Stage, which is the stage of the parent process as soon as this step is reached.
- In Converted Type select Excel to CSV.
- In the field Convert From select the binary user field where you will upload the Excel file.
- In the Convert To: define the memo user field where the CSV will be displayed in.

Digital Signature
- Drag and drop the Digital Signature in the workflow pool.
- Specify a Title for the component.
- Set the Parent Stage, which is the stage of the parent process as soon as this step is reached.
- Signature Document: choose the binary field, where the user will upload the document in PDF format without signatures. After the digital signature component runs, the selected binary field will store the PDF document with the signature included.
- Select which Model you would like to run at this step, from the list of the Signature Models that you have already created.
- User’s Signature: choose which user’s signature you want to add to your document.
- Signature position at Document: refers to the number of the signatures that you need to place in your document (e.g. 1, 2, etc.).

Document Creator
Create invoices, reports, or other types of documents by combining a file template format and fields of the workflow.
- Specify a Title for the component.
- Set the Parent Stage, which is the stage of the parent process as soon as this step is reached.

- Set a Template File for your document either in a Form, or upload it in a step of the workflow in a Binary Field, or give the Template Name of a file stored in DMS.
- Form: Select the User Form in which you have uploaded the Template Tile. (fixed template scenario)
- The Template file should be either .docx or .xlsx.
- The produced file can be either .docx, .xlsx, or .pdf.
- Apply format options in your template such as font colour, size, alignment, number format, etc. and they will be captured in the produced document.
- Form: Select the User Form in which you have uploaded the Template Tile. (fixed template scenario)

-
- Binary Field: Select the binary field in which the Template File will be uploaded during the workflow. (dynamic template scenario)
- Template Name: Type the name of a file stored in DMS. Keep in mind that this file should be linked with the Account of the process in order to be used as a template file.
- Define the Variables being used in the Template File by providing the Key and its Value, as the run-time value of a custom field or predefined value.
- Set the binary field in which you wish to save the Response document.
- Check the option Return PDF if you wish the produced document to be in PDF format.
- In Status you can add a text field, to see the response of this component.
QR Generator
With the workflow component QR generator, designers generate QR codes with data defined from the workflow with no-code.
Drag and drop the QR generator component into the design and add it to a workflow step.

- Define the following:
- Check the Dynamic field option and choose a text field from the list in the input.
- Alternatively, leave it unchecked and type your input if you want to add hardcoded text.
- The produced QR code is stored in a binary workflow field in .png format. Define the desired binary in the Response.
- Display the QR code in the main process form, either as an attachment of an email triggered by the workflow or as part of a produced document from the document creator component.
Excel Processor
Use the RPA Excel Processor element to parse a big excel file or a part of it, and capture values of certain cells into user fields or a whole area and depict it in an excel type user field.

- Drag-and-drop the RPA Excel Processor element.
- Specify a Title for the component.
- Set the Parent Stage, which is the stage of the parent process as soon as this step is reached.
- Select a binary field in the Excel Document – the document that you have uploaded in a previous stage.
- Define the Action you wish the Excel Processor to perform from the following:
- Parse Excel – use this action to return values of cells or an entire area of the excel and store it in user fields.
- Get No of Sheets – this action is useful for large excel files with multiple sheets. The response will be the number of sheets in the uploaded excel.
- Find in Sheet – use this action when you want to find a certain value in the excel. Define the Search Index.
- Find the row in Sheet – use this action when you wish to find a specific value in the excel and get the entire row as a response.
- Check the option Create Excel From Uploaded when you want to define an area of the excel to be saved in an excel type field. The fields Read uploaded from (row), Read uploaded to (row), Read uploaded from (column), Read uploaded to (column), and Produced Excel Field appear.
- In Assign to user fields map the user fields with the cells. E.g. if you want to display B2, type in Index r1c1.
- Select a memo user field to store the Response Field after the RPA Excel Processor runs.
RPA Components
RPA Caller/ Receiver
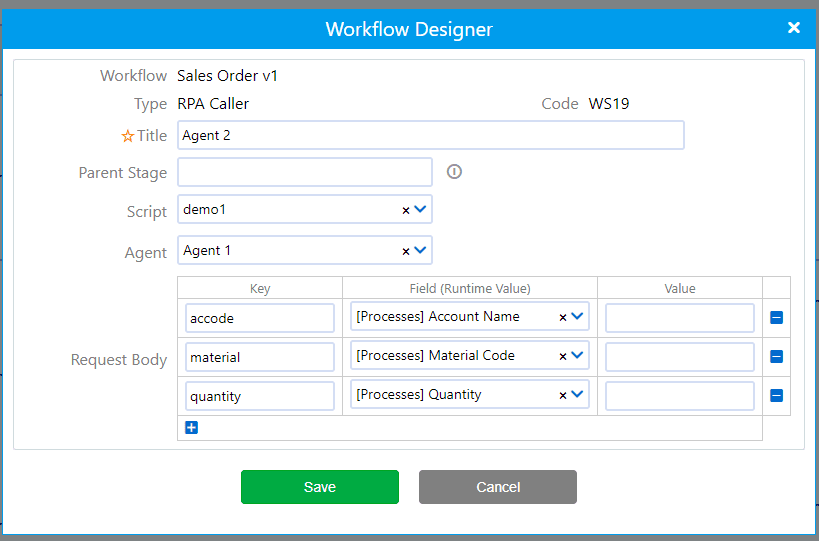
With the Comidor BPMN 2.0 workflow designer, users can involve RPA agents within their processes. Add an RPA Caller in various steps of the workflow design, to send data from the workflow and perform a series of repetitive actions in the 3rd party system, or an RPA Receiver to perform actions and receive data from other systems in Comidor workflow fields.
RPA Caller
- Specify a Title for the component.
- Set the Parent Stage, which is the stage of the parent process as soon as this step is reached.
- Select which Script to run at this step, from the list of RPA Scripts that you have already created.
- Select which Agent to run at this step, from the list of RPA Agents that you have already created.
- Define the Request Body by specifying the Key and its Value as the run-time value of a custom field or predefined value.

RPA Receiver
- Specify a Title for the component.
- Set the Parent Stage, which is the stage of the parent process as soon as this step is reached.
- Select a user field to store the RPA Response after the RPA runs.

Sentiment Analysis
Use the Sentiment Analysis element in a workflow to identify and categorize opinions expressed in a text field of a workflow, and determine whether the writer’s attitude is positive, negative, or neutral.

- Specify a Title for the element.
- Set the Parent Stage, which is the stage of the parent process as soon as this step is reached.
- Select which Model you would like to run at this step, from the list of the Sentiment Analysis Models that you have already created.
- Define the field in which the Sentiment analysis should be performed (Sentiment Analysis Field).
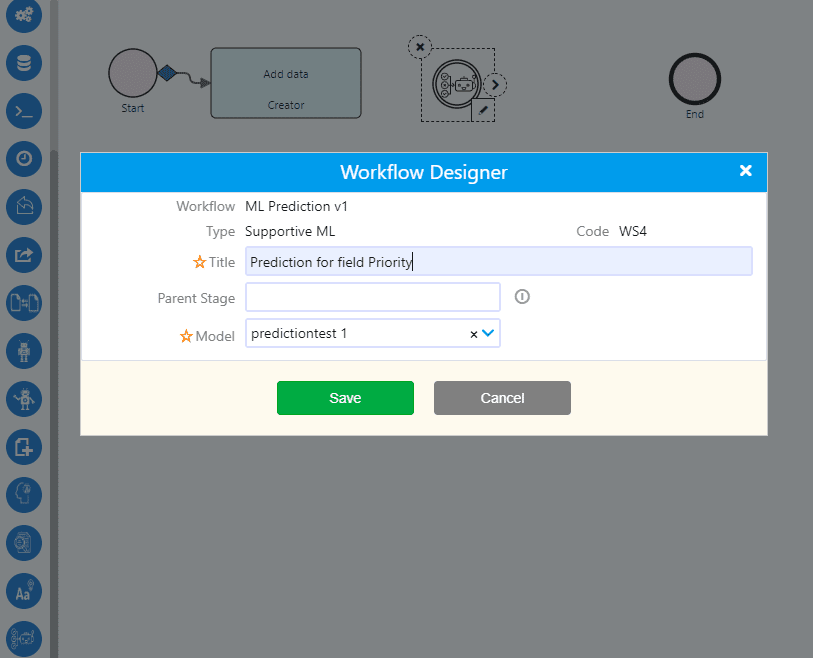
Supportive ML
Add a Supportive ML in the workflow design, to trigger an ML Predictive Model and get a prediction for the Target Field of a workflow.
- Specify a Title for the component.
- Set the Parent Stage, which is the stage of the parent process as soon as this step is reached.
- Select which Model you would like to run at this step, from the list of the ML Predictive Models that you have already created.

Document Analyser
With Comidor Document Analyser Models, enterprises scan documents, e.g. invoices, and create digital copies. The text that is extracted from the document is saved in a text field and can be used within any workflow.

- Specify a Title for the component.
- Set the Parent Stage, which is the stage of the parent process as soon as this step is reached.
- Select which Model you would like to run at this step, from the list of the Document Analyser Models that you have already created.
- Document Analyzer Field: the binary field for the file you wish to analyze.
- You can create a text field and set it as the Response Field, to see the response of this component.
Text Classification
Add a Text Classification to classify the selected Target field based on the ML Text Classification Model.
- Specify a Title for the component.
- Set the Parent Stage, which is the stage of the parent process as soon as this step is reached.
- Select which Model you would like to run at this step, from the list of the ML Text Classification Models that you have already created.
- You will also see the Target field and the Training fields that were selected in the ML Text Classification Model in view-only mode.

RPA Selenium
Use an RPA Selenium in your workflow to replicate repetitive manual steps. Use unique CSS Selectors for specifying each element.

- Drag-and-drop the RPA Selenium element in the workflow design.
- Specify a Title for the component.
- In the Bot Actions table, define all the actions that you wish the bot to execute step-by-step:
- Go to URL: use this action to define the URL that the bot should browse.
- Sleep: use this action to determine how many seconds should the bot wait until the next action. This depends on the loading time of each website.
- Wait for element: use this action when you are not certain of how many seconds the bot should wait for an element to be displayed.
- Click: use this action to define where the bot should click.
- Input-Put: select this action when you wish to add value to a specific element. Specify the unique id of the element in “Value 1” and the value of the field in “Field(Runtime Value)”
- Input-Get: select this action when you wish to get the value of a specific element. Specify the unique id of the element in “Value 1”.
- Select a user field to store the Response Code after the RPA runs. If you have used more than one “Input-Get” all the values are stored in the response field, separated with commas.
Image Classification
Use one or more Image Classification components in your workflow to specify images to be found within documents.
- Drag-and-drop the Image Classification component in the workflow design.
- Specify a Title for the component.
- Set the Parent Stage, which is the stage of the parent process as soon as this step is reached.
- Define the binary field that you wish to be scanned in the Template File.
- Upload the Wanted Image in png which you want to be found in the template file.
- Specify the Response field to store the outcome of the image classification.
- In case the wanted image is found in the Template file, the response field gets the Actual value
- In case the wanted image is not found in the Template file, the response field shows -1.

Web Scraper
Use an RPA Web Scraper in your workflow to find information in a selected area of a website and store it inside user fields.

- Drag-and-drop the RPA Web Scraper element in the workflow design.
- Specify a Title for the component.
- Set the Parent Stage, which is the stage of the parent process as soon as this step is reached.
- Define the URL that you wish to be scrapped. Select a text field.
- Choose the Search selector from the variety of options (xpaths, class, id, etc) based on the website you are scrapping.
- Define the Selector (based on the Search option above) Select a text field.
- You can have a script in a previous step and give a specific value to this field. (e.g. #this.USR_SELECTOR# = “//*[@class=’v2-responsive-table__content v2-pav10′]//tbody/tr/td”)
- Select a memo user field to store the Response Field after the RPA runs.
Code Components
Set values
One of the available code components is the Set values, where Comidor enables users to assign values to specific fields. For example, you can give to a date field the value of the current date (#DATE#), make a calculation, define a value (make a checkbox checked, or give an option in a key-value list type field), etc.
- Specify a Title for the component.
- Set the Parent Stage, which is the stage of the parent process as soon as this step is reached.
- In the Data map, define the fields of the workflow and the values you wish to assign to them.
- Click on the + icon to map more fields
- Click on the – icon to remove a row.

Existence check
With the Existence check component, Comidor enables users to check if a record exists in a particular Comidor application. For example, you can check the existence of a contact or an account based on a defined condition (e.g. email).
- Specify a Title for the component.
- Set the Parent Stage, which is the stage of the parent process as soon as this step is reached.
- Define in which Entity you want to search in if a record exists. Choose from the list of all Comidor applications.
- Write the Condition of your query (as if you would write it in a script)
- Choose a Response field to store the response of the check existence code component.
- If you receive value 1, the system has found at least one query result
- If you receive value 0, the system has not found any query result
- You can use the response field in the workflow conditions to activate an alternative flow.

SQL Creator
Another code component is the SQL Creator component, which enables users to produce or execute database queries. For example, you can run an insert query in a specific table (e.g. Contacts). The SQL Creator component supports the statements: Select, Insert, Update, and Delete.
- Specify a Title for the component.
- Set the Parent Stage, which is the stage of the parent process as soon as this step is reached.
- Type: define the kind of operation/statement you want to perform. Choose between the Select, Insert, Update, and Delete options.
- Action: choose between:
- Produce query – the component forms the statement and writes it on the Statement field so that the user runs it on a DB
- Execute query – the query is executed and the results (in case of selection) are shown on the Results field
- Advanced Query: if checked, the advanced query text area is displayed and the users write the query to be executed by themselves
- Recommended for complex queries which cannot be specified otherwise
- Define in which Table you want to search in if a record exists. Choose from the list of all Comidor applications.
- Choose fields: the field (select one field of the table) Value (select an app/process field)
- in case of insert: the entity which will be inserted has the value to the respective field
- in case of update: similarly for the entity which will be updated
- in case of select: the field of the first row of the results is stored to the Value
- Click on the + icon to add more fields to your query.
- Click on the – icon to remove a row.
- Write the Condition of your query (as if you would write it in a script)
- Order by: in the first row select the field which will sort the results, and in the second, specify if the sorting will be ascending or descending.
- Choose a Results field to store the response of the code component.

String Utilities
Drag-n-drop the String Utilities code component into your workflow to perform common functions for a string variable (text field). Currently, the String Utilities code component supports the Index of and the Substring methods.
By using the Index of method, the user identifies the position of the first character of a string inside another. It is also a way to actually check if a character or a string exists in another.
The Substring method enables the user to get a part (substring) of a string(text) by defining the start and the end positions.- Specify a Title for the component.
- Set the Parent Stage, which is the stage of the parent process as soon as this step is reached.
- Select a string field: the text or memo type field to run this code component.
-
- Index of
- Substring
- Determine the Function Parameters:
- Value to be found – for Index of: define the value of a field(runtime value) or a hardcoded value to be found in the string field selected above.
- Start index – for Substring: add a value of the character position to start the substring
- End index – for Substring: add a value of the character position to end the substring
- Choose the Result field to store the response of your function.

JSON Array to Excel
One of the code components that allows you to get values from a JSON is the JSON Array to Excel. Add this code component into your workflow, get values from a JSON array and give its values to an excel type user field.

- Give a Title to the component.
- Set the Parent Stage which is the stage of the parent process as soon as this step is reached.
- Choose the memo/text field that contains the JSON array in the Input.
- Define from the list of user fields the excel type field to store the Output.
- Choose the Result text field to store the response of the code component.
- The response will be “Error” or “Successful”.
Deserialize JSON
Drag-n-drop the deserialize JSON code component into your workflow, get values from a JSON object, and give its values to certain fields. Comidor enables users to map the keys of a JSON object with application fields and assign its values to them.
- Give a Title to the component.
- Set the Parent Stage which is the stage of the parent process as soon as this step is reached.
- Choose the memo/text field that contains the JSON object you want to deserialize.
- Map the JSON keys with fields in which the values of the corresponding keys will be stored.
- Click on the + icon to add more keys
- Click on the – icon to remove keys.
- Choose the Result text field to store the response of the code component.
- The response will be “Error” or “Successful”.

Custom Component
Comidor workflow customization options are now limitless through the custom components building. Developers can upload their own plugins for custom code to perform any advanced functionality they wish.
My plugins table
Manage all your plugins in the My Plugins table and add new code for your custom components by defining the class name and uploading a jar file (code in Java). Only system administrators have access to this unit from the System Administration menu icon> My Plugins.

Drag-n-drop the new Custom Component in any workflow, and choose which plugin to run. The response of your plugin can be stored in an app field and used in your workflow.
- Give a Title to the component.
- Set the Parent Stage which is the stage of the parent process as soon as this step is reached.
- Choose the Plugin from the list. Here you will be able to view all the plugin records that the system administrator has created in the “My Plugins table”.
- Choose a text field in the Output field to store the response of the code component.

Find out more on how to include Code components in your workflows.
Find out more on how to create and manage workflows step by step.
