Comidor Leads Unit offers you a dedicated area to your leads for exploiting your chances to convert them into valuable clients. In addition to the basic actions which are available to every table & record in Comidor (print, export to xls, follow, tags, link, etc.), unique options have been added in order to support you on taking care of your leads in an optimal way. Monitor and filter your leads and receive automated e-mail and SMS notifications to be notified immediately as soon as a lead was generated from your website or any other source.
Create a Lead
- Go to Packages > Sales Automation > Leads.
Click ‘+’ at the top right of the screen, in order to open the Create Form.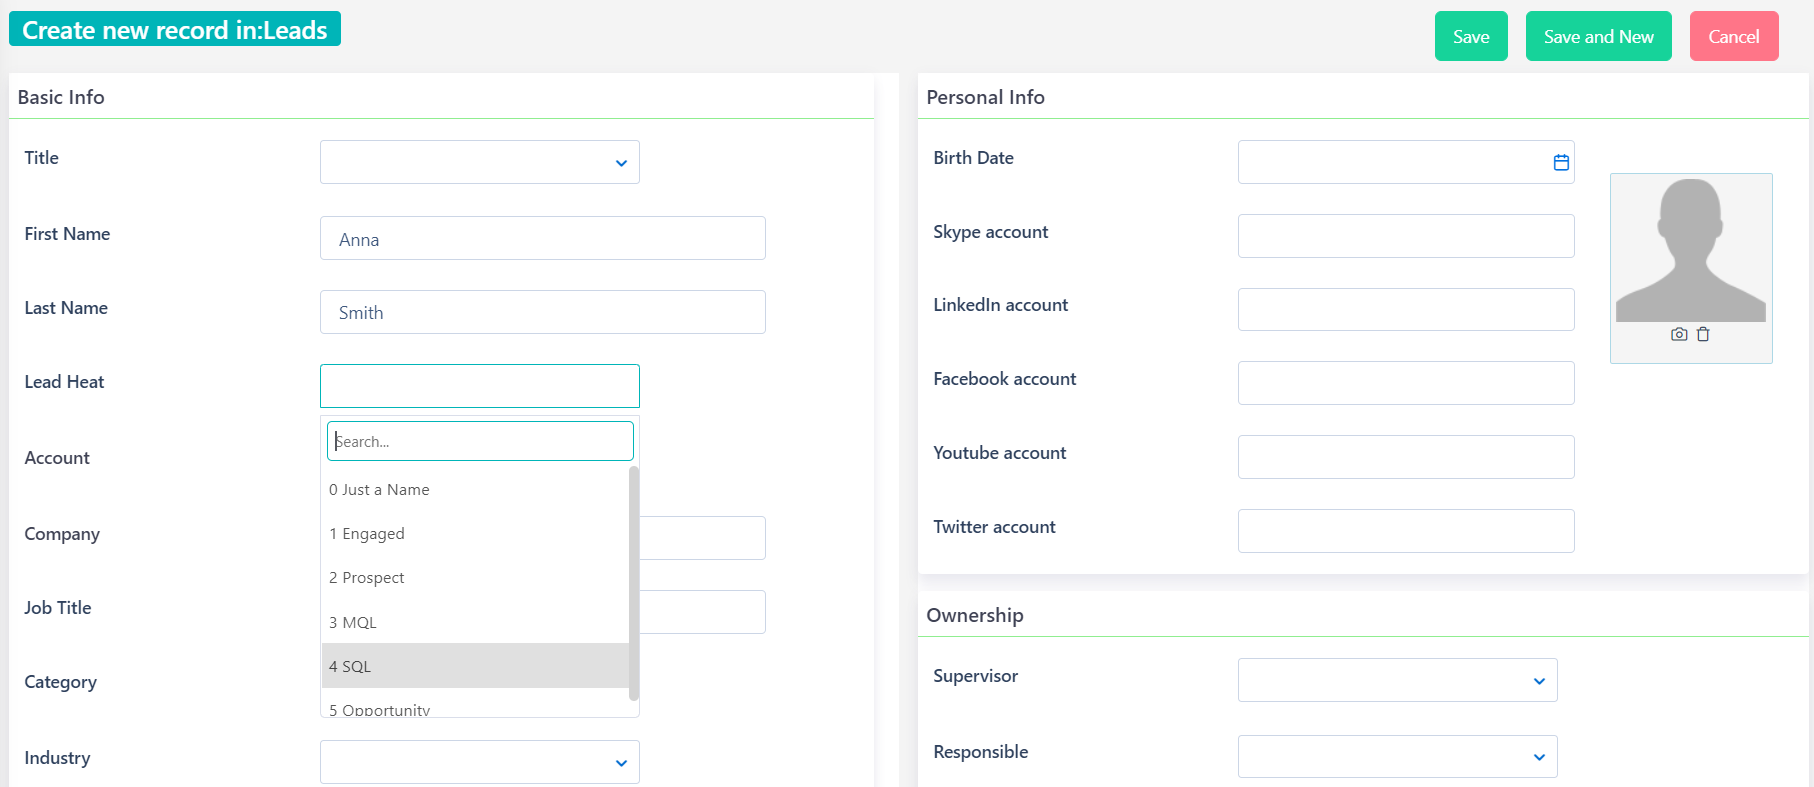
- Then, fill in the Basic Info of the Lead. Lead Heat is the state of engagement of the lead. Select:
-
- 0 Just a Name when the only information that you have for the Lead is the name of it.
- 1 Engaged when the Lead tried to communicate with the company (e.g. phoned or sent e-mail).
- 2 Prospect when the lead shows more interest.
- 3 MQL (Marketing Qualified Lead) if the marketing department of the company communicates and gives more information to the Lead.
- 4 SQL (Sales Qualified Lead) when you make an offer to the Lead.
- 5 Opportunity when the lead becomes a probable customer and Create an Opportunity for the specific lead.
- Also, link your Lead with an already existing Company (Account).
- Fill in his or her Job Title description.
- Select Category: Search for a Process Category and select it or add a new one. See how to add Categories in Data Management.
- Link your Lead with the product that the Lead is interested in.
- Make sure that you fill in the Demo Date when the company shows the demo of the product to the specific Lead.
- If your product is software don’t forget to fill in the Registration Date.
- At last, Lead source is the person or the site from whom/which the company was informed about the Lead.
-
- Then, fill in the Contact information.
You can also write the Address information.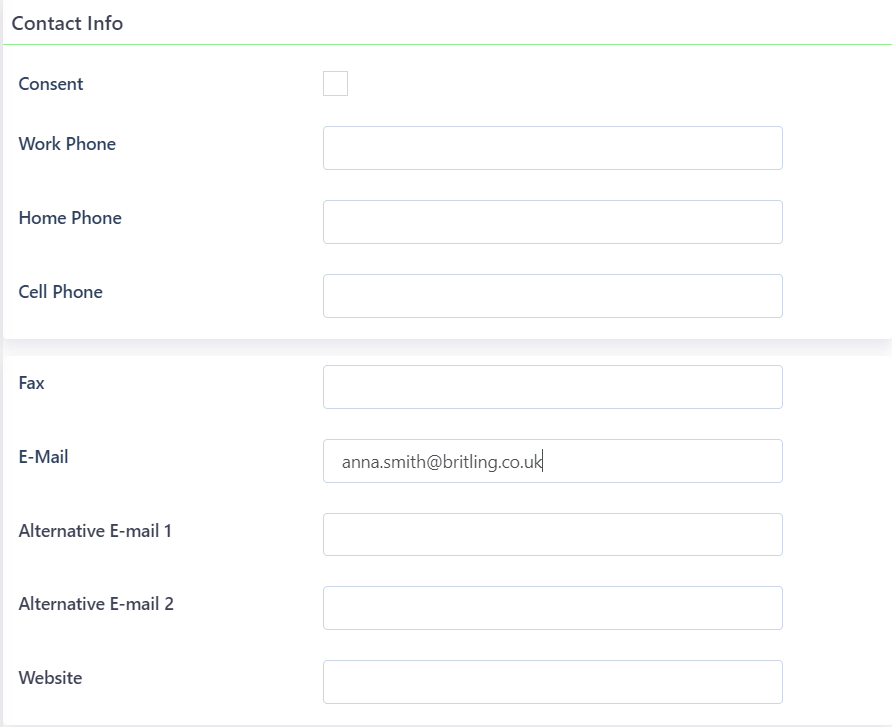

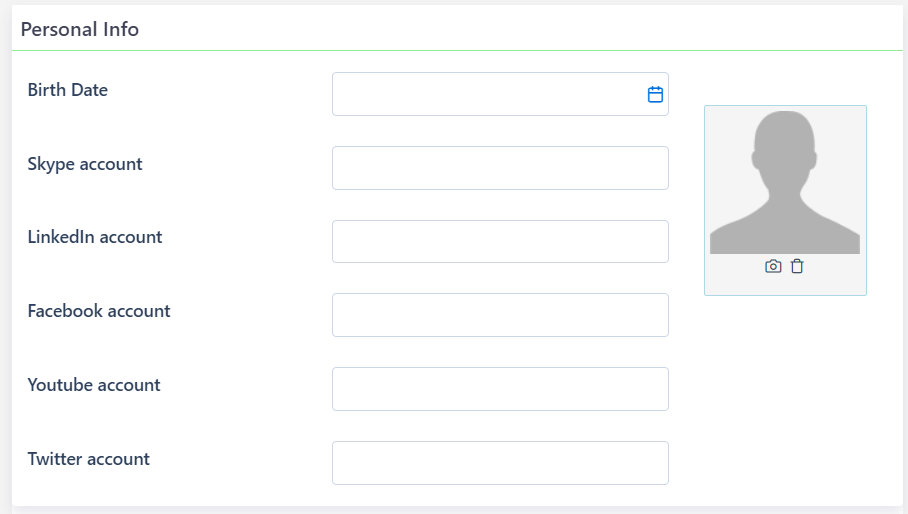
- Additionally, complete some extra personal information for the Lead.
- Click on the camera button to upload a photo for the Lead or on the bin to delete an uploaded photo.
- Choose the Ownership of this Lead among the Users.
- The supervisor is the superior of the Department.
- The contacts’ Managers are the persons who are responsible for this Lead.
- Use the Description Box to write down any other information for the Lead.
- Finally, click on:
- Save, or Save and New to save the Lead and open the Create Form for a new Lead.
- Cancel to erase all the information and close the create form without saving.
View a Lead
- Go to Packages > Sales Automation > Leads.
- Click on a Lead to view its Details.
View the Summary of the Lead. 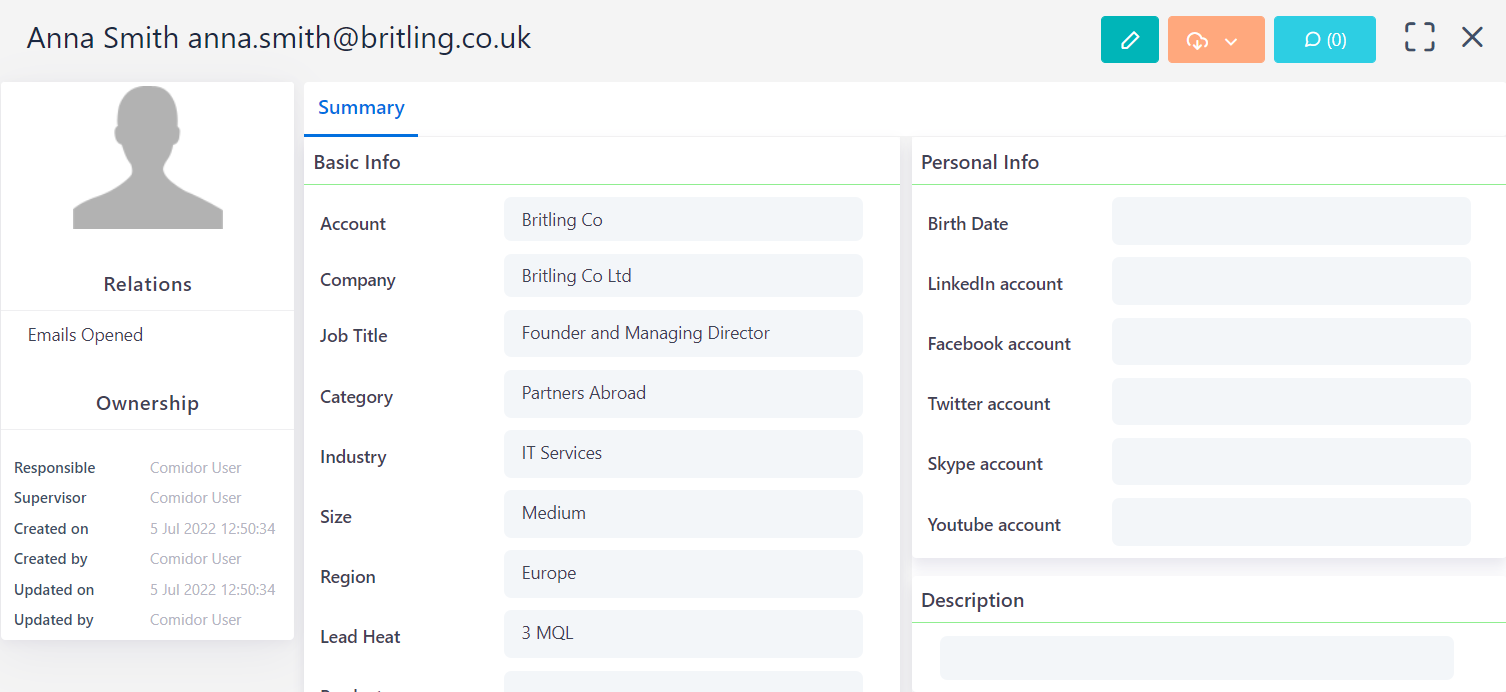
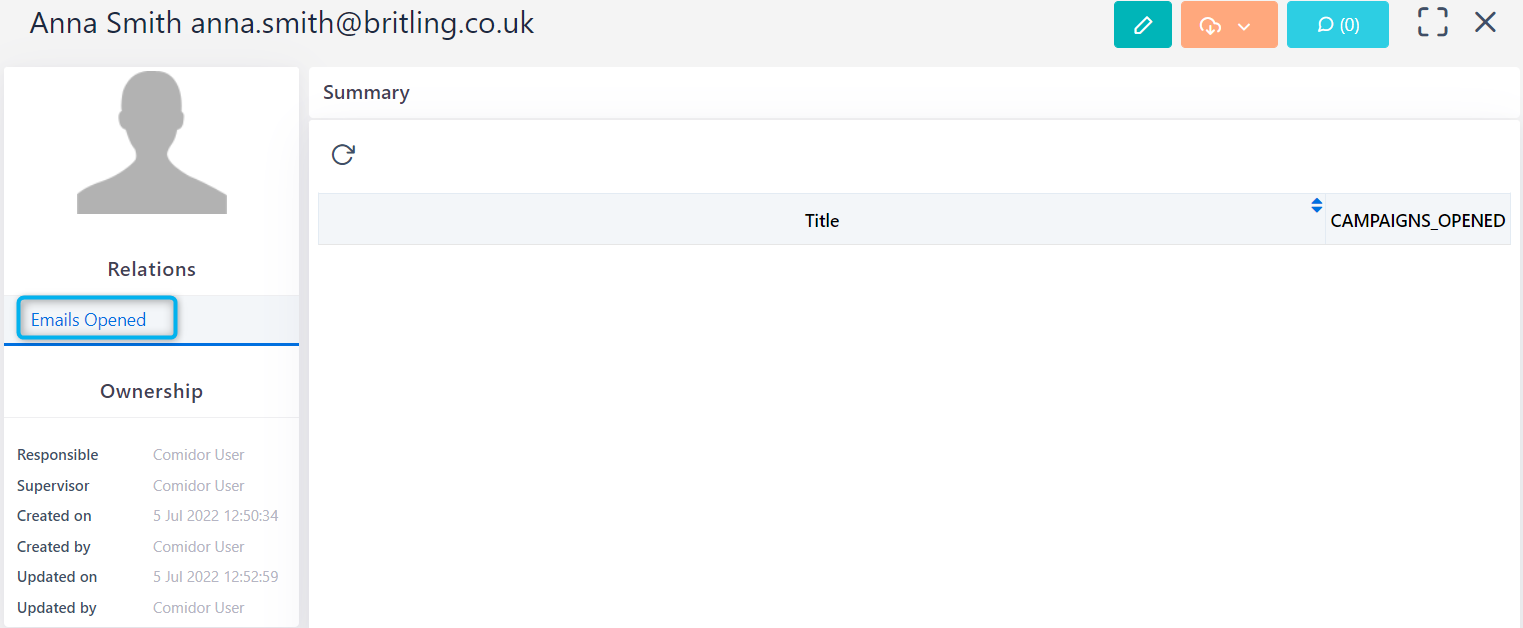
- If you have sent an email to this Lead through a Campaign, press Emails Opened to view all the campaign results.
- Click on a campaign to open the aforementioned campaign process.
- Click on a campaign to open the aforementioned campaign process.
- Click on Links to add a new Link between this Lead and any other Comidor entity e.g. a Project, an Event, etc. Already added Links can be found on here, such as all communication messages that refer to this Lead’s e-mail and have been held through the company’s mail account, any related Projects, Files, etc.
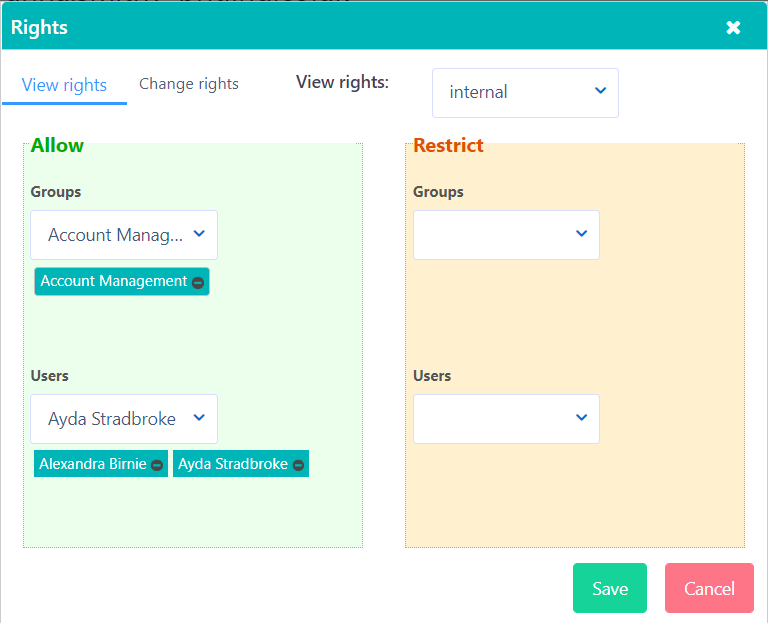
- Moreover, you can change View and Change Rights in a Lead by pressing on Rights. When selecting the View Rights tab, you can choose to give access to a group that you are a member of or select multiple groups and /or users from Allow options on the left side of the pop-up box. On top of that, you can Restrict specific users or groups from viewing this Lead, too.
- When selecting the Change Rights tab, you can choose to allow change of a Contact from a group that you are a member of or select multiple groups and /or users from Allow options on the left side of the pop-up box. On top of that, you can Restrict specific users or groups from viewing this Lead, too.
Convert a Lead to Account/Contact
- Go to Packages > Sales Automation > Leads.
- Click on the Lead you wish to convert.
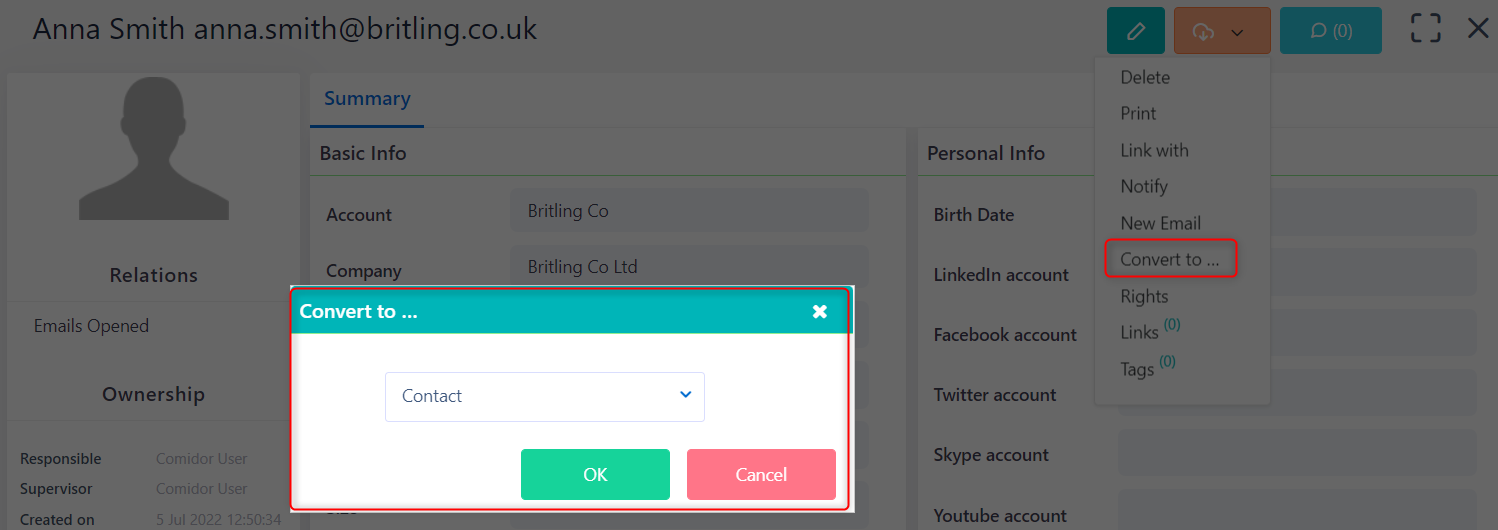
- Click on Convert to button from the action icon at the bottom right of your screen and select one of the options of the list.
- A pop-up window appears. Select Convert to a new account to change the specific Lead to an account with all the information of the Lead. Click on Ok to proceed or close the window.
- Moreover, you can Convert to Contact of a New Account to create a new account. In particular, change this lead to contact and link the created contact with the new account. A pop-up window appears. Fill in the information of the New Account and click on Save to proceed or close the window.
- Select Convert to Contact of an existing Account to change the Lead to contact and link it with an existing account. A pop-up window appears. Search for the Account and click on Save to proceed or close the window.

Add a Task in a Lead
Tasks setting is necessary in order to allocate work in multiple people and groups. Create a Task by clicking on the ‘+’ at the bottom right of the Lead. As a result, you will be transferred to create a new Task Tab. There, you can complete all the required fields.
- Click on an existing task to enter and monitor it from this point.
 Discuss for a Lead
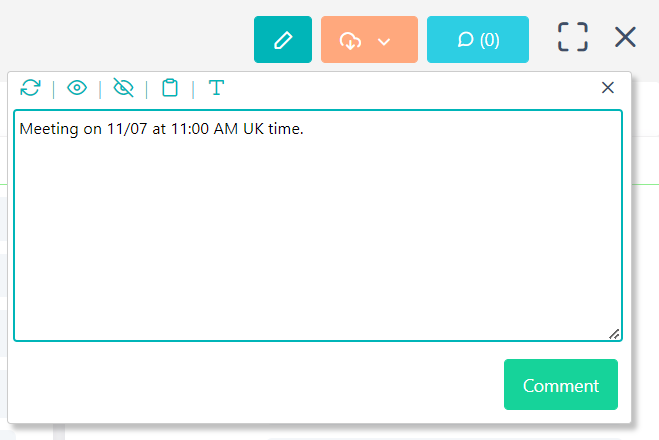
All the Users that have access to Leads Unit of Customer Relations package can read any discussion that occurs inside that Lead in Comments.
- Anyone who has access in this Lead will be notified upon the specific Lead.
They can click on Refresh to see new comments; click on Show More or Show Less to see the number of comments they wish. Also, they can write a note and click on Comment to see it added.
Edit & Manage a Lead
- Go to Packages > Sales Automation > Leads.
- Click on the Lead you want to edit to open it.
- Click on the Edit Button to open the Edit Form.
- Edit the information you want and click on:
- Save to save the changes and close the Edit Form.
- Cancel to erase all the information and close the edit form without saving.
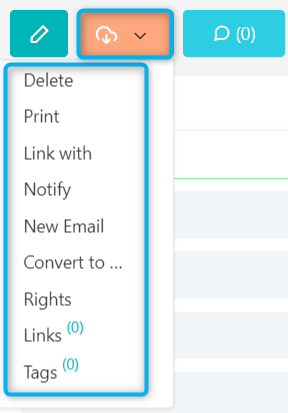
- Click on the Actions Button in the Lead and a list of options appears. Then, click on: Delete to Delete a Lead.
- Print to open the Lead in a new tab so that you can print it. Follow your browser’s default printing procedure.
- Link with to Link the Lead with other entities.
- Notify to notify specific Comidor groups or Comidor users or external recipients via email (Notifications).
- New Email and therefore automatically the New Email Form will be opened to compose an email to this Lead.
- Users can either Convert the specific Lead to contact with all the information of the Lead or to account.
- After you convert the Lead to either a(n) contact or an account you can no longer view it in the leads unit.

- After you convert the Lead to either a(n) contact or an account you can no longer view it in the leads unit.
Managing a Group of Leads
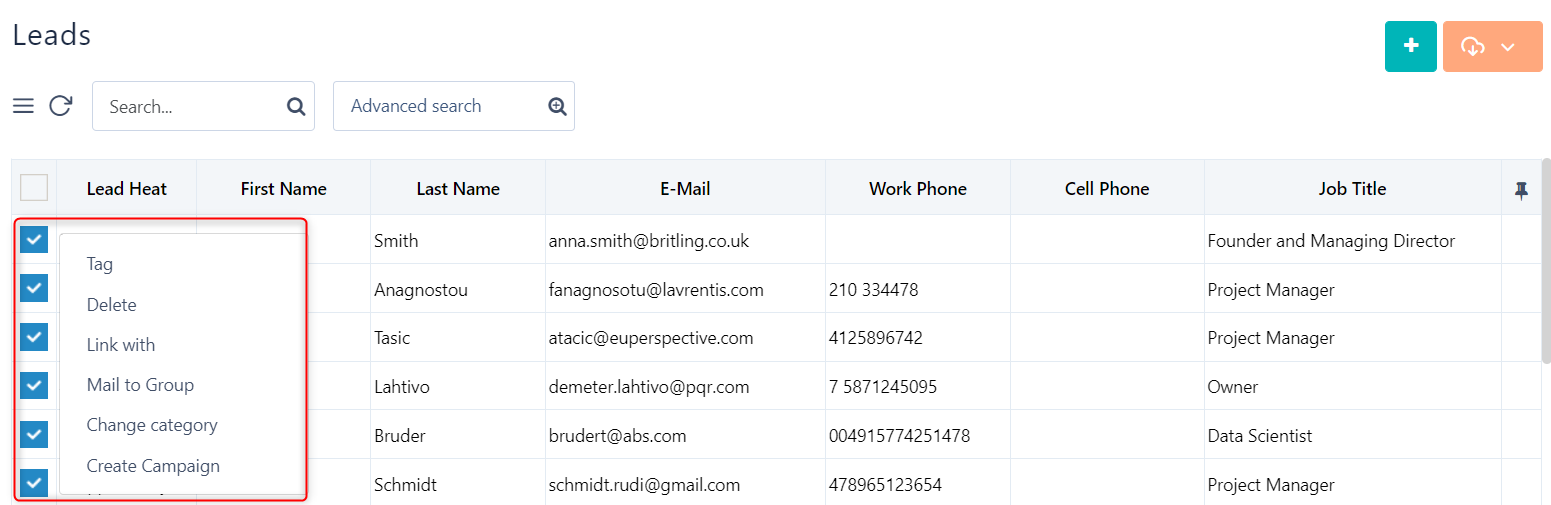
- Go to Packages > Sales Automation > Leads.
- Click on the Check Boxes of the Leads you want to manage and a list of options appears. Choose between:
- Tag, if you want to Give a tag on this Lead.
- Delete to delete these Leads.
- Link with to Link the Leads with other entities.
- Mail to Group to send a unique Email to each one of the checked Leads.
- A pop-up window appears. The From field will be automatically completed.
- Choose a template from your saved emails.
- Set a Subject for your message.
- Write your message (HTML Editor).
- Also, you can attach a file if you wish.
- Click Send to send the Email or Cancel to return to the table of Leads or close the window.
- Choose Change Category, in order to change the category of the specific Leads.
- A pop-up window appears. Select the category you wish and click on Ok to save the changes or close the window.
- At last, choose Create Campaign to create a campaign for the specific Leads.
- Hence, a pop-up window appears. Set a title for the campaign. Select between or add the Category, Type and Media of the campaign (Data Management). Click on Save to save the campaign or on Cancel to go back to the table of Leads or close the window.
- Hence, a pop-up window appears. Set a title for the campaign. Select between or add the Category, Type and Media of the campaign (Data Management). Click on Save to save the campaign or on Cancel to go back to the table of Leads or close the window.
Lead Actions
- Go to Packages > Sales Automation > Leads.
- Then, click on the Actions Button in the Table of Leads and a list of options appears.
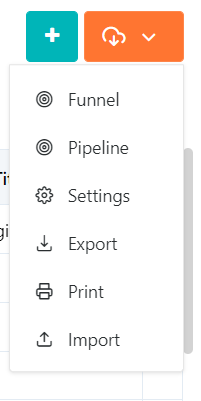
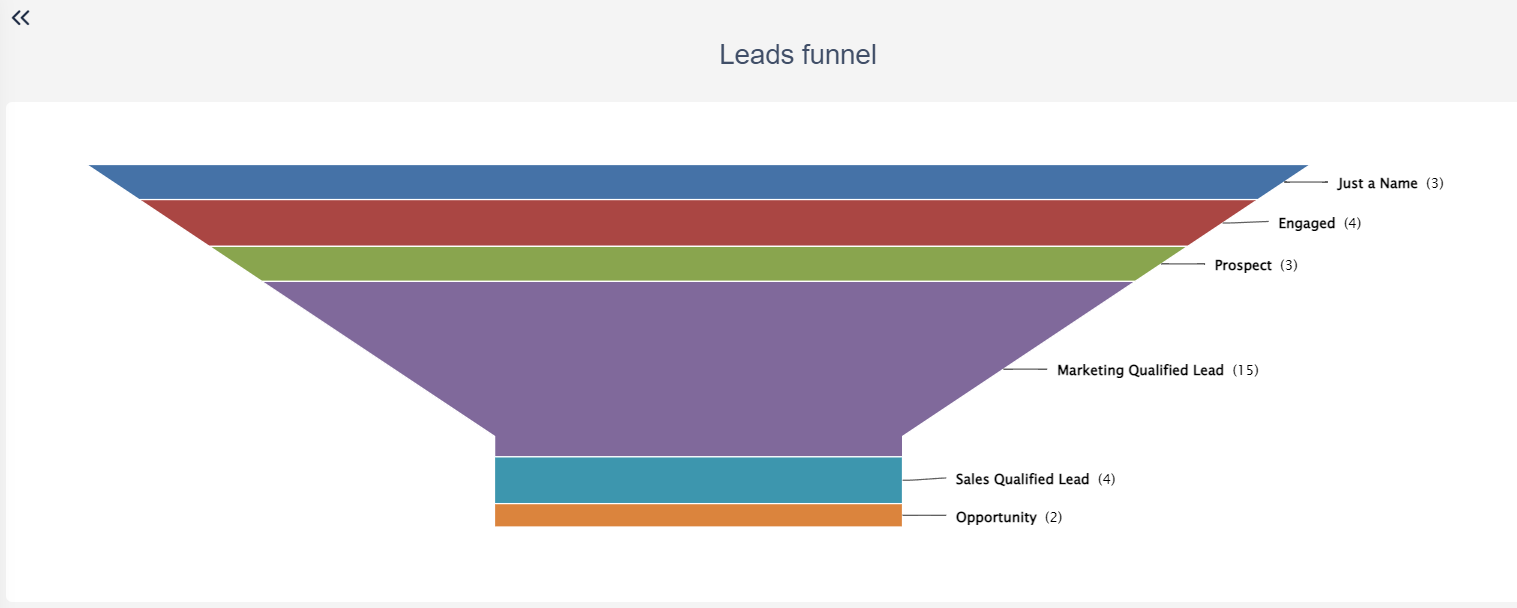
- Firstly, you can click on Funnel. Here, users can view their Leads according to the status of Lead Heat in a graph as a funnel. The Leads now appear according to the status of Lead Heat in a funnel graph.
- Then, click on the Pipeline. View your Leads according to the status of Lead Heat that you have set. At this point, the Leads appear according to the status of Lead Heat.

- In order to change the status of a Lead click on a Lead and drag -and -drop it in below the group you wish to.
- Also, if a Lead is in Opportunity status, you have the option to add a new opportunity connected to this Lead from this point.
- Click on the option Export to open the Lead(s) in an MS Excel file.
- A pop-up window will appear.
- Select either All pages or Current Page.
- Click OK to open in an MS Excel File or Cancel to go back to the View Form or close the window (X).
- Make sure that your browser doesn’t block the pop-ups.
- Choose Print to open the leads in a new tab so that you can print it. Follow your browser’s default printing procedure. Make sure that your browser doesn’t block the pop-ups.
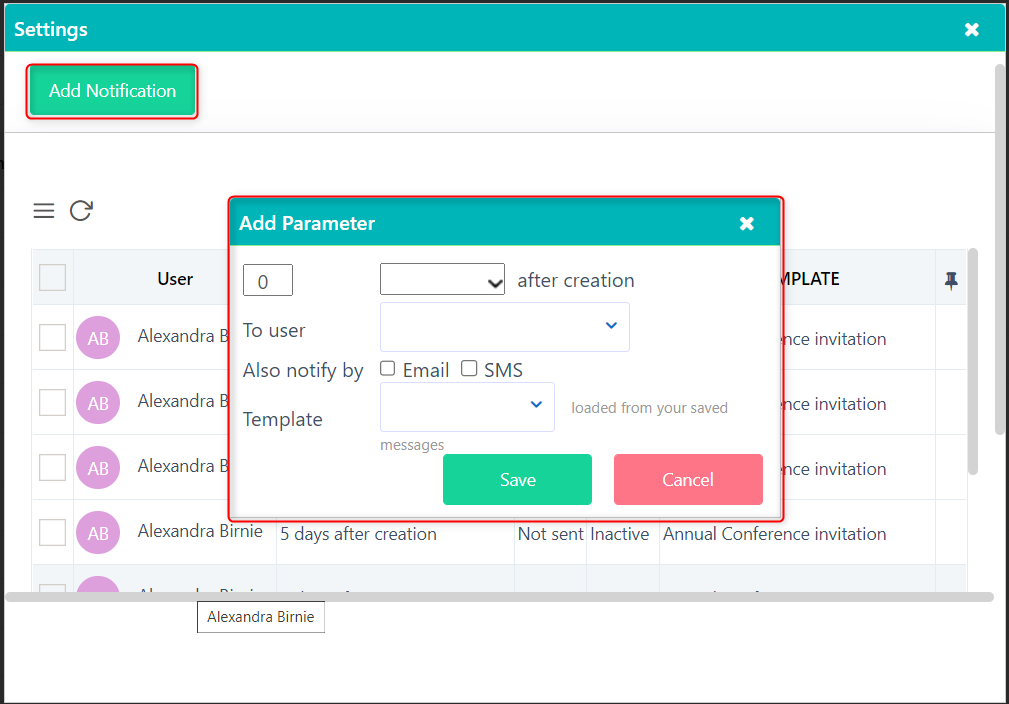
- Click on the option Settings to set the users that will be notified.
- A pop-up window appears. Here you can monitor all the set upon this Lead notifications and you can create one. Delete a User from the notifications by checking the left box and then choose Delete.
- Click on Add Notifications. Select the hours or days parameters, the User that should be notified, the way that he will be notified and if applicable choose an email template. Click on either Save to proceed or Cancel to cancel the procedure or close the window.
- Press Import. In the pop-up window that opens, you can import Contacts following these:
- For Gmail, you have to select the imported Contacts’ Access Rights and then Login.
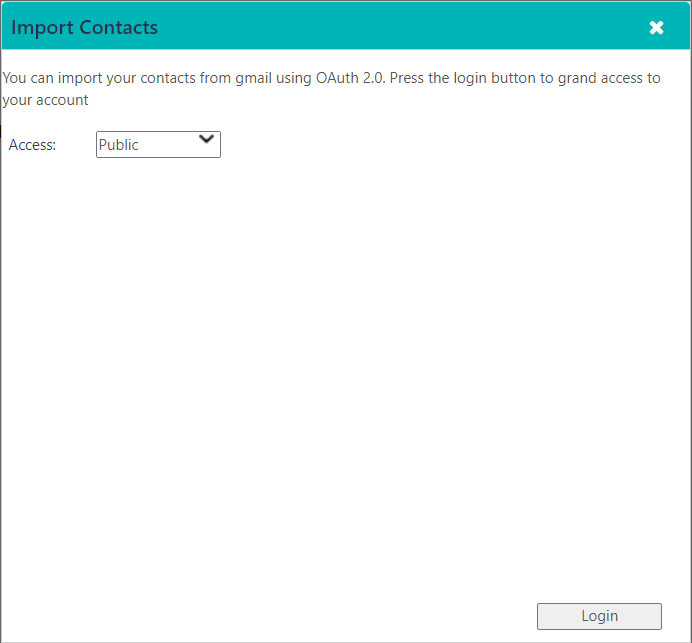
- For Gmail, you have to select the imported Contacts’ Access Rights and then Login.
- Firstly, you can click on Funnel. Here, users can view their Leads according to the status of Lead Heat in a graph as a funnel. The Leads now appear according to the status of Lead Heat in a funnel graph.